4 minute read

 The Blackmagic Video Assist: You never realise how essential something is till you start using it
We’ve reviewed the BlackMagic Video Assist before, but it's always interesting to see how products cope out and about in real world use, especially in atypical environments like the Queensland sun. David Hague reports from Australia.
I’ve never really thought about using an on-camera monitor recorder, so when the opportunity to have a play with Blackmagic’s Video Assist while I still had the Panasonic PV 100 was too good to pass on. (The Video Assist has recently had a price drop down to AUD$615 making it even more attractive.)
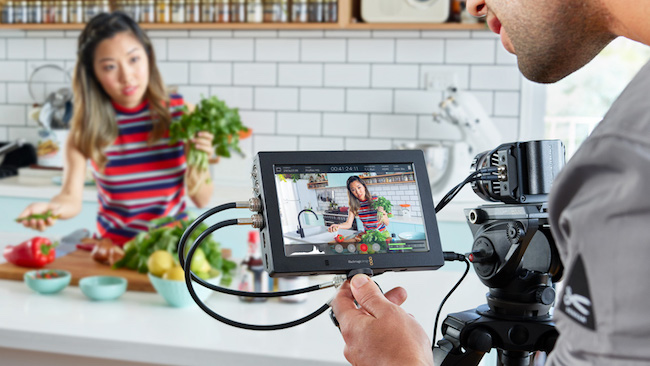
As I have suggested, the Blackmagic Video Assist allows you to monitor your footage as you shoot as well as record to an SD card, video and audio via either a mini BNC, HDMI or SDI connection from your camera. The unit can either run on 240v power via a supplied power adaptor, or there is provision to install two common LP-E6 type batteries (these are not part of the package and need to be purchased separately.
The unit can either be on-camera mounted using a standard fitting, on an external device or alternatively, a flip out underside allows the Video Assist to free stand on a desk or other level surface.
When turning the power on, the on/off button is flush with the bezel meaning a decent fingernail is needed to get it to start and after that, commands entered via the touch screen of the Video Assist.
The Video Assist automatically detects which connector is applied (BNC, HDMI or SDI).
Recording is to a high speed UHS-1 type SD card for HD recording; lower resolutions or compression may allow slower cards but either way, cards need to be pre-formatted to HFS or exFAT. The cards can be formatted in the Video Assist or via a computer (Windows) for exFAT and HFS for Mac (Macs can also read exFAT).
Recording is simply a matter of swiping up or down on the touch screen to reveal the controls, and pressing the round on-screen record button at the bottom of the LCD. A “recording” icon will then appear. Tap the icon to stop recording. When recording, a Timecode counter shows the duration of the clip or, if for some reason the screen is obscured, a small LED indicator at the bottom of the LCD confirms recording is in progress.
Recording of your HD or SD clips is to QuickTime files using Apple ProRes or Avid DNxHD. Timecode’ and ‘SDI/HDMI start/stop’ trigger recording is also available.
For the fans of using dSLR cameras for recording video, to get around any 8 bit internal issues, if you have HDMI out available, this then lets you record full 10 bit ProRes or AVID DNxHD, even in 4:2:2 if available from the camera rather the internal 4:2:0.
Playback of recorded footage can either be linear or looped.
The Blackmagic Video Assist has a multitude of settings you can use to tailor it to your workflow. These include overlays such as zebra, focus peaking, guides and guide settings, grid and HDTV, resolution options in a large number of ranges (but not including 4K in this unit, you need the Blackmagic Video Assist 4K unit for that), and you can also set frames / second, the Codec, Timecode, Trigger Record and monitor the battery level (if on battery power).
A zoom feature lets you zoom into your image to check your focus or examine detail in the footage in close up. Zooming has to be performed prior to any recording taking place.
A socket on the side of the Video Assist is used for plugging in a set of headphones, and the volume level can be changed using an on-screen level slider. Display settings are altered with Brightness, contrast and saturation controls. You can also set the date/time.
Truly making the Video Assist useful are a set of scopes to help in checking audio levels plus luminance and exposure. (Histograms show the level of luminance with black at the far left and pure white on the far right).
On the underside of the Video Assist is a standard USB port and this can be used to update any firmware changes made by Blackmagic from time to time. Simply download the Blackmagic Video Assist Utility for your PC or Mac, unzip it, connect your PC to the Video Assist and run the utility following any prompts.
All of this of course is worthless if your editing package of choice doesn’t support ProRes or AVID DNxHD! For example, Vegas has only just allowed support of this codec, so prior to this transcoding would have been needed, making the whole exercise sort of pointless! Blackmagic list AVID Media Composer, Autodesk Smoke, Adobe Premieres Pro CC and Final Cut Pro X, but any package supporting ProRes or AVID DNxHD should be fine.
Of course, Blackmagic’s own DaVinci Resolve is supported (and recommended just quietly. I am very impressed with it, especially in conjunction with Blackmagic Fusion for compositing and motion graphics etc. And they are both free in their base formats which is a bonus! See www.blackmagicdesign.com for details and downloads).
Whilst to the “pro” shooter / cammo, using a device such as the Blackmagic Video Assist is most likely a no-brainer, to others, it may cause a chorus of “what’s the point?”
Yes, you have an on-board LCD but is it really big enough to see the imagery you are shooting in detail? And do you get the tools such as the scopes to make sure everything is as it should be? And then there is the issue of backup; two copies of your data in separate devices is far better than one. And not least of all, most camera LCDs are useless in sunlight; the Blackmagic Video Assist I used outside in Queensland’s midday sun with no issue.
Having now had an initial play with one, I am going to use it a lot more, and already I have this niggling feeling I might start to be more reliant than I want to seeing as I have to give it back!
The only complaint I have is one the Blackmagic Video Assist shares with many other devices. I know manufacturers are trying to cut costs every which way, but is it too hard to have a Getting Started manual in the box. Having to go online to download a PDF each time is a PITA if I am honest!
Tags: Production

RedShark 2020 @ All rights reserved.

Comments