4 minute read
 ISO can be used creatively as well as to help with exposure
In the concluding part in his series on exposure, Neil Oseman covers ISO, and shows how it can be used to help you in different lighting conditions.
So far in this series, we have seen how we can adjust exposure using aperture, which affects depth of field, ND filters, which can help us retain the depth of field we want, and shutter angle, which affects motion blur and flickering of certain light sources. In this final part, we’ll look at ISO, perhaps the most misunderstood element of exposure, if indeed we can technically classify it as part of exposure at all!
The acronym stands for International Organisation for Standardisation, the body which in 1974 combined the old ASA (American Standards Association) units of film speed with the German DIN standard. That’s why you’ll often hear the terms ISO and ASA used interchangeably.
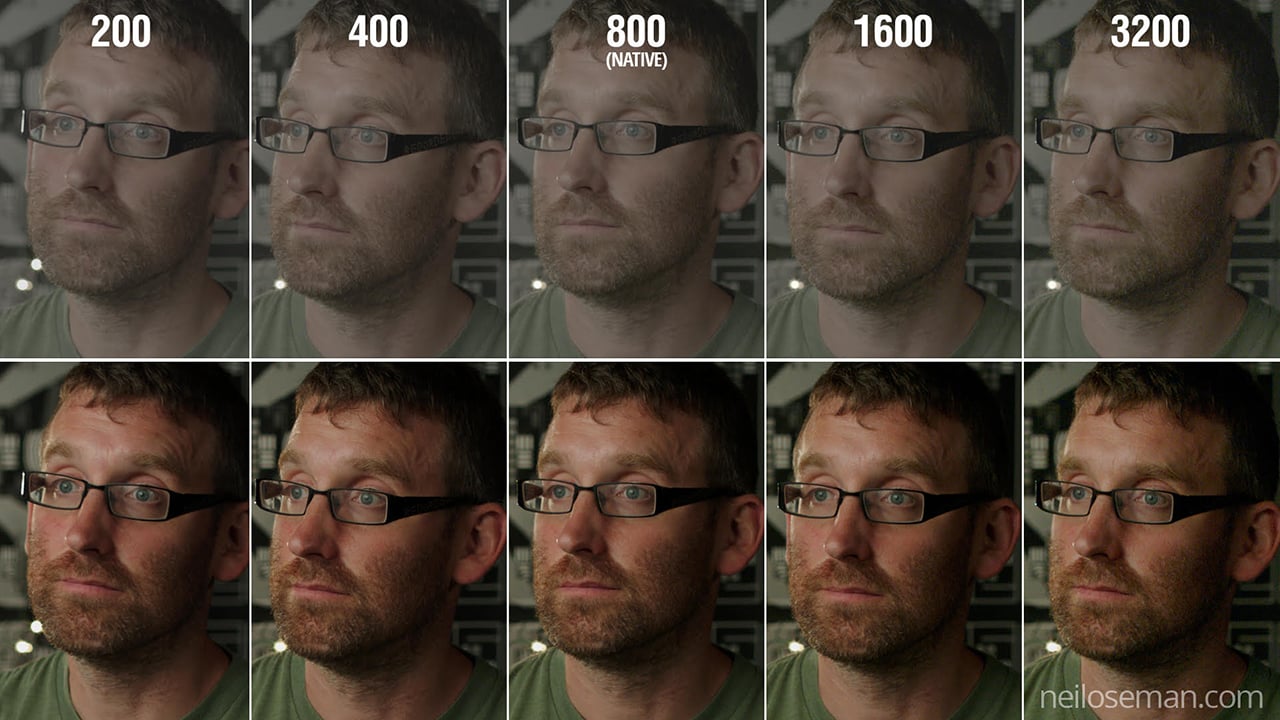
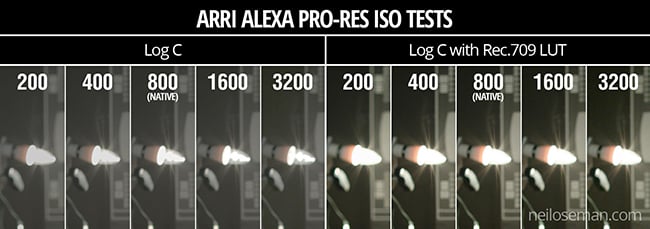
ISO defines the relationship between a given combination of aperture and shutter speed and the lightness of the image. For example. a common ISO to shoot at today is 800. One way of defining ISO 800 is that it’s the setting required to correctly expose a key-light of 12 foot-candles with a lens set to T2.8 and a 180° shutter at 24fps (1/48th of a second).
If we double the ISO, we double the effective sensitivity of the camera or halve the amount of light it requires. So at ISO 1600, we would only need six foot-candles of light (all the other settings being the same), and at ISO 3200 we would need just three foot-candles. Conversely, at ISO 400 we would need about 25 foot-candles or 50 at ISO 200. Check out this exposure chart if it’s still unclear.
Note that I said “effective” sensitivity. This is an important point. In the photochemical world, ISO indeed denotes the light sensitivity of the film stock. It is tempting to see digital ISO as representing the sensitivity of the sensor and changing the ISO as analogous to loading a different film stock. In reality, the sensitivity of a digital sensor is fixed and the ISO only determines the amount of gain applied to the sensor data before it is processed (which may happen in camera if you’re shooting log, or in post, if you’re shooting RAW).
So a better analogy is that altering the ISO is like altering how long the lab develops the exposed film negative for. This alters the film’s exposure index (EI), hence some digital cameras using the term EI in their menus instead of ISO or ASA.
We can take this analogy further. Film manufacturers specify a recommended development time, an arbitrary period designed to produce the optimal image. If you increase (push process) or decrease (pull process) the development time you will get a lighter or darker image respectively, but the quality of the image will be reduced in various ways. Similarly, digital camera manufacturers specify a native ISO, which is essentially the recommended amount of gain applied to the sensor data to produce what the manufacturer feels is the best image. If if you move away from that native ISO, you’ll get a subjectively “lower quality” image.
The most obvious side-effect of increasing the ISO is more noticeable noise in the image. It’s exactly the same as turning up the volume on an amplifier: you hear more hiss because the noise floor is being boosted along with the signal itself.
I remember the days of Mini-DV cameras, which instead of ISO had gain. My Canon XL1 had gain settings of -3dB, +6dB and +12dB. It was the exact same thing, just with a different name. What the XL1 called 0dB of gain was what we call the native ISO today.
At this point, we need to bring in the concept of dynamic range. Let’s take the Arri Alexa as an example. This camera has a dynamic range of 14 stops. At its native ISO of 800, those 14 stops of dynamic range are equally distributed above and below “correct” exposure (known as middle grey), so you can overexpose by up to seven stops and underexpose by up to seven stops, without losing detail.
If you change the Alexa’s ISO, those limits of under- and overexposure still apply, but they’re shifted around middle grey. For example, at 400 ISO you have eight stops of detail below middle grey, but only six above it. This means that assuming you adjust your iris, shutter or filters to compensate for the change in ISO, you can trade-off highlight detail for shadow detail and vice versa.
Imagine underexposing a shot by one stop and bringing it back up in post. You increase the highlight detail because you’re letting half the light through to the sensor, reducing the risk of clipped whites, but you also increase the noise when you bring it up in post. This is basically what you’re doing when you increase your ISO, except that if you’re recording in log, the restoration of brightness and increase in gain happen within the camera rather than in post with RAW.
We can summarise all this as follows:
Doubling the ISO…
Alternatively, halving the ISO…
Then adjusting the exposure to compensate (e.g. opening the iris one stop)…
This brings me to the end of my exposure series. We’ve seen that choosing the “correct” exposure is a balancing act, taking into account not just the intended brightness of the image but also the desired depth of field, bokeh, lens flares, motion blur, flicker prevention, noise and dynamic range. I hope this series has helped you to make the best creative decisions on your next production.
Tags: Production

RedShark 2020 @ All rights reserved.
Comments