
2 minute read
 mFlare 2 lets you add realistic lens flares to your footage
MotionVFX have always had their finger on the pulse when it comes to creating useful plugins and effects. Erik Vlietinck has taken a look at mFlare 2, and is certain that it will give you your lens flare fix!
To create flares in Final Cut Pro X, you can buy a collection of “titles” and by positioning these get more or less what looks like a lens flare. But titles don’t move with the subject causing the flare unless you move them with it, using keyframes. That’s tedious and often not very accurate. In addition, most lens flare offerings don’t even come close to the real thing. MotionVFX created mFlare 2, a plugin that uses the Mocha tracker to bind your lens flare to the subject that you want it to move together with. It’s also pretty close to a real lens flare if you create an “Organic” one.
mFlare 2 is a plugin developed by MotionVFX, a European developer who is becoming an important competitor of FxFactory. Its plugins and effects are of a very fine quality and most plugins have mocha tracking technology on board. That is also the case with mFlare 2.
mFlare 2 lives in the Effects category of Final Cut Pro X’s Inspector. It has an impressive number of presets, neatly organised in Anamorphic, Cinematic, Organic, Offscreen and SciFi sections. I was especially interested in the Organic category, as that one holds the flare effects that come closest to the real thing.
I tried it with a shot of a large square in my native city, Antwerp. I shot at an angle that I knew would normally cause the sun to generate flares. In this case, I deliberately used a lens that was not “flare sensitive” enough, as I planned to add a nice flare in post using mFlare 2.
In Final Cut Pro X, after dragging the mFlare 2 plugin to the clip on the timeline, I was greeted with On Screen Controls (OSC) that contained buttons for editing the effect, for tracking and resetting. I used a preset that came close to what I needed, tracked the sun and then watched the effect. Not too much to my surprise — given my previous experiences with MotionVFX’s plugins — it looked exactly like what I expected from having created similar shots at roughly the same angle using a zoom lens with no lens hood attached to it.
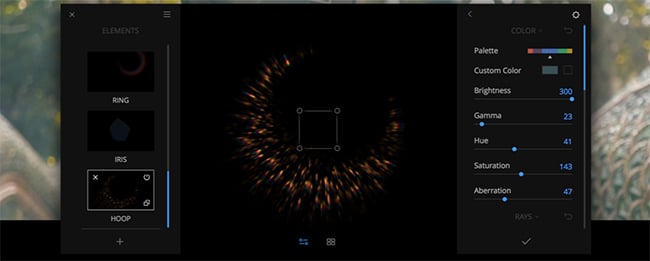
The mFlare 2 effects have two sets of configuration settings. The first are the basic ones that appear in the Final Cut Pro X Inspector, the in-depth ones let you change the components of the flare itself and can be accessed only from the OSC Edit button. Components include the Iris, Glint, Loop, Orb, etc. Each component can be made to glow differently, be more or less transparent, etc, etc. The Inspector settings also contain some basic appearance parameters, such as the colours used, grain, etc.
The greenish horizontal streak — a component of the effect that had four of them — that only appeared after I panned away slightly from my light source was a bit too opaque to my liking, so I delved into the OSC Edit effect settings.
In the window that appeared and that hovers above the timeline, freely movable across the screen, I got an impressive array of settings to change. The green streak was actually a 3-level component and I could change every one of them. I changed only the streak itself — lowering the opacity of the green colour.
After re-rendering my adjustment in FCPX, everything looked like as natural as you can possibly get it. Given the dazzling number of ways you can tweak mFlare 2, I think it’s a must-have if you’re into adding some flare to your footage in post, even if it’s not really cheap at $149.
Tags: Post & VFX

RedShark 2020 @ All rights reserved.

Comments