4 minute read
 Is Pixelmator good enough to usurp the current crown holder?
RedShark review: Can the new MacOS based Pixelmator Pro be a viable image editing alternative to the industry king? Read on to find out.
Pixelmator made a big splash among Apple’s Mac App Store offerings when it was first launched. To close out 2017, the developers are back with Pixelmator Pro, a next-generation version of the original. Although both products co-exist, future development is now directed to the Pixelmator Pro product with an iPad version to come. Like its predecessor, Pixelmator Pro is only for macOS and, in fact, this version requires High Sierra or newer.
Pixelmator Pro is intended to appeal to users who want the power of Adobe Photoshop, but without the subscription and at a more attractive price. By being designed only for the Mac platform, the Pixelmator developers can optimise their applications for Apple-specific technologies. Pixelmator Pro taps into some features available through macOS High Sierra (10.13), like Apple’s Metal 2 GPU image processing and machine learning via Core ML. This excludes legacy Mac Pro towers, because they aren’t capable of Metal 2, in spite of being able to install and run High Sierra.
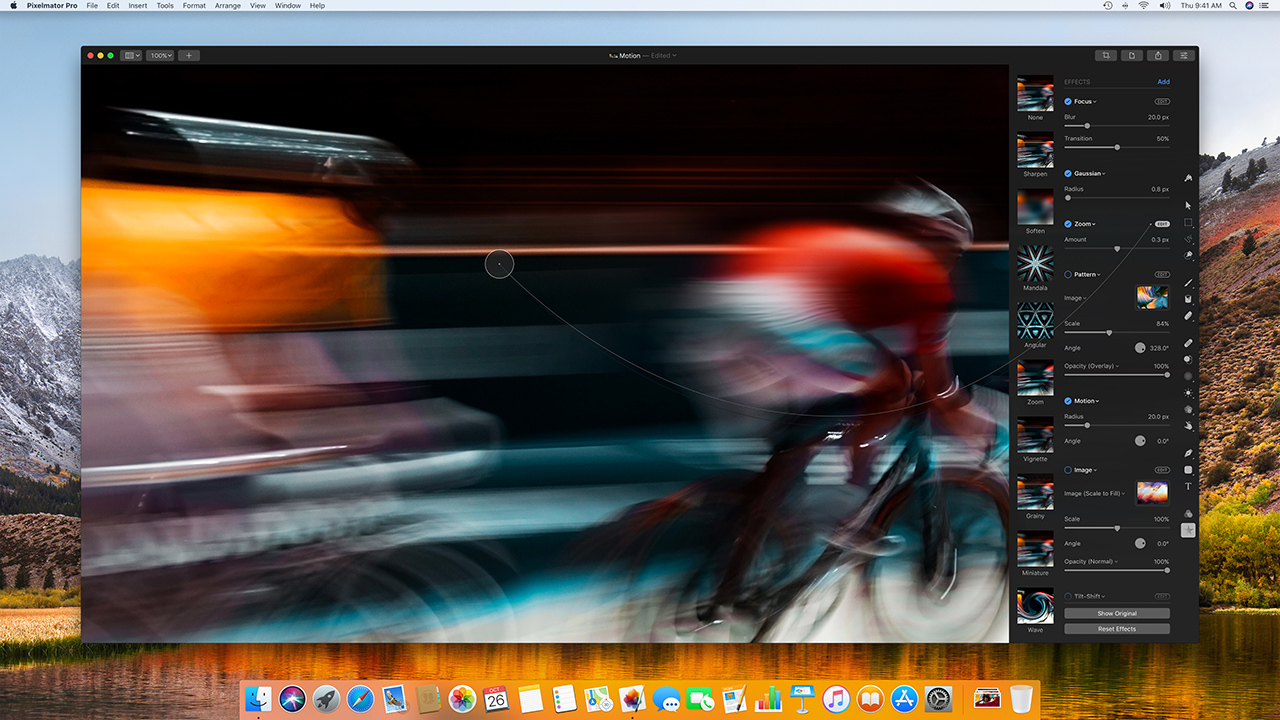
Much like Apple’s own software, Pixelmator Pro features a pleasing user interface with a streamlined layout. The original Pixelmator interface was colourful with floating windows and tool palettes, but Pro takes on a more integrated and flatter design. You can quickly show/hide controls and bounce between a windowed and full-screen display of the image to maintain the best focus on what you are doing. Layers are shown on the left edge of the interface with tools down the right edge. Additional tools and controls can be accessed from the main menu, as well as from a pulldown at the “+” sign in the upper left corner of the interface window. Whenever you select a tool like “Adjust Colors”, specific control parameters appear, along with thumbnails of your image using one of the built-in presets. Click “Add” at the top to expose more possible modifiers for that tool. This keeps the starting point simple, with an easy way to add more tools, much like Aperture did in the past.
Pixelmator Pro operation is very fluid. Little impedes your interaction with the interface. Camera raw images are processed in their native state, without the need for an image development step before you can work with them. Multiple raw files can be placed on separate layers. Most camera raw formats, including DNG, can be imported; however, compressed raw formats aren’t recognised. For example, I was able to import images from a DJI image sequence, but not a Blackmagic Design URSA camera. With raw files, colour adjustment tools continue to be available even as another manipulation is done.
![]()
Machine learning drives automatic layer naming. When you import a photo to a layer, Pixelmator Pro takes a best guess at what the image contains and names the layer accordingly. I imported an image of a large metal artwork and it was named “sculpture”. An image of the sanctuary in the Notre-Dame Basilica of Montreal was named “stained glass”. Most of the time, the automatic naming was close enough, but you can always change it yourself. The background layer and layers with camera raw images are not renamed. Another tie into macOS is the integration with photo libraries from Photos and/or Aperture. When selecting an image for importing on a new layer, one option is to pick from collections that you’ve curated in one of these two applications.
If you come from graphics applications like Photoshop, then Pixelmator Pro takes a bit of readjustment in your workflow. For instance, the hierarchical order of applied processes is fixed. I can adjust colour and then apply an effect, like a Gaussian blur. But then I can’t add grain from the colour menu on top because that’s part of the colour adjustment options. Instead, I have to apply a separate grain modifier from the effects menu. Likewise, there are no adjustment layers to apply non-destructive effects to all the layers below. However, I can group layers together and then apply effects to the entire group, which is a viable alternative. You can rotate an image on the z-axis, but there’s no x- or y-rotation. Instead, you have to use the “Perspective Transform” effect and corner-pin an image to produce the look that horizontal or vertical rotation would provide.
Pixelmator and Pixelmator Pro both use their own proprietary file formats. Pro will open Pixelmator’s PXM files, but Pro’s PXD files can’t be opened in the original Pixelmator application. Of course, you can export in various standard formats, like JPEG, TIFF, and Photoshop. Pixelmator Pro also uses Apple’s Share menu, in order to send an image to Mail, Airdrop, Flickr, and also to your Photos and/or Aperture libraries. Importing layered Photoshop files with effects is a mixed bag. Standard items come across, but some layer effects are merged. Other effects, like texture effects on text, are dropped. The competing Affinity Photo gave me a closer translation of the effects when I imported these same Photoshop test files. Nevertheless, the Pixelmator development team is committed to improving Photoshop compatibility.
There are certainly pros and cons to any application. Pixelmator Pro’s strengths are in image adjustment/retouching/correction, tasteful graphics design and digital painting. Thanks to tapping into GPU power, painting with various brushes or deforming an image is fast and responsive, even on standard Macs. Paired with a tablet, Pixelmator Pro feels like the best digital paint product available on the Mac to date. The interface tends to hide its complexity, so if you don’t think Pro does something, make sure to check out its online help offerings. Odds are that the function or capability is indeed there. If you are looking for an alternative to Photoshop that’s also a great Mac design and image application in its own right, then Pixelmator Pro hits a home run.
Pixelmator can be purchased from the Apple App Store for $59.99. For more information visit the Pixelmator website.
Tags: Post & VFX

RedShark 2020 @ All rights reserved.

Comments