4 minute read
 Understanding Compression, Part One
In part one of a four part series, we delve into the concept of (dynamic range) compression and reveal how it's possible to maximise the potential of your recordings. By Shawn Skead.
We musicians are a funny breed; we insist on giving multiple names to concepts that are practically identical.
Compression, limiting, maximizing – what’s the difference? Likewise, clipping, distortion, saturation and overdrive are all synonymous to pushing a waveform into places it shouldn't be.
On electric guitars, we distort all the time! That distortion, for most people, is pleasing to the ears. But digital distortion is like fingernails on a chalkboard and you'd be pretty hard pressed to find an actual use for it. If you want/need distortion, it is much better to run that signal through a plug-in or outboard equipment designed for distortion. When analog tape distorts, the sound is much smoother and, depending on the instrument or sound effect, can actually be quite pleasing.
The good news is that outside of 'normalizing', all of the above terms are essentially doing the same thing, just a little less or a little more. When we compress, limit and maximize, what we are doing is getting control over the dynamic range of the recording.
Dynamic range is simple a measurement of total silence, compared to the loudest peak of the waveform.
Obviously, the higher the sample rate and the higher the bit rate, the more dynamic range we can achieve.
In the days of yesteryear, if you printed a waveform like what we see in Diagram 'A' onto analog tape, you would have a serious problem on your hands.
Diagram A
You could use a fader on the mixing board or you could use an external hardware compressor to also boost the signal, but two problems would occur:
1. Tape hiss would be amplified in the signal as well (called the 'Noise Floor')
2. That 'hissy' track would have difficulty standing out, in comparison to all of the other tracks that were actually recorded with a good signal-to-noise ratio.
Skipping ahead in time to the first generation of A/D converters in digital technology, the common thought was that Diagram 'A' was fine, because there was no apparent noise, and we didn't need to worry too much about signal-to-noise ratio any more.
How wrong we were!
The problem is that not all A/D converters are alike, nor are they all built with the highest quality parts. This is why we now have sound cards available from $99 all the way up to $4000. You get what you pay for!
So indeed, signal-to-noise ratio is less important than back in the analog days, but is still something that needs our attention, because A/D converters have their own built in 'noise'.
In addition, A/D converters are expensive. It's also the reason why the audio mics on your camera (no matter what camera you have) generally sound thin, bright and noisy. This is also why the Zoom portable recorders are all the rage in filmmaking: Good mics and better A/D converters.
The best way I was taught to remember the effect of compression is that it "makes the quiet spots louder, and the loud spots quieter." And it's highly subjective!
On a radio pop song, when the singer is gently strumming an acoustic guitar and singing on the intro, we need this to be almost as loud as when the rest of the band kicks in.
In film, it's a different approach. For example, an actor is walking through a quiet forest; we hear cicadas in the background and his footsteps on the leaves. When the Grizzly bear comes out of nowhere in a jump shot and roars at him, we need this to be LOUD. Much louder than his footsteps in comparison, so in this case, we would typically be using just enough compression, so the background noises are heard, and just enough limiting of the dynamic range, so that the Grizzly bear's roar is under control and not distorting. This drastic change in volume, this large dynamic range, creates an auditory 'impact'. The more dynamic range we have, the better.
If we were to take this 'film' approach with a pop song, people would be fiddling with the volume on their iPods constantly as the song played out! And this, my friends, is why we need to learn what compression does and how we can find a balance between not being heard to being heard just enough – from things being 'too loud' to being simply 'loud enough'.
All normalizing really does is bring the waveform up to it's peak level before clipping. It will not affect the dynamic range differences of the recording whatsoever. The quietest spots compared to the loudest peaks will still be relative to each other.
It needs to be said, however, that there are two camps to this: people who normalize everything and people who don’t. It's an artistic decision, rather than a necessity. In my work, I prefer to batch normalize all of my files, because when I sit down to mix, all of the files are given "equal opportunity" in terms of volume. I may not need to compress absolutely everything. The flute is just as loud as the electric guitar; the snare drum is just as loud as the 'background wind ambience'.
A very crucial point is that normalizing is going to take the highest peak, or spike, in the sound byte and use that as the measuring stick for the rest of the audio. So if you have a peak that is already at 0dBu, normalizing is effectively doing nothing at all for you.
When you look at Diagram 'B', you see that the recording was recorded at a really low volume and there is a nasty spike near the end of the recording.
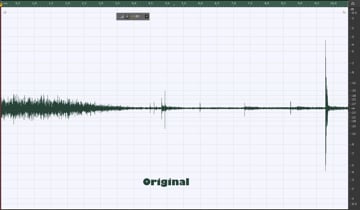
Diagram B
Looking at the same track in Diagram 'C', you see that normalization does little to nothing – only a few dB of gain.
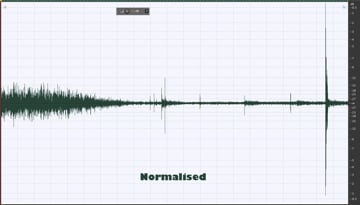 Diagram C
Take a look at Diagram 'D', you see that I erased the spike and now normalization works as it should.
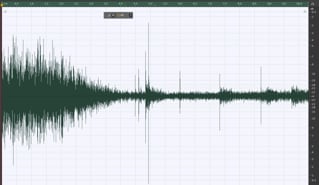
Diagram D
Looking again at Diagram 'D', we now have a new problem: that crazy spike in the middle of the waveform! Normalization is not, in fact, going to make all of your files equal in volume. It is simply going to give some of the quieter files the opportunity to compete with some of the louder files right off the bat. In order to truly give equal opportunity to all files, we are going to need to apply some compression.
Post compression, some of our audio spikes will be controlled and, making a decision in advance about how much dynamic range we need, we hopefully end up with a wave that looks similar to Diagram E.
Diagram E
In 'Compression Depression' Part Two, we will talk about different types of compressors and what to look for! Click here to go straight to it
By Shawn Skead
Tags: Audio

RedShark 2020 @ All rights reserved.

Comments