4 minute read
Adobe Premiere Pro has plenty of tools that leverage AI technology to streamline an editor’s workflow. Shiv Rajagopal runs through the highlights.
With the rapid advancement of AI technology, there is fairly naturally a lot of concern around AI systems replacing jobs. In the entertainment industry, editors could face the brunt of this technological advancement, but there is perhaps a more nuanced view developing that is summed up by economist Richard Baldwin when he says: “AI won’t take your job, but somebody using AI will take your job.”
So, to that end, let's have a quick look at some of the tools that editors have available to them here and now in 2023, using Adobe Premiere Pro as an example of what Adobe characterises as the 'co-pilot' approach to AI. And it's worth pointing out that these features are based on Adobe's existing Sensei AI technology; there will be a lot more to come when the company continues to roll out its Adobe Firefly generative AI into the video realm.
The Remix Music tools allow editors to adjust the length of their chosen soundtrack to fit the length of the video. Often, editors find themselves in a position where the soundtrack is shorter or longer than the video. In the past, Editors had to manually cut, duplicate, and reattach sound clips to create a new soundtrack that better fits the video. Doing this is time-consuming and not necessarily within the purview of an editor’s job. However, using the Remix Music Tool allows editors to skip a tedious step in their workflow and lets Premiere Pro’s AI do the heavy lifting.
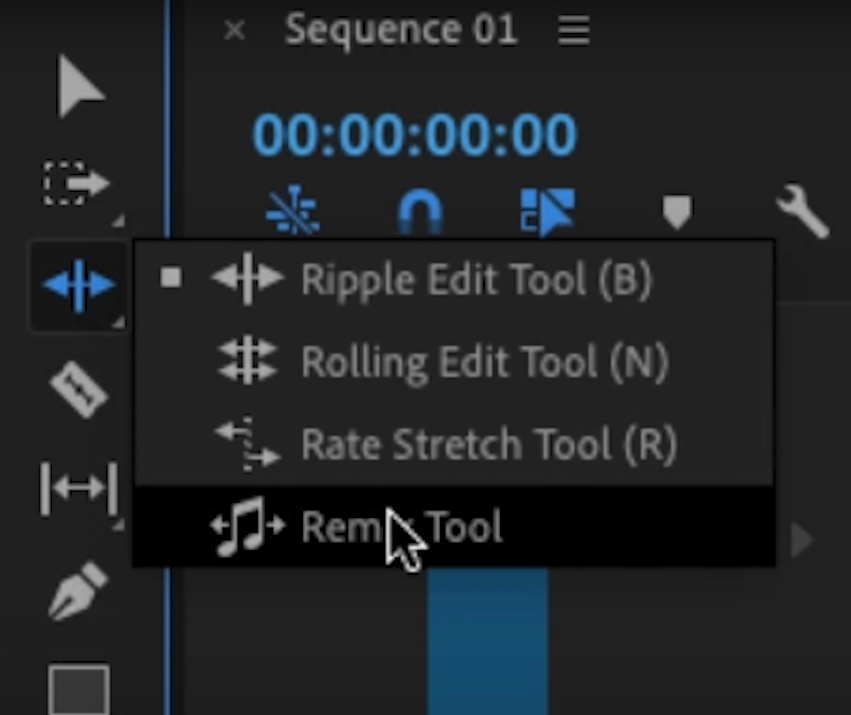
To use this tool, open the Essential Sound Panel. In the timeline, select the sound clip to remix. In the Toolbox, click the Ripple Edit Tool and hold down to select the Remix tool. Once the symbol of the cursor changes, simply click and drag the end of the sound clip to the desired length. The soundtrack should update instantaneously. Premiere Pro will highlight the automatic edit points using a vertical white zig-zag line. In the Essential Sound Panel, editors can make further creative customizations, such as the number of segments and variations. Experiment with the settings to find the ideal remix.

Auto Subtitling is an AI tool that will analyze the audio track and automatically create subtitles that can be added as captions to the video. Instead of transcribing the dialog line by line, editors can use this tool to automate a slow process. The Auto Subtitling tool is a colossal timesaver and a must-use for editors who don’t want to listen to their audio tracks repeatedly. This tool is handy for editors working with social media content, as many subtitles/captions are a staple in TikToks and Instagram Reels.
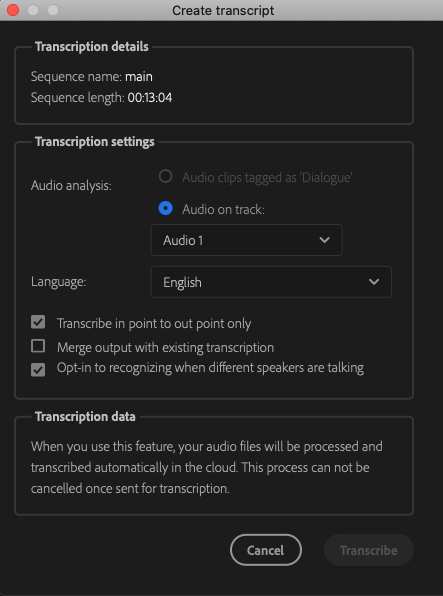
To use this feature, open the Captions and Graphics workspace. Then, select the footage. In the left window of your screen, select the Text column and then the Captions subcolumn underneath. Click Transcibe Sequence and adjust the settings in the pop-up window. When ready, click Transcribe. The duration of the process will depend on the length of the clip. Once complete, navigate to the Transcript sub-column. The generated captions should be visible here. Select Create Captions near the search bar. Select the Subtitle Default under the Format option if the video requires subtitles. Click Create to finish the process. The text should now appear as part of the video. Review the spelling, grammar, and timing before exporting the video.
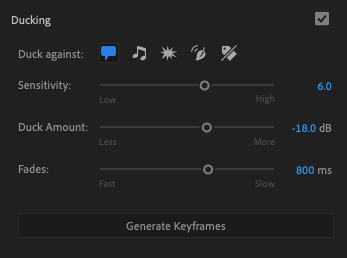
Auto Ducking is another sound-based AI tool built into Premiere Pro. Premiere Pro analyzes the volume of all the soundtracks in the timeline and automatically lowers the music levels when the dialog is spoken. By calibrating the volume of the sound clips, this tool ensures that the dialog track will be the focus of the video. Auto Ducking allows modern editors to be far more efficient than their predecessors who had to do this task manually. In this instance, Premiere Pro’s tool streamlines an editor’s workflow and creates a cohesive audio experience.
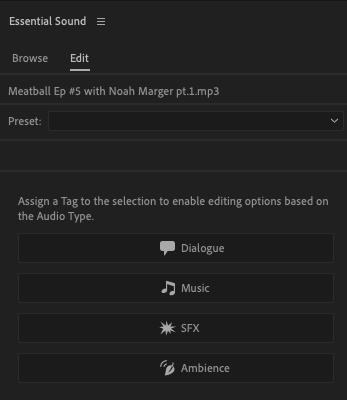
First, assign each audio clip to its particular type in the Essential Audio Panel. Assign the audio clips as either Dialogue, Music, SFX, or Ambience. Once the tracks are tagged, navigate to the Loudness tab in the Essential Sound Panel. Click Auto-Match to ensure that each audio clip's volume matches the suggested range for its type. To use Auto-Ducking, select the music clip and activate Ducking. Ensure that the chosen music clip is ducking against the dialog clips. Adjust any further settings in the dropdown menu and click Generate Keyframes. As always, finalize by reviewing the effect and adjusting the keyframes on the audio tracks.
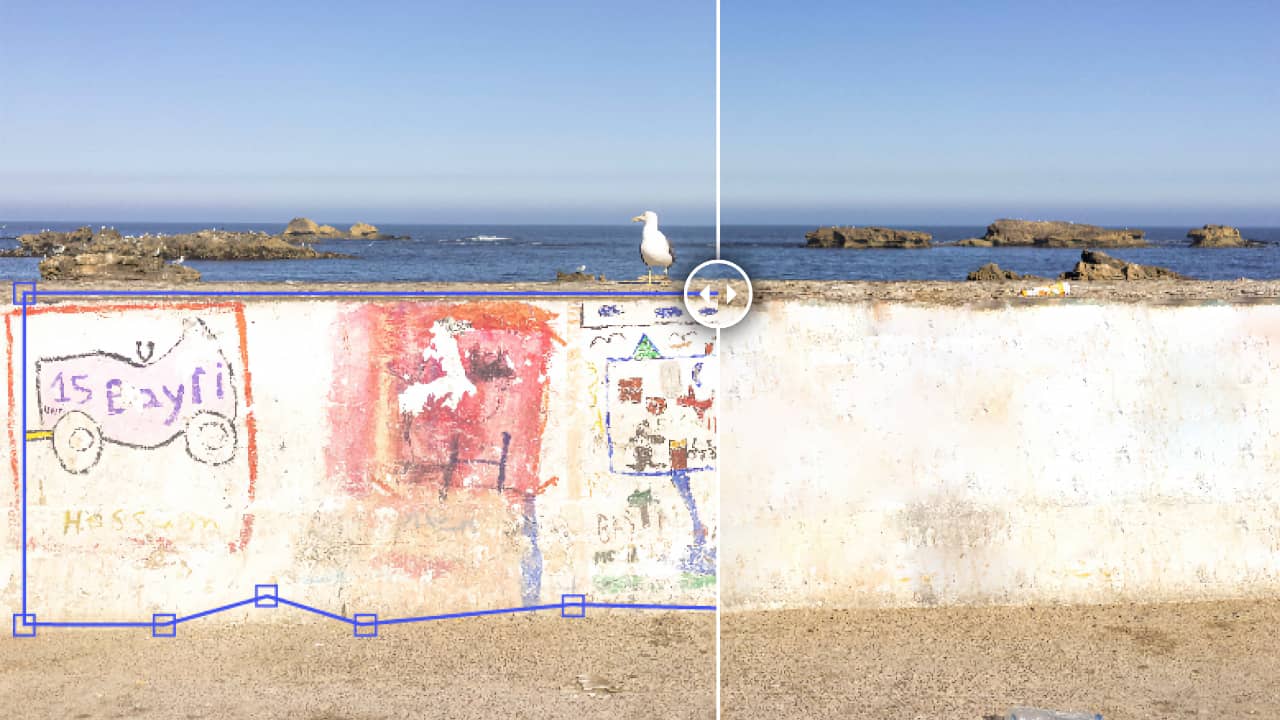
Production can be unpredictable; sometimes, the footage has unflattering blemishes that editors must remove. Content Aware Fill is an AI tool in the Adobe family that can replace unwanted areas of the shot with similar surrounding frames to create a seamless video. Content Aware Fill streamlines the editing workflow and eradicates having to replace defects frame by frame. This effect is a time saver and allows editors to gain a competitive edge by completing their jobs faster.
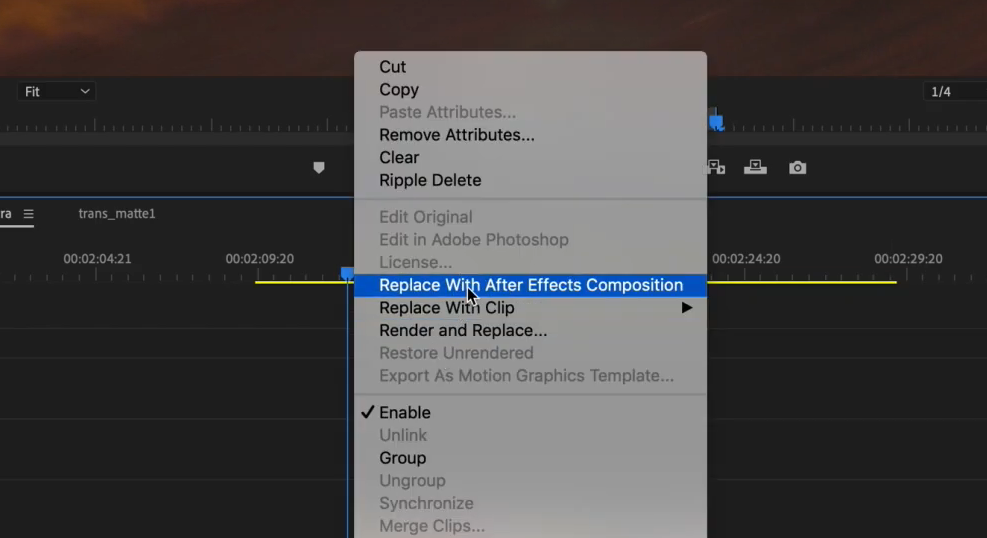
Please note that this effect is available on Adobe After Effects, not Premiere Pro. However, with Adobe’s Dynamic Link feature, it is easier than ever to use this effect.
First, right-click the footage on Premiere Pro and select Replace With After Effects Composition. Designate a position for the file to save, and After Effects should come alive. Then, open the Content Aware Fill panel. Use the Rectangle or Ellipse tool and create a Mask around the area that needs to be removed. Ensure that the Mask is set to Subtract. Back in the Content Aware Fill panel, set the value of the Alpha Expansion. If unsure, set the value between 25 and 40. Now select the Fill Method based on the type of blemish. If the camera is moving, select the Mask layer and use the Track Mask feature. Click play, and After Effects automatically tracks the mask as the video plays, generating keyframes. Return to the Content Aware Fill panel for the final step and click Generate Fill Layer. Wait for the software to analyze and replace your pixels. Review the effect on the video and adjust any settings as necessary. Return to Premiere Pro and the effect should be updated on your timeline.

Tags: AI

RedShark 2020 @ All rights reserved.

Comments