4 minute read

Can you really make a GH5 look as good as an Alexa? the GHAlex colour conversion tool makes big promises, and as Kevin Luiz finds out, the results may surprise you.
Imagine for a moment color matching your GH5 or GH5S content with that of the Arri Alexa. Surely any seasoned colorist can accomplish this with a little bit of finesse, but I suspect it’s no easy feat to the “everyday Joe”. So to my surprise, when I came across a workflow (Emotive Color GHAlex) that remapped the Panasonic GH5 color science to the Alexa, I was a little skeptical. Now I must confess, I am far from being a professional colorist. That said, I actively try to further my understanding of color from project to project, and I certainly know the image I’m chasing.
If you were take a deep dive into my vimeo profile, all the thumbnails of my “liked videos” have a commonality between them that becomes quite evident. The coloring is usually a soft, pastel grade that blooms in the highlights. This is a trending theme amongst cinematographers and colorists alike. Delivering on this comes from a number of factors, but quite possibly the easiest way to acquire this look is simply to shoot and grade with the venerable Alexa Classic.
Unfortunately, I don’t know about you, but I don’t have a spare $10K - $14K laying around, so my GH5 & GH5S will have to do. With sensors providing more latitude, increased color depth, and refined color science with every iteration, remapping colors in post is actually a viable solution. To be fair, this nowhere near a replacement to an Alexa, but merely an emulation of its color.
What Alex has done is something that is quite admirable. With some determination and a strong understanding of color principle, he purchased an Alexa Classic to accomplish his goal. He painstakingly proceeded to measure and track twenty-seven (27) thousand data points between the Alexa and the GH5, and coded a custom engine to interpolate between fifty-five (55) thousand points.
This has lead to an undeniably beautiful rendition of matching the two camera’s color profiles. The GH5 while inherently green dominant has been pulled back to more pleasing red or “warm” undertones, most especially visible in the skin tones. He has also remapped the luminance levels and contrast, adjusting how these highlights are interpreted, even providing an optional mode employing a Sicario ceiling .
Let me be clear, this is not a slap on LUT, and you’re out the door. Your image needs to be properly balanced before you even begin the process. My recommendation is nailing white balance in camera with a gray card or X-Rite passport color checker in the field. This is something that until recently I’ve integrated into my own works. I was using pre-sets to get my white balance in a “ball park” and then refining my white balance in post, which in hindsight is less than ideal. The older, and more experienced I become, the more I have an understanding of how detrimental color is over the final impact of your work.
Even if you’re shooting raw, don’t cheap it up or cut corners, get yourself a gray card and save yourself the headache!There is a particular order to the conversion as well, and if not followed meticulously, can yield some bizarre results. So once applied this process comes across in a soft, pastel like coloring that has a mild blooming effect in the specular highlights. Pair this with something like a Blackmist Pro filter and some live grain for texture, and you’ll have a real organic image on your hands. The biggest issue with these Lumix cameras is that they do not offer the ability to turn sharpening off entirely. Fear not, Alex has gone as far to offer an anecdotal solution by setting your sharpening in camera to -5, noise reduction to -5, applying an adjustment layer set to 20% opacity, and dropping a Gaussian blur effect on the adjustment layer set between 5 and 6 points to your desired result. This undoubtedly will take the edge off your global sharpening, without any perceivable hit to your overall detail retention.
So I’ve had the opportunity to work with this conversion for three projects now, and it has really impacted my image in a big way. Once you get a handle on how it works, you need to tailor it to your own style. Personally, I inject luminance and contrast to my liking, as the mids are well below the 60 IRE scale post application. I have also found the saturation to be a bit much and even needs to be taken down in the red channel a smidge as I prefer cooler tones. Before I started working with GHAlex(a), I was using my own custom methods, finalized with FilmConvert. Don’t get me wrong, that program can yield beautiful results, but it wasn’t until I took a closer inspection did I realize what sort of funky stuff it was doing to my color (and my highlights, yikes!) I was also completely unaware how “sickly” my skin tones really were till I started utilizing this process.
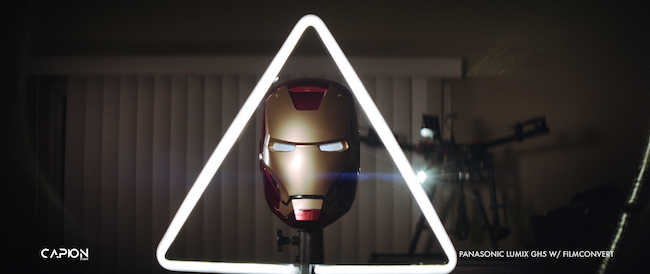
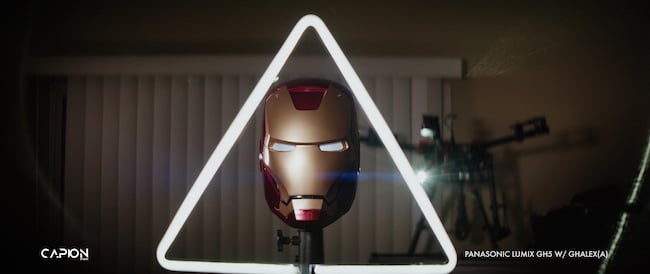
This is a pretty eye-opening test. My old mentor once taught me “you can learn a lot from a dummy”. I’ve opted to supplement a dummy head for my Ironman helmet that has a soft matte finish, with a slightly metallic surface. In my experience, metallic surfaces are the most revealing to how light reacts that I can easily perceive, so long as they are not projecting any reflections back to the camera.
Here’s FilmConvert. Take note of the banding separation occurring on the left side of the helmet.

Now here is the GHAlex(a) color conversion. Note the smooth gradation, specular highlight handling, and the neutralized color pallet of the helmet.
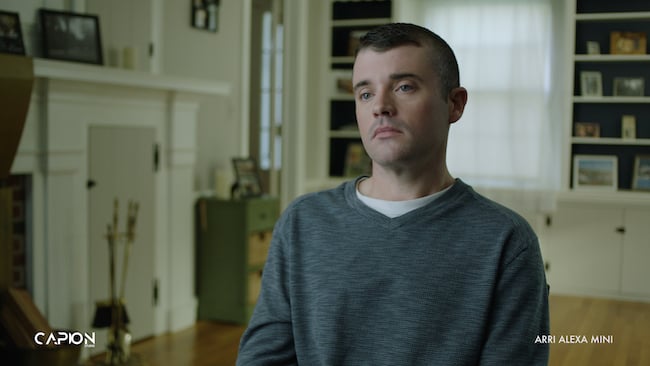
And here are two still frames from a shoot I performed a year ago where we had an Arri Alexa Mini on set, and my GH5 as a C-Cam. I went back and recolored these shots quickly with the Sicario ceiling to emulate the Alexa. With more time this certainly can be refined for a perfect macth.

With all of this taken into consideration, I set out to apply this color conversion to a short trip I made to Barbados. I did not white balance this properly in the field, and I did not want to belabor the process for skin selecting and motion tracking. While the grade is most certainly imperfect, and suffers from magenta cast in Christine’s skin tones (though she was pinkish / burnt in real life), the overall results came out to my liking and I believe the work to be “passable”.
So all together, I love what Alex has done here. He’s taken a great set of cameras, and democratized the color for the “everyday Joe”. It is after all how we use these tools that drives the end result. Color conversions like the GHAlex(a) in the proper hands truly can pack a punch if you’re after the “Alexa look”. What do you think? Would you use something like the GHAlex(a), or are you skilled enough in Resolve to create a repeatable look in two minutes or less? Let us know in the comments below!
Find out more and try it for yourself at the Emotive Color website.
Tags: Production

RedShark 2020 @ All rights reserved.

Comments