
6 minute read

RedShark Replay: This article is nearly two years old now and, as we all know, the industry moves a bit faster than that. But, for anyone that's watched our new Resolve tutorials, this story about one man's quest to put together a smooth, responsive system to run it on a budget will still have resonance.
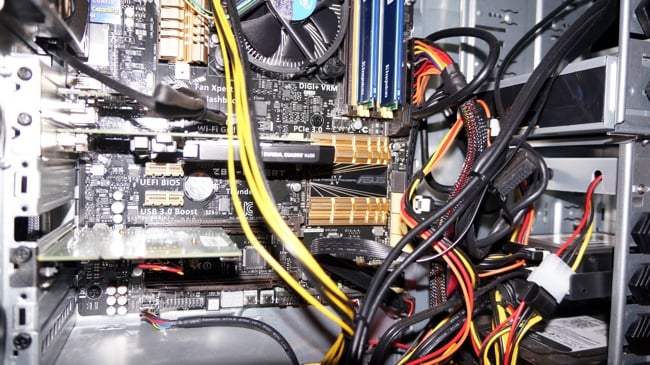
Back in mid 2014, I decided to bite the bullet and build my own PC-based workstation around the affordable and seemingly ‘most for the least’ Asus z87 ‘Expert’ motherboard. Having not commissioned a new PC since the early 90s when we built a Pentium-based workstation to integrate Autodesk 3D Studio into a component Betacam SP television commercial production facility, this new build was planned to address my current NLE requirements with perhaps a ‘toe in the water’ experiment with DaVinci Resolve as Blackmagic Design had recently released a ‘lite’ version as a free download. Consequently, I chose a range of modern components which would offer high performance, low power consumption and all for a modest financial outlay.

Of course everybody you meet, from carpenter to rocket scientist, will be pleased to tell you unsolicited that “you should have bought such and such” or that “you have not made a good decision here” and that your system will bog down at the earliest opportunity. You can buy the cheapest hammer, the mid-priced hammer or the most expensive hammer but your decision to purchase one or the other will largely be based around a choice which offers the sort of performance your budget and clients expect but at a price that can be justified by your potential return. This is called a ‘business plan’ and whether we like it or not, having one makes good sense no matter whether we’re building a garden shed or a Saturn 5 space rocket.

My eventual PC build included 16GB of 1800Mhz RAM, a socket 1150 i7 8 core processor (hyperthreaded) running at around 4Ghz, a 128GB SSD for Win7 64bit OS and software, a second 256GB SSD for short-form productions plus a pair of 3TB WD Reds running in Raid 0 under Win 7 to offer around 4Tb of storage at access speeds approaching that of the SSDs. Total cost, including tower case with 600 watt PSU, an internal USB 3.0 card reader and 6G SATA optical drive was around A$1,500 or US$1100.
I’m pleased to report that after six months of regular NLE use, my build has proven remarkably quiet, very cool but blisteringly fast and ultra reliable. I also have an X-Keys USB Jog/Shuttle controller connected with 68 programmable buttons and editing ProRes HD material on Lightworks, my system is as smooth and responsive as a quarter of a million dollars of dedicated Sony BVE VTRs.
Readers who may be familiar with the DaVinci Resolve colour grading suite will be aware that in order to successfully install and operate the software, a dedicated graphics card supporting CUDA cores will be required. The more CUDA cores and the more dedicated RAM on the GPU, the better, basically. Here, the sky is the limit when it comes to how much you can spend on a dedicated ‘grading’ suite, but in keeping with my budget and PSU requirements, I chose an entry level Nvidia Quadro K600 GPU to test the waters for a modest outlay of only $190. The K stands for Kepler and with PCIe bus power requirements of only 41 watts, it was certainly not going to cook my system. With the small Quadro card plugged into one of the fast Asus z87 motherboard slots, Resolve 11 installed quickly, found the GPU and quietly settled into work.
Everyone will tell you the K600 is far too small to operate DaVinci Resolve successfully but during the past few months of testing and learning, Resolve has been running sweetly on my system and with only the baby K600 installed, it is capable of successfully running ProRes 4:4:4 HD files in realtime at my working frame rate of 25fps. Native 4K/UHD files bog down as you would expect but here very fast Raid access times are demanded as well as high performance dedicated GPUs. The new series of GTX 978/980 256bit cards look very promising as they use the latest architecture but retain only modest power requirements. We all want high performance computers which run efficiently, not ‘electric radiators which also edit pictures’!
Blackmagic Design shocked the post production industry a few years ago when it bought DaVinci and released the Resolve software for $1K and a ‘lite’ version for free. When I ran a busy television commercial production facility in the 80s and 90s, a fully turnkey Resolve system could cost upwards of $80K. In our analogue SD Betacam SP suite, we had to be content with minor lift, chroma or gain level adjustments courtesy of TBC remote controls and expensive, dedicated CRT waveform monitors and vectorscopes. Today, every teenager with a DSLR has access to class leading colour correction software and this is a good thing, but achieving consistent results with Resolve requires training, understanding, experience, discipline and last but certainly not least, a calibrated display. Brave is the man who charges clients money without access to all of the above!
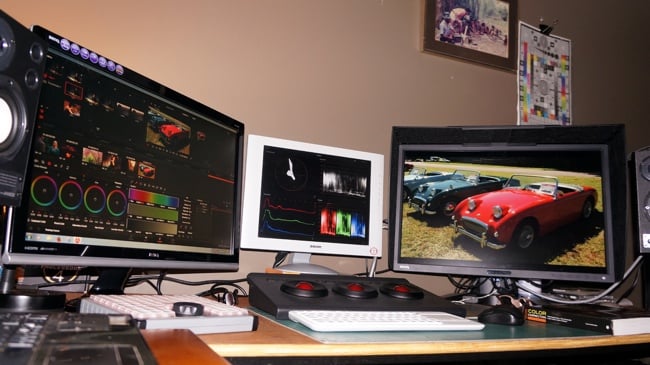
For someone like me, semi-retired but still working professionally in stills photography and HD film making, having access to a reliable and calibrated display is of the highest priority. If your Red ain’t really Red, you’re really stuffed! I cannot stress this point more: assuming you have 20:20 vision, using a calibrated display as a ‘reference’ is a must and fortunately, good reliable 10bit IPS displays are finally becoming cheaper and more accessible.
As I visit Taiwan regularly on holiday I’d become a fan of BenQ LED PC monitors because in my experience, they seemed to offer excellent quality at a very affordable price so when it recently released its first 10bit colour managed display, the 24in 1920 x 1200 PG2401PT at around US$1K, I secured a demo unit at a very good price direct from the factory. Each of these high quality monitors is individually hand calibrated prior to customer delivery and each monitor comes with its own individual calibration report in the box. It has ‘factory presets’ for all the usual CAD and design requirements, but more importantly for video editors, the PG2401PT has a Rec.709 preset with the ability to calibrate the display via hardware and software modes using one or more probes and 14bit 3D LUTs.
Now came the task of integrating this 10bit colour managed display into a typical DaVinci Resolve setup but it soon became clear to me just what a remarkably successful exercise it was for Blackmagic Design to release one of the industry’s favourite and most expensive pieces of colour correction software for free: they get to sell a lot of additional hardware! In order to monitor at 10bit or better out of Resolve on a second display, you need to purchase and install an intermediate device.
Most popular are the range of cheap Decklink ‘mini monitors’ in either Thunderbolt or PCIe models. These small cards convert your Mac or PC OS to a 10bit colour managed HDMI output and are recognised and supported by Resolve. So long as your colour managed monitor accepts a 10bit or better signal via HDMI, you’re sweet. Unfortunately, as with several other monitors designed for the professional computer graphics industry, the BenQ PG2401PT will only ‘see’ a 10bit signal from either its DVI or Display Ports, not HDMI so this required me to purchase a bit more hardware…
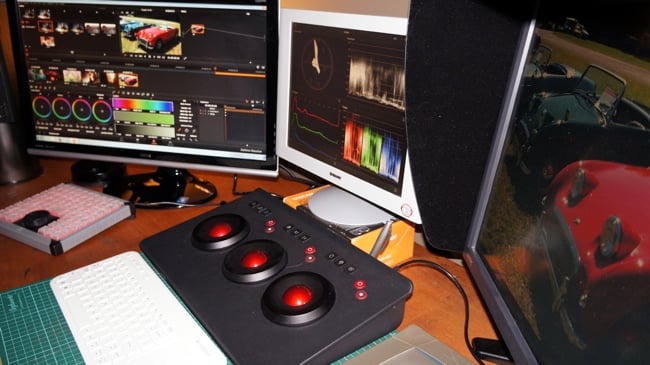
Navigating through the vast technical resources on the Blackmagic Design website, I decided to buy a Decklink 4K SDI I/O card which will output HD or 4K/UHD at 6G 4:2:2 via Serial Digital Interface only. (Note: 12G compatible equipment is required for 4K/UHD at 4:4:4 colour space.) I like SDI as it is capable of very long cable runs without the potential degradation that consumer HDMI is subject to. I next sourced a second hand BMD HD-Link box. This device accepts the SDI signal from the Decklink 4K SDI card with a ‘loop through’ facility and converts it to DVI, maintaining the 10bit display quality. I loaded up a quick 14bit greyscale ‘ramp’ test TIFF and switched between 8bit HDMI and 10bit DVI on the monitor. Voila, no gradations! Ultra smooth on 10bit DVI but graduated banding clearly visible at 8bit HDMI.
Now, are you counting? That’s three pieces of additional BMD hardware (including the original mini-monitor PCIe card) since my installation of the free Resolve ‘lite’ just to ‘see what all the fuss was about’. So now, all is set, the spending is over and I can get back to work? OK? Well not quite…
Naughty Santa delivered two more toys to my newly completed edit suite in late December: I now have one of the few OxygenTec ProPanels in captivity outside China. This USB device weighs in at nearly 5Kg and is designed specifically as an alternative colour control surface for DaVinci Resolve. It even works like it says on the box.
(Actually, it’s all in Chinese on the box and I can’t read Chinese. Whoops!)
I also took delivery of a 55” 4K ‘client monitor’ in the form of Sony’s spectacular new KD55X9000B 4K/UHD TV. Both these units will be the subject of further reviews soon but in the interim, I’m pleased to report the purchase and successful installation of a fourth and final piece of BMD hardware, in the shape of an SDI to HDMI 4K ‘mini converter’ which successfully adapts a 5m long SDI cable from Resolve’s I/O card to a short 1m HDMI cable plugged into the 4K TVs HDMI 2.0 ‘Graphics’ input.
Works a treat!
Follow the link for Craig's sequel to this article: Running Resolve on a (slightly longer) shoestring
Tags: Post & VFX

RedShark 2020 @ All rights reserved.

Comments