5 minute read
Many of us are now shooting video in 4K/UHD resolution as opposed to HD. Whether we edit and deliver in 4K or not is a decision based on our commissioning requirements but either way, additional hard drive capacity and speed of data access seem to be constant and increasing necessities. 4K might be twice the horizontal and vertical resolution of HD, but it requires four times the data throughput, so dealing with this requirement can cost a lot of money – or you can use a bit of cunning…
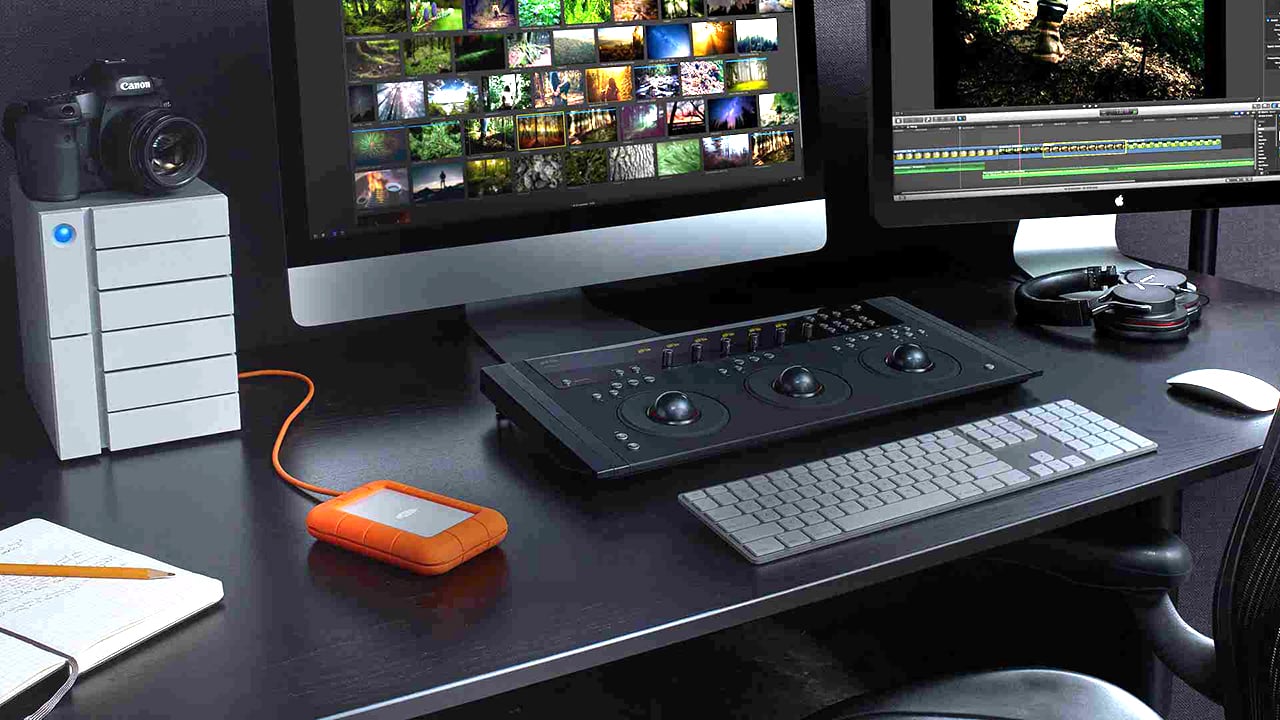
When I built my initial PC-based DaVinci Resolve video suite several years ago, (the subject of a very popular RSN article) I installed a fast, Solid State Drive for my operating system as well as a pair of 2TB WD Black 7200RPM internal hard drives operating together in RAID 0 (actually, I set them up as striped volumes under Windows Disk Management for editing speed rather than data redundancy). I later put in a second larger SSD for Resolve Specific Smart render ‘cache’ requirements as well as a bank of slow but high-capacity portable USB 3 HDDs for external data storage. To date, my low budget i7 3.9Ghz build employs only a single GTX 970 GPU, yet has been able to support three GUI monitors and provide real-time, 4K/25p Resolve Colour page ProRes/DNxHR Decklink SDI playback to my calibrated SDI 24” Rec.709 reference monitor. In addition, it drives an additional 55” 4K ‘client’ TV via an SDI-to-HDMI converter.
Over the years, my pair of WD Black HDDs has proven extremely reliable, running in tandem under RAID 0, never losing any data. In the same time frame, I have lost three separate SSDs for reasons unknown. An important point to note with DaVinci Resolve is the Smart Render feature. Resolve should ideally point to your fastest SSD for temporary render cache and if your motherboard supports it, a large and fast M.2/NVMe SSD is your best bet here. With the 4TB WD array, my system only struggled with real-time 4K/25p playback in the Color page after grading when I had text over any inter-scene transitions, so if you select Smart Render, Resolve will cache out those effects to your chosen drive in the format you specify (DNxHR in my case). In most cases, this will offer smooth client playback right off the 4K timeline.
As many of you will have learned, shooting 4K requires a bunch of fast camera cards, or if you are shooting compressed H.264/H.265 to Micro-SD cards, then any separate edit/grade post requirement will usually require a transcode across to an I-Frame codec for timecode, embedded reel names, PCM audio, plus the general ‘editability’ afforded by I-Frame codecs. The latter allows your computer’s CPU to run as fast and unstressed as possible without needing to build frames from compressed media.
As a case in point, I’ve just returned from a 30-day shoot across Japan and Taiwan where I captured approximately 1TB of H.264 4K ‘log’ data. My edit studio workflow involves archiving the camera original files to my external USB3 storage drives, then transcoding them across to 10bit DNxHR HQX on my internal RAID 0 disk array in folders based on their embedded reel names. The first frame in each reel will start with timecode 00:00:00:00 and so long as no two frames in any reel share the same timecode, all conforms to DaVinci Resolve will prove fast and reliable. I sometimes make a set of identical DNxHD or ProRes proxies to ensure that my NLE edit using the HD files, runs as fast and responsive as possible.
Like most modern NLE’s, Lightworks will work with native 4K codecs, but editing with a hardware controller rather than a mouse, I find lightweight HD proxies prove slightly faster and somewhat more responsive to my X-Keys Jog/Shuttle commands. (As of v14.1 beta, Lightworks fully supports my 12Gigabit Decklink 4K Pro SDI card and now operates internally in 32bit float too, depending on the installed GPU).
Once my exported EDL/AAF or XML edit is conformed in DaVinci Resolve to the DNxHR or ProRes 4K files and my project is completed there in full resolution, I usually master to either a DPX image sequence or an uncompressed RGB file, then make my deliverables from that. Being able to play a completed 4K timeline off the Resolve Colour page to a big 4K monitor or TV for your client in real-time at 24/25fps with no judder is the Holy Grail of DaVinci Resolve and this generally requires some serious computer hardware. Using Resolve’s ‘smart cache’ to pre-render transitions, repositions, supers, VFX, etc, to a fast SSD certainly assists complex projects, but either way a high-quality 4K master file will generally require about 500GB of storage space for every 10 minutes of screen time.
You see my problem? 4TB of internal RAID is not enough to cope with the post requirements from a 30-day shoot so I went on the hunt for some larger, more modern 3.5” drives. Fortunately, the Boxing Day sales were on over Christmas down here in Australia so I picked up two 8TB Seagate IronWolf 7200 RPM NAS drives for approximately US$200/each. That’s around 15TB of fast internal RAID 0 at a very good price. These relatively new drives from Seagate feature 256MB of on-board cache compared to only 64MB on my 2TB WD Blacks.
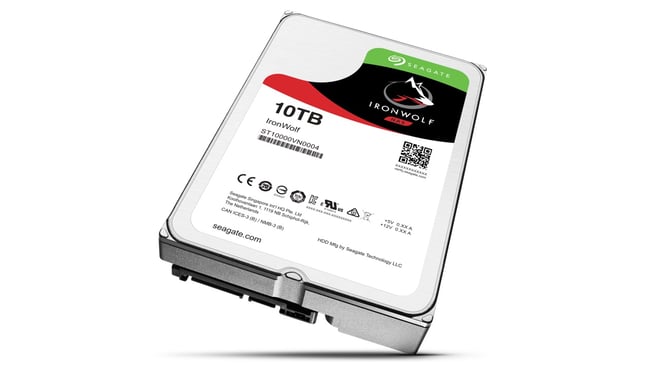
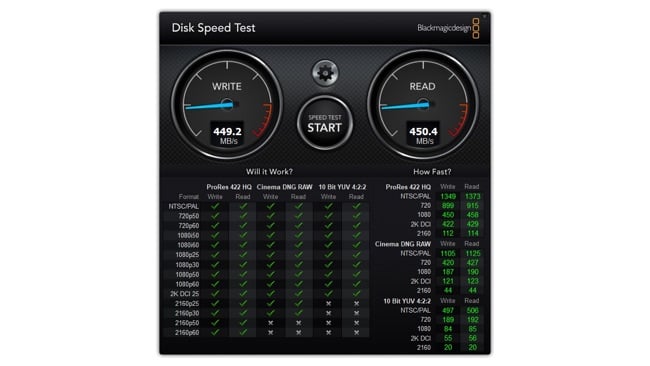
Seagate claims the IronWolf models to be optimised for RAID applications and offer a sustained data transfer rate of 210MB/second. This looked good on paper, but I was keen to see some ‘real world’ video performance comparison tests. Once installed inside my PC case and connected to the common internal 6G SATA connectors, I opened Blackmagic’s popular (and free) Disk Speed Test software at the 5GB stress mark and set about assessing the drives separately as well as in the ‘striped volume’ or pseudo-RAID 0 configuration – entirely under Windows 10 64bit Disk Management. My Asus motherboard has a simple onboard RAID controller as well as fast Thunderbolt output. The latter is ideal for connecting an external RAID disk array but, in my opinion, these potentially faster units seem to be targeted at the Mac laptop or Thunderbolt-only Mac Pro community, so they seem too expensive when compared with a simple DIY internal setup.
Here are my test results:
1 x WD Black 7200 2TB 64MB Cache empty disk:
Write: 163 MB/s Read: 166 MB/s
1 x Seagate 8TB IronWolf 7200 8TB 256MB Cache empty disk:
Write: 220 MB/s Read: 226 MB/s
2 x WD Black 7200 - 3.75TB capacity Striped (RAID 0) empty:
Write: 315MB/s Read: 325 MB/s
2 x Seagate IronWolf 7200 RPM - 14.5TB capacity Striped (RAID 0) empty:
Write: 441 MB/s Read: 444 MB/s
2 x WD Black 7200 RPM 3.75TB disk array containing 1.25TB of DNxHR Data:
Write: 275 MB/s Read: 277 MB/s
2 x Seagate IronWolf 7200 RPM - 14.5TB disk array containing 1.5TB of DNxHR Data:
Write: 449 MB/s Read: 450 MB/s
After several years of struggling with how to manage longterm file storage, I’ve concluded that cheap, naked 2.5” and 3.5” HDDs - say up to 1TB in capacity and with one disk allocated to each project has become a cost-effective solution. A backup copy, stored in an alternative location, makes good sense too. Desktop USB 3 disk docking stations are commonly available and much like the shelves of videotapes seen in the dinosaur days of television production. A handy 3.5” HDD in a plastic case with a project label on it has proven to be a reliable solution for me, so that will become the fate of my now redundant 2TB former RAID Blacks.
Tags: Technology

RedShark 2020 @ All rights reserved.

Comments