
3 minute read
Looking to run a collaborative editing project on Adobe Premiere Pro? You need to get acquainted with Team Projects.
Almost a decade ago, Adobe started its migration towards the cloud with the launch of Creative Cloud. Today, it is one of the most popular content creation platforms on the market, partly due to its readiness to adapt to the ever-changing needs of consumers.
One of these needs comes from the rise of remote work. Content creation is global now, and all crew members (especially those working in post-production) don't need to live in the same city. Remote content creation requires a seamless, cloud-based, and collaboration-first workflow. Adobe empowers this through Team Projects.
Adobe offers an easier way to collaborate using its Team Projects tools. This allows users to work seamlessly on Premiere Pro and After Effects project files.
Collaborative editing through Team Projects has been available for many years but was restricted to Adobe’s ‘Team’ and ‘Enterprise’ plan tiers. However, during the COVID-19 pandemic in 2020, Adobe expanded access to Team Projects for all Creative Cloud subscribers at no additional cost.
Team Projects enables the lead editor to create a project file hosted in the cloud. Other editors and post-production collaborators can access this project file and edit the timeline simultaneously. Which is pretty neat.
Let’s look at some of the features Team Projects unlocks on Premiere Pro.
When using Team Projects, all collaborators must have access to the source footage. It is best practice to use a cloud-based sharing file system in combination with Team Projects. Editors can set the scratch disks in a shared file that exists on the cloud, allowing collaborators to access the metadata and media that underpins a Premiere Pro project file. Using cloud-based file storage is also efficient, eliminating the need to transfer footage back and forth. Subsequently, this ensures the media will never go offline.
Well-known platforms such as Dropbox and Google Drive will suffice. However, all the editors must ensure that they download and install the desktop client. This allows them to set the cloud drive as a location in Premiere Pro. Not only will your team members have real-time access to the media, but any changes (such as new uploads) will instantly be reflected to all the users.
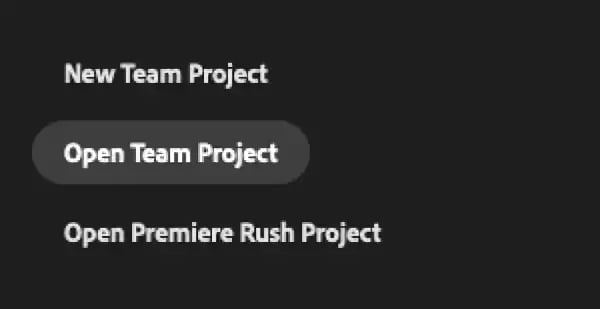
To create a shared project file, open the Premiere Pro application. In the home screen, select ‘New Team Project’ located in the bottom left of the window.
Then, users will be prompted to name the project and add collaborators. All collaborators must have an email address associated with an Adobe account.
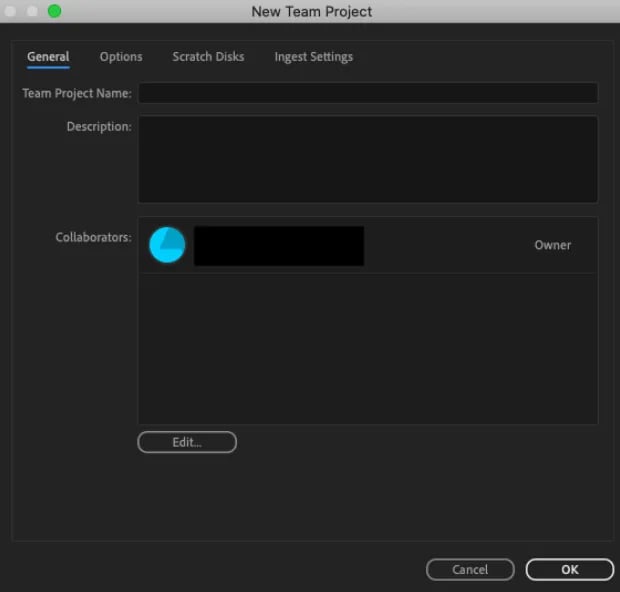
Users can also customize their ‘Options Settings’, set the ‘Scratch Disks’ location, and update the ‘Ingest Settings’ in this pop-up window. Once finalized, click OK, and a Team Project timeline will appear.
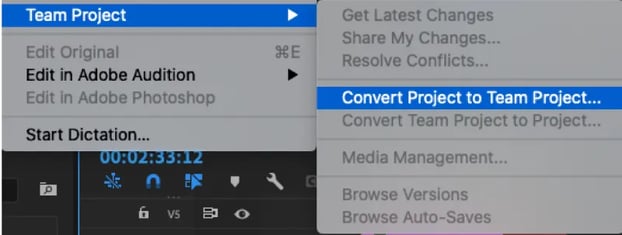
Premiere Pro also gives users the option to convert an existing local project file into a shared team project file with a single click. Navigate to the ‘Edit’ dropdown menu and go to the ‘Team Project’ tab, which will show a list of commands. Here, choose ‘Convert Project to Team Project’.
Since the project file itself is saved to the cloud, there is no need for repetitive file transfer across different collaborators. All the editors are looking at the same file at all times. This reduces time wasted during the upload/download process, making editors far more productive.
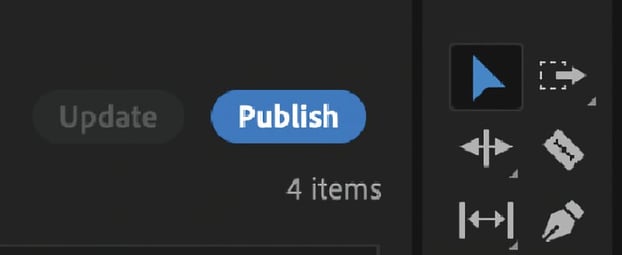
While it may seem chaotic to have multiple editors working on the same timeline, Premiere Pro’s system eliminates confusion through the publish feature. Users can import footage, make edits, and render sequences independently. Once ready, they can ‘Publish’ their version, updating the timeline for the other collaborators working on the project.
When users publish their edits to the team, they are also given an opportunity to write comments or notes in a text box. This allows editors to brief the rest of the team on edits already made and the remaining tasks at hand.

To prevent overwriting, Premiere Pro also has automatic ’Sequence Locking’ to avoid duplicate edits from occurring on the timeline. Collaborators can access the project file in ‘View-Only Mode’ when the timeline is locked.

Premiere Pro’s inbuilt visual cues (as seen above) keep editors on the same page when collaborating on a single project file. These cues notify users when they can publish their changes, are in read-only mode, or have an updated version of the timeline available.
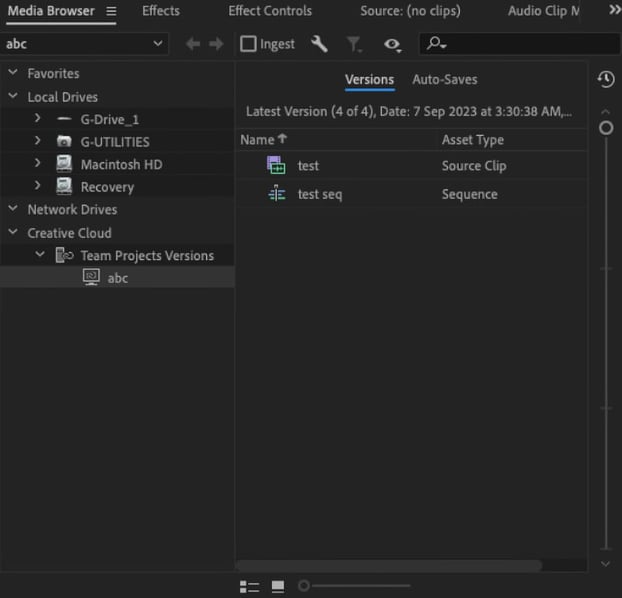
Using Team Projects as part of post-production workflow can seem scary due to the simultaneous editing. However, users can rest easy knowing that every edit made is saved to the cloud and never truly lost. Any conflicts between versions will also be flagged and can be resolved by the project’s owner. Each time a collaborator makes a change, it is automatically recorded in a ‘Version History Tab’. To find an older version of the timeline, users must navigate to the Media Browser tab and will see a scroller on the right-hand side. The scroller can cycle through all the different versions of the timeline as they were published.
Another way of reviewing previous versions is to right-click the Team Project file on the Media Browser and select ‘Team Project Versions’. This will open a new window that lists every version of the project that was published to the cloud.
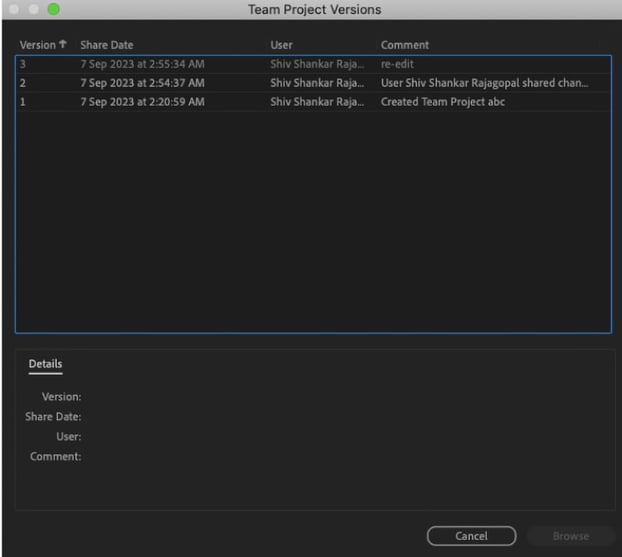
If necessary, users can revert the timeline back to a previous version. They can also create a new local or Team Project file from a previously recorded version.
Team Projects is currently compatible with Premiere Pro and After Effects. A Creative Cloud subscription offers access to all the features listed in this article. To learn more about Creative Cloud, click here.
Tags: Post & VFX Cloud

RedShark 2020 @ All rights reserved.

Comments