3 minute read
Erik Vlietinck shares his secrets to good post production audio using Izotope's remarkable RX 6 and Ozone 8 plugins.
If you are recording audio separately when shooting a documentary, interview or movie, chances are you'll not only have to synchronise it with the footage but also edit your audio to make it sound perfect in post production. The two apps I use for this are the iZotope RX 6 Advanced Audio Editor and the Ozone 8 mastering suite.
To be honest, my workflow will only work well with one or two microphones. If you're recording a classical concert, you may have more than two mics set up to record audio from different parts of an orchestra. You might also be preparing a soundtrack CD from multiple recordings. That's not the audio post production I'm covering here as those also require careful mixing. Mixing is less of an issue when you're recording an interview or a commentary to go with a documentary, for example. What I'm going to discuss is how I optimise such recordings.
To create a good sounding audio file, you'll have to record at a high enough gain. If your gain levels are too low, any sort of post-processing you apply will add artefacts that become more annoying as you turn up the volume. A rule of thumb is to set gain as high as possible without any clipping occurring and then dialling back a little to have some headroom. On A Sound Devices recorder such as the MixPre-6 I reviewed earlier or on an Apogee Duet iPad/Mac, you'll find a soft limiter. On these two, the soft limiter works great, but on some cheaper audio interfaces it may downgrade sound quality, so you should first try before turning it on.
Let's take an interview from a manufacturing site as an example. Avoiding clipping but have the interviewee clearly audible without a soft limiter that gracefully avoids transients from getting through will mean you'll be constantly fiddling with the faders to keep everything in check.
Using a microphone that has been designed to capture only the sound coming in directly from the front may help as well. Of course, the easiest is to move away from the production floor and go somewhere else with a more even sounding background noise — if you can.
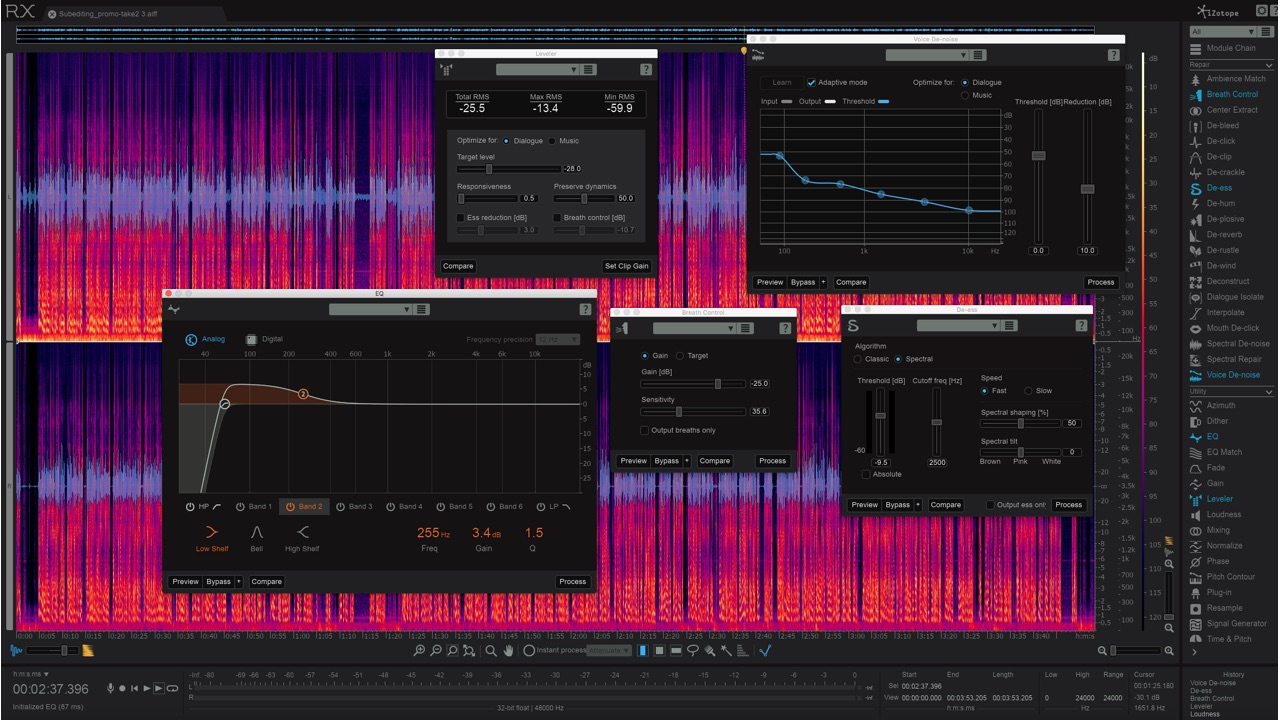
To get rid of annoying noise that will inevitably seep through at higher gain levels, I like to start my recordings with about ten seconds of silence so that RX 6 Advanced has no difficulty finding the best setting for its noise reduction algorithms. When recording voice, I use the Voice Denoise module; otherwise Spectral Denoise is what you need. The latter is more difficult to master than the former. Most of the time, I reduce noise by between eight and ten dB. That helps avoid an artificially sterile sounding environment.
Background noise is a problem, but sibilance too can sound awful, so the next thing I do is run RX6 Standard and Advanced's new Spectral De-Esser and Breath Control modules. The De-Esser used in Spectral Mode only attenuates the high frequencies where sibilance is most active, leaving the lower frequencies untouched, which gives better results than the De-Ess parameter in the last module I use, the Leveler module.
That plugin allows me to crank up the volume of all channels to a specific loudness setting, but not in a static way like the Loudness plugin does. Loudness adjusts the volume by the same amount regardless of whether it's processing a silent or a loud part of the audio. The Leveler module is dynamic and will adjust silent parts less dramatically than loud parts. I use it to tone down the volume as well as to crank it up.
As RX 6 Advanced is non-destructive, I always save my project first, then save the audio file so that I can always come back later when things would unexpectedly go wrong.
Once I'm inside Final Cut Pro X, Ozone 8 comes in. The order of processing I use is Equaliser first, then Dynamics and Stereo Imaging if needed. In a recording of a chirping bird, for example, I tend to increase the range between 1,000Hz and 8,000Hz and then, trusting my ears, gradually decrease the equaliser's bell shape (aka IQ) to narrow it down so that I do not introduce unwanted background noise.
Most often – and certainly with interviews – I also boost frequencies in the range of 80Hz to 180Hz for men and 165Hz to 255Hz for women as a way to make the voice stand out more. This only works well if not too much of the background noise is in the same range, though.
And that's my basic audio workflow for most of my video projects. What's yours?
Tags: Audio

RedShark 2020 @ All rights reserved.

Comments