
2 minute read
 Reverb graphic by www.shutterstock.com
We continue our investigation into all things reverb with a quick primer on its behaviour, as broken into a series of events, from pre-delay to diffusion.
The figure below is a simple diagram displaying the various features of how reverb behaves. The terminology used has stayed the same for a long time, although new features and, therefore, terminology has been introduced in modern day VST effects.
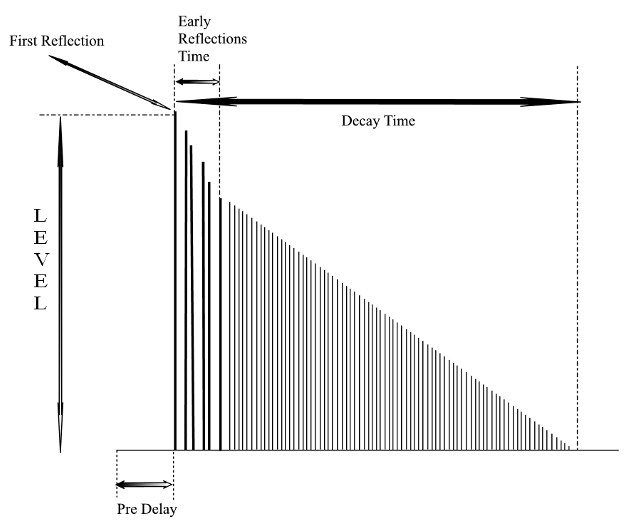
When the sound is triggered, there is a pre-delay just before the signal reflects off the first surface. The time taken for the signal to reach and reflect from the first surface is known as 'pre delay'. In other words, the pre delay controls the amount of time taken before the reverb sound begins. By adjusting this parameter, you can impress a change in distance. The longer it takes for a sound to reach a reflecting surface, the further that reflective surface is away from the sound source. This is the first stage in the reverb process.
This is then followed by the early reflections. The early reflections are the primary reflections after the pre delay and this is actually quite significant, as it will denote the shape and size of the room before the decay sets in, which in itself further defines the dimensions of the space. We tend to concentrate more on the pre-delay and the early reflections to reference ourselves to our surroundings/environment, than we do to the dissipation process of the ensuing reflections.
The decay time (also known as reverb time) denotes how long it takes for the reverb sound to dissipate/lose energy, or die. The decay itself is equally important when gauging the surface absorption properties of the space. We can control the texture, length and behaviour of the decay in such a way as to create a new colour or to expose the surface material.
In most reverb units, you will have a high frequency roll-off, sometimes referred to as HF damp. In natural spaces, high frequencies dissipate quicker than low frequencies. By controlling this roll-off, we can simulate the frequency dissipation. However, we can also manipulate this by using traditional filters post reverb. The depth and detail of control over these features allows us huge flexibility and scope to create interesting environments and textures/colours.
As our figure shows, there are a number of early reflections spaced out between each other. This is where diffusion comes into the equation. Diffusion parameters control the spacing in between the early reflections. The tighter they are packed together, the thicker the sound and vice versa. The more diffusion you apply, the thicker the reverb will sound. This can translate across as 'dark' or 'confined'. If you apply less diffusion, the opposite happens; you space out the reflections further apart and make for a thinner reverb sound.
Graphic by Shutterstock
Tags: Audio

RedShark 2020 @ All rights reserved.

Comments