4 minute read
 Understanding Compression, Part Four
In the conclusion of our series on audio compression, we cover Maximization and list free compressor resources. By Shawn Skead.
We've gone over quite a bit of detail in the last three articles on compression. Hopefully, you've had a chance to get caught up to speed, as we cap it off in the final stretch!
We have covered Ratio, Threshold, Attack and Release in the previous article, which is all one really needs to understand to make sense of the Voodoo Magic known as Compression, but we need peaceful ending to 'The Loudness Wars'.
I could be wrong (it's happened before!), but it seems like engineers are starting to back off on this a little bit, as musical artists are slowly learning about the effects of ear fatigue.
In order to create the loudest mix possible, we use a 'final' type of compressor that is far more intelligent: a Maximizer.
A Maximizer simply looks at the overall waveform and, doing the work for you, adjusts itself accordingly, while distorting the signal.
Yeah, I said it: Distorting.
If you remember in 'Understanding Compression, Part One', we talked about 'pleasing' distortion, vs. 'nasty' distortion. When we listen to sounds that have been distorted in a pleasing way, the audio tricks the ears into thinking that it is louder, when in fact, it isn't actually louder at all! But if you do an A/B comparison of the same track before and after Maximization, you would absolutely be convinced that the Maximized version is louder. So which is better?
If you have an opinion about that, congratulations, you have now entered 'The Loudness War'.
Most modern day pop songs have a dynamic range of about 4dB-6dB. That means the quietest spot in the music is only 6dB quieter than the loudest spot. If we examine different styles of music from 20 years ago, you would find that the dynamic range is anywhere from 10dB to 20dB – a pretty vast difference. It's also one of the reasons why vinyl recordings have so much appeal; they have more dynamic range than songs of today and absolutely less distortion and, therefore, less ear fatigue. Another problem arises due to our consumption of music. We now use portable music players; we listen to music on our mobile phones. If the user needs to turn up the volume every time they listen to your song, this is frustrating. Even more frustrating: when the next song comes on that has been mastered much louder, the user gets his-or-her ears blasted out.
In 'Part One', when we were discussing the objectives to compressing for film, I concluded that more dynamic range creates 'impact.' The more dynamic the sound is (loud vs. quiet), the more drama and impact your soundtrack will have! So the dynamic range between a 'babbling brook' versus the sound of a 'gunshot ringing out in the night' should indeed be drastic, because the difference in dynamic range in real life is, in fact, pretty extreme and, with film, we are usually attempting to recreate reality.
When deciding which side of the fence you should be sitting on, remember that you don't need to choose sides. Let the client make the decision for you. If you are doing post production for a big budget film, you will be given a spec sheet that tells you exactly what your levels need to be: the loudest you are allowed to go, the RMS (average) level and the minimum levels allowed. All you need to do is conform to those levels by setting your compressors correctly, watching your meters and, in theory, it should be a piece of cake. (This is where a limiter or a brick wall limiter comes in really handy.)
If Sony Pictures tells you the loudest allowable peak is at -6dBu, you can set a limiter to 'stop all audio' @ -6dB. Any and all of the waveforms that try to get past it will get immediately slammed back down, like a car hitting a 'brick wall'. But if you are mixing a Metal band or a Pop artist, chances are pretty good that the artist wants the music to be as loud as possible and will actually require and want Maximization.
Contrast that to a jazz band or an orchestra, where you'd be pretty hard pressed to find someone who wants the final track Maximized, because similar to film, dynamic range is what gives this type of music 'impact'. Once again, we want to compress it just enough so the quietest spots are made loud enough to be heard easily and the loud spots are controlled so that they are not overbearing. This is a matter of taste. If the artist has no opinion, it's up to you. And if you're not sure, pull up other successful bands in that genre, get out your metering plugins and take some detailed notes (anyone who is an Artist is simultaneously a Scientist!).
Firstly, if you own an Apple computer, you already have a handful of compressors built into the operating system as AU (audio units).
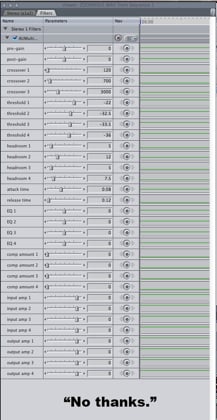 Diagram A
But one word of caution: if you look at Diagram 'A', you can get a glimpse of what Apple's Multi-Band AU looks like in Final Cut Pro 7. Not having any kind of visual reference to actually see what the compressor is doing and not hearing real-time audio feedback (or not being able to reference while you are attempting to decipher what the sliders are actually doing) is clearly a waste of time. Using something like this is an absolute nightmare, especially for beginners to compression. This might be enough to drive you off the deep end and have you throwing in the towel before you've even started.
And if your NLE requires you to render after every adjustment?
I am suddenly getting a massive headache. This is not how pro-audio guys work, unless the year is 1993. Instead, use an audio editor that allows for real time playback of plugins and reimport the corrected audio – good grief.
On the market today, it seems like the sheer quantity of compressor and EQ plugins completely dominates any other type. Finding free, (yes, free) compressor plugins is as easy as doing a Google search.
A word of caution: I cannot vouch for all of these, because the compressors I listed in 'Understanding Compression, Part Three' are paid plugins and the old adage of 'you get what you pay for' rings true. Using 'free' plugins, you run the risk of adding latency (a timing/sync issue) and possible unwanted coloration of the sound. In short, use at your own risk, but chances are pretty high you will find something suitable.
To give you a head start, there are three free compressors HERE.
There are four more compressors HERE.
If that isn't enough to choose from, there are 14 different types of compressors on this page alone.
In conclusion, I need to note that there are other 'bells and whistles' you will see on modern compressors like 'look-ahead', 'Stereo vs. Dual Mono', 'RMS vs. Peak', 'Make-Up', 'Side Chain' etc., but hopefully if you've been following this series and, if you are new to compression, you will now have a leg up, whether you are a musician, a DIY filmmaker or a seasoned pro who has secretly been confused for more years than you care to admit.
Compression is one of the most powerful and essential tools you will never regret spending the time demystifying.
Tags: Audio

RedShark 2020 @ All rights reserved.

Comments