
6 minute read
You don’t have to raid the piggy bank to get your film over the line, there are plenty of tips, tricks, and hacks you can use instead. Many of them seem to involve lighting…
A lot of independent films call out their low budgets by looking cheap. While BTS videos usually show tricks and additions that raise their production value, these usually turn out to be quite expensive.
Improving the image with color grading and VFX works, but it is also rather laborious, and for some productions hiring a colorist and VFX artist can get quite expensive. The rule is that improving the image in-camera, even at a modest cost, can save a lot of work downstream, therefore saving cost downstream.
So let's take a look at some ways to improve the production value of a film without spending a lot of money in the process. These techniques are not limited to low-budget films, though; even the best of the best use them. This is not a set of poor man's cheesy hacks; it's a sample of ideas that even big-budget filmmakers use.
Let's start with an easy one, a technique well-known in low-budget horror films: show less.
Since even funded horror films tend to have relatively small budgets, they often cannot afford to spend a lot of money on set design and decoration, so they get around that by simply not providing enough light for audiences to see what was outside of the production budget.
On a recent short science fiction film I worked on we were filming in a set built in a studio, made of painted cardboard and Styrofoam on a plywood framework. With the studio fully lit while I visited to plan the lighting and go over the director's shot list, the walls and decorations looked like they were cardboard and foam in spite of the metallic paint. There were also some set lights that consisted of translucent panels with small battery-powered LEDs behind them. Those lights were not powerful enough to provide any noticeable illumination.
On the day, I made sure that we dialed in the lighting so that the walls were underexposed just enough to hide the material they were made of. That left the translucent panels with their wan light surrounded by darkness, and hence, by comparison, they looked bright enough to look more like high-tech accent lights. To illuminate the actors, we used a simple cinematic top light by shining a spotlight on the ceiling between the two of them. Top lights are quite common in cinema for the sculpting effect they have on actors while being soft enough for the wrap-around effect to fill in their eyes. The result was a pleasantly soft, flattering light on the actors without enough spread to overlight the walls.
Big budget films also use darkness liberally at times, such as in 1917. In the trench scene, the only lights are motivated, so there are expanses of deep darkness that create a claustrophobic feeling, and in the night city scene, there is no full light, so the shadows are inky black, creating a sense of dread.
One of the hallmarks of low-budget film is flat lighting. It is less than obvious why so many low-budget filmmakers favor flat lighting, but outside of Hallmark films and 3-camera sitcoms, flat lighting really has no place in filmmaking. For starters, it's flat, in case that was less than obvious. The most common reason for lighting being flat is actually due to an obsession with lighting everything. Even when the budget allows for top-notch art direction, it's usually less than ideal to light it all, and even less ideal to light it all evenly.
When everything is evenly lit, especially without using artistic techniques like leading lines and taking advantage of visual weight, there is not much to differentiate one part of the image from another. For beginners, simply lighting the background less than the talent is a good place to start; that way the talent will attract more attention from viewers than the background. A good step up is to add some highlights to important elements in the background, and even better is to use the background to frame the talent to keep the viewers' attention where the story needs it to be.
At the very least use a flag to block the key light from the environment just to create some separation. To step it up, add color contrast, highlight important elements, and use light and dark to guide the viewers' eyes where the story needs them.
Adding those highlights on set does require some equipment, but a simple flag to separate the background and foreground is pretty easy to jury rig with available bits and bobs – such as boxes and whiteboards (they are opaque and therefore work as flags in a pinch), grips, directors...
That can also be enough to give the colorist more to work with when color grading, taking advantage of luma keying to add strategic highlights in post. The idea is not to eliminate post, it's to give post the best starting point possible.
For a very small budget short that was set in an abandoned building, the easiest thing to do is to shoot in an abandoned building. We tried that; we had a building that had once been a psych ward, no longer had active maintenance, and was schedule for demolition in our sights. We scouted it and found that it was pretty much perfect for our needs, but the rental fee ended up exceeding our budget. So we ended up shooting in an apartment build... but due to one of our crew being friends with the building managers, we were able to get access to normally unavailable rooms in the basement, like a couple of rooms that normally only the maintenance staff could access, emergency stairwells, and the boiler room.
The boiler room required very little work to make it look grungy, but some rooms were too clean. For the latter, we scrounged stuff from the storage area and used it to basically make a mess of things to create the abandoned look we were after.
Even that was not quite enough, so we added...
Anyone familiar with DMX knows how powerful and flexible it is, up to and including being able to control hundreds of thousands of lights. That takes a lot of time and preparation in addition to a lot of knowledge and experience in addition to some pricey DMX control hardware. For those of us who can't afford to hire “Nellie” Nelligan (which is everyone not working for a big studio production), the usual conclusion is “no dynamic lighting.”
Thanks to the likes of Aputure and Nanlite, that's not the case anymore. Most of Aputure's current fixtures have Bluetooth apps that allow for an impressive level of control, and Pavotubes offers a lot of the functionality found on the high-end Astera tubes (which can also be controlled with an app on a cell phone).
When working on a satirical indie superhero film, during the scene where the toxic goo gives the superheroes and supervillain their powers, we took advantage of this. We were using green detergent as the toxic goo, and we had a rented Astera Helios set, plus a pair of Aputure 600x Pro lights. I created two macros on the Aputure app for those lights; one was the ambient light with one 600x set to .5% and the other at 1%, and the second macro was the lighting effect at 100% intensity, followed by darkness. At the same time, we had the Helios tubes placed strategically around the set so that they would be lighting from below, and set them to a sickly green. On the director's cue, my crew triggered the lightning effect and then brought up the power on the Helios set.
In the boiler room scene, we had Pavotubes instead of Asteras; the app is different, but the functionality is very similar. My gaffer set up a chase sequence with the lights rapidly cycling colors which created a whirling light effect that worked really well for the climax of that scene.
Even inexpensive lights nowadays offer a lot of functionality that used to require major investments in DMX hardware and very expensive, skilled operators to use. On an indie production that has ten lights instead of 200,000, phone apps over Bluetooth can do the job.
On the aforementioned science fiction film, we had a scene set in a different location from the set, but the studio had little by way of variety in it. We found a spare room to shoot in, but it was... plain. The options available for backgrounds were a white wall, a white wall, and a dirty white wall; on the surface it was rather uninspiring.
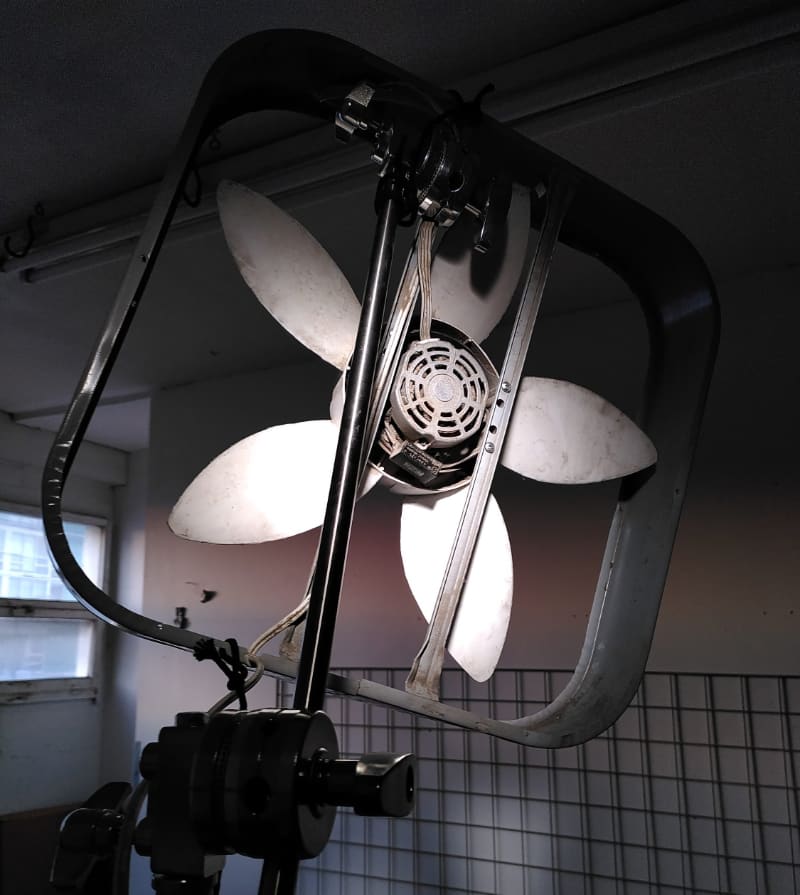
The room with the most space also had a fan in it, which gave me the idea of shooting a spotlight through the fan for texture, but it was bolted into the window so there wasn't a way to extract it for a shot. My gaffer (who was also my grip) found a dusty old fan in a closet somewhere and, after getting the studio owner’s permission, proceeded to take it apart, removing the front and back grates so that she could attach the frame to a C-stand and move the blades manually. On the day, we placed a pair of glass aquariums alongside the chair for the talent and placed a metal grate that was lying around on top of them, leaning against the wall. Adding a pair of small LED panels, one on top of each aquarium, created a grungy-looking grid shadow on the wall above the grid, and the fan rotating slowly in front of the key light added a dynamic shadow to the shot.
Of course, more common tricks like adding visible atmosphere with haze or fog machines are always on the table – just be sure to account for fire alarms when using haze and smoke indoors.
This is hardly an exhaustive list; there are a lot more ideas about where these came from. The idea here is to get more independent filmmakers thinking about creative ways to make their films look better without spending big bucks to get there, and more ideas are, of course, welcome, as we can all learn from them. Feel free to stick your favorites in the comments below.
Tags: Production

RedShark 2020 @ All rights reserved.

Comments