3 minute read
How a new generation of audio tools in Adobe Premiere Pro such as Auto Ducking, Remix Music, and Enhance Speech help make the job of editing quicker and easier than before.
With each new update, editing audio clips on Premiere Pro is getting easier. Over the last few years, Adobe has launched many features to streamline audio editing workflow. These tools leverage Artificial Intelligence to speed up tasks that might otherwise take a long time. Tools like Auto Ducking, Remix Music, and Enhance Speech allow editors to quickly edit and mix audio tracks without leaving the Premiere Pro ecosystem.
For this article, we will detail how editors can start using Auto Ducking, Remix Music, and Enhance Speech as part of their audio editing workflow.
Auto Ducking allows editors to automatically adjust the volume of certain audio tracks in the timeline. Premiere Pro automatically analyzes the audio tracks and generates keyframes to lower the volume when dialog is present. Without this tool, editors would have to manually create keyframes to lower the volume of music clips, but now, the process is much easier.
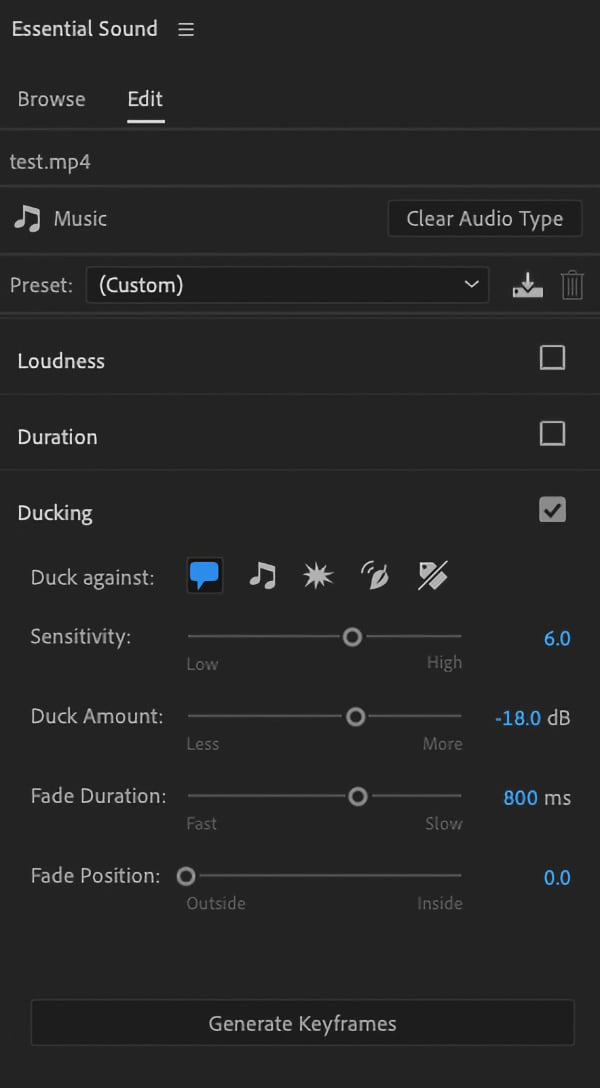
To use the Auto Ducking function, select the audio clip you want to ‘duck’ and navigate to the Essential Sound panel. Auto ducking is only possible if the clips are tagged as Ambience or Music. Please note that this tool will work best if all the clips are categorized, so ensure you tag all the clips on your timeline (this process will become much easier when Adobe launches the auto-tagging feature currently in beta).
Once the clip is selected and tagged, various audio tools should appear in the Essential Sound panel. Click the Ducking checkbox to enable the feature. A dropdown menu will appear where editors can set the effect's parameters. First, choose what type of audio tracks you wish to duck against. Then, adjust additional elements such as the Sensitivity, Duck Amount, Fade Duration, and Fade Position. Once the settings are finalized, click Generate Keyframes, and Premiere will automatically analyze and adjust the volume of the chosen clip. Executing this effect requires some trial and error but is still faster than manually lowering the volume of music clips.
Music underpins so much of the content we consume. It is vital to any type of media, from blockbuster films to YouTube videos. However, editors rarely find the perfect audio track. In fact, oftentimes, editors have to cut and remix the music clip to match the length of the video, which can be difficult and time-consuming. However, with the Remix Music tool, even novice editors can quickly remix audio tracks to perfectly fit their video clips.
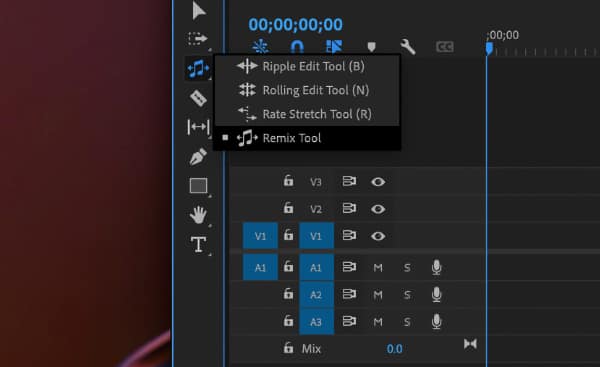
Select an audio clip to either shorten or lengthen. Then, navigate to the toolbar and select the Ripple Edit icon. Click and hold this icon until the Remix Tool option appears. Once the cursor changes, click and drag the edges of the audio clip to adjust its length.
Next, open the Essential Sound panel. Tag the clip as a music track to begin adjusting the parameters and intensity of the effect. Use the Remix option when trying to shorten the length of the audio clip and Stretch to increase the length. As mentioned before, you can adjust the length of the clip using the Remix tool from the toolbar. But you can also input the ideal duration of the audio clip in the Target Duration section to adjust the length.
Under Customize, editors can tweak the Segments and Variations of the effect. Segments refer to the number of cuts/crossfades Premiere Pro will use when remixing the clip. A lower number of segments means Premiere Pro will use very few cuts, whereas a higher number of segments gives Premiere Pro more flexibility. Adjusting the Variations slider allows editors to quickly audition different versions of the remix based on the harmonic or melodic elements of the song.
Editors can’t control the quality of the footage during post-production. Regardless, editors are often tasked with boosting the dialog tracks so the audience can hear the lines without any distractions. Unfortunately, it takes a certain level of skill to enhance the dialog while still maintaining the quality of the clip. Alternatively, editors can use the Enhance Speech feature in the Essential Sound panel. With the click of a button, Premiere Pro’s AI will analyze the dialog clip and automatically boost the dialog track.
[Please note: Editors must have the latest version of Premiere Pro available to use the Enhance Voice tool. Ed.]
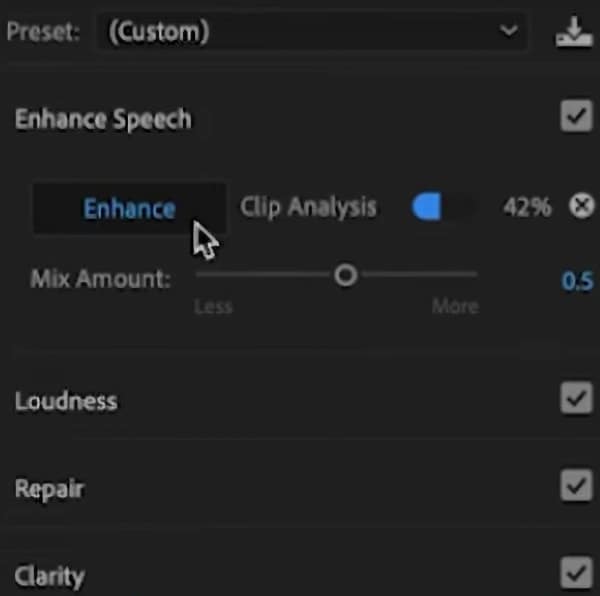
Select the audio clip and navigate to the Essential Sound panel to use this effect. The clip must be tagged as a dialog clip to access the Enhance Speech tool. Enable the Enhance Speech checkbox to begin the process. In this dropdown menu, use the slider to adjust the mix amount, which will determine the intensity of the effect. When ready, click the enhance button, and Premiere Pro will begin a clip analysis in the background. A progress bar should appear beside the Enhance button. Listen to the clip once the progress bar reaches 100% and make any adjustments as necessary.
Premiere Pro’s AI tools allow for a faster, more seamless audio editing experience. These tools reduce costs and stress levels, allowing editors to deliver more projects at a much quicker pace. With a suite of new audio features recently introduced to the beta app, the audio editing workflow will undoubtedly become even more efficient. In the near future, editors may never have to leave Premiere Pro to mix and master high-quality audio tracks.
Tags: Audio Adobe Audio

RedShark 2020 @ All rights reserved.

Comments