5 minute read
Breaking into the world of underwater filmmaking is a niche but fulfilling adventure. Here’s how you can get started.
I’ve been shooting videos and films for a decade but it’s only two years ago that I finally got my feet wet. Work on documentaries in Indonesia (the world’s largest archipelago) necessitated the transition from land to water more frequently and before I knew it, I was diving (literally) into the world of underwater filmmaking.
As a total beginner, I started from scratch using tutorials found on YouTube (and articles just like this one) to teach myself. With that knowledge and journey now under my belt, I’m passing on my experience and advice for anyone else looking to take the plunge.
Shooting underwater presents a unique set of challenges that will dictate how we shoot and what we shoot with.
Stating the obvious here, but it really does change everything. Shooting underwater isn’t easy. As far as I’m aware, no human can breathe underwater without the aid of diving gear and a supply of oxygen. Alongside ocean currents, an array of alien-like wildlife and landscapes, different temperatures and visibility, there’s a lot of risk that comes with shooting under the waves. Sea water is also particularly corrosive and doesn’t agree with cameras.
The biggest thing I had to adjust to when shooting underwater footage was the changes in light and colour. Down to around 5 metres just under the surface, conditions are fine. It’s why your snorkelling GoPro footage looks acceptable, maybe even great. However, once you dive down further, you’re playing by a whole new set of rules.
Underwater, you lose light fast, and with that you also lose certain colours. Going back to your GoPro footage, have you ever wondered why it looks so blue and green? In short, colours travel in wavelengths (demonstrated best when sunlight passes through a prism and splits into a rainbow on the other side).
Water absorbs these different wavelengths at different depths. As you descend, you’ll notice that the colours red and yellow disappear fairly fast, while blue and green remain. This, along with the lack of sufficient light, provides a very challenging scenario for any cameraman.

With the above challenges in mind, make no mistake. Underwater filmmaking is an expensive process. Not only do you have to invest in very specialist camera equipment, but you have to think about other factors such as your own ability to dive (this requires undergoing lessons and courses), as well as hiring out a boat and guide who can get you to where you need to be.
The challenge of filming underwater requires specialist equipment. And no, unfortunately your GoPro probably doesn’t cut it.
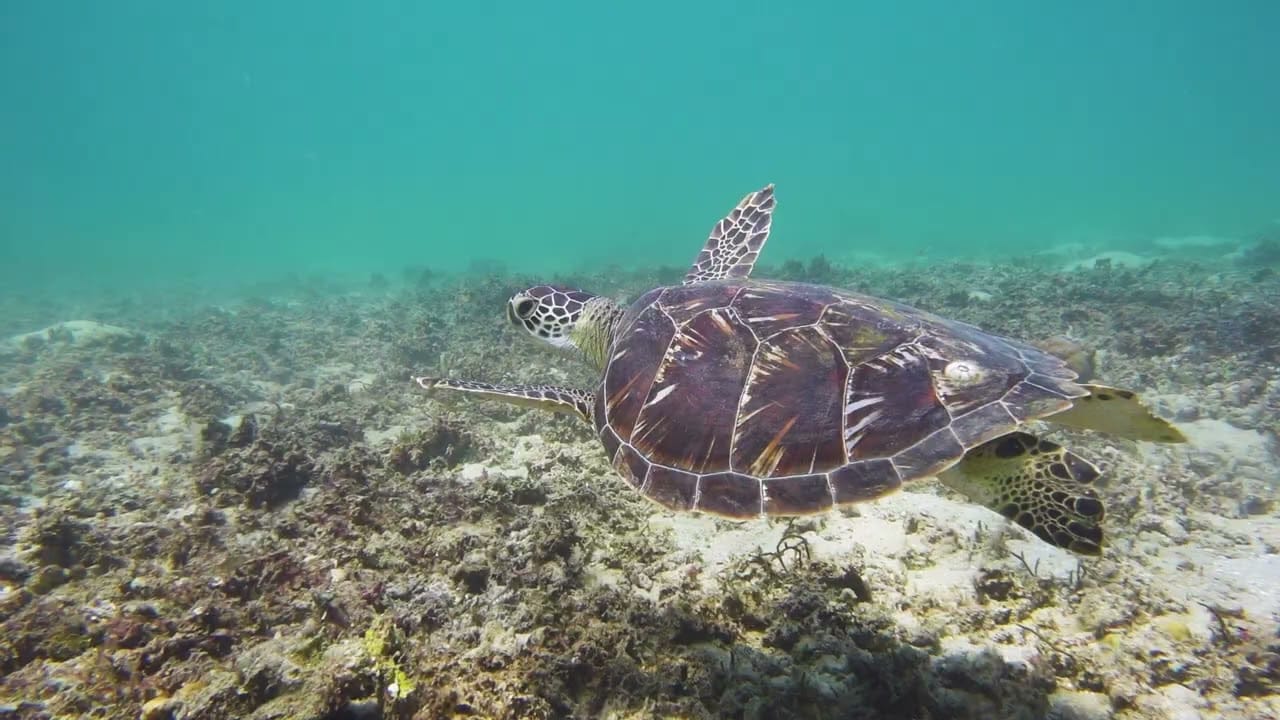
When I first started diving, I naturally brought my GoPro Hero 7 Black with me. At the time, I remember capturing what I thought was great footage of turtles and clownfish. However, on review and in hindsight, the footage doesn't make my underwater showreel.
GoPros don’t really cut it for a number of reasons. First and foremost, they have a relatively small sensor that isn’t great when you’re already working in challenging lighting conditions. Apart from punching in on 4K footage, you don’t really have any zoom or focal range to work with either. And most importantly, you can’t manually white balance a GoPro underwater. With the frequent changes in light and loss of reds and yellows, you really need to be able to white balance accurately.
So, you need to upgrade from a GoPro. On this realisation, the temptation for me was to go all out and break the bank purchasing a brand new underwater housing for my Panasonic GH5, which cost even more than the camera body itself. Fortunately, I saw sense and held back. I urge you to do the same.
The ability to shoot great footage underwater isn’t going to happen for you overnight. It takes time and many hours of practice before you’re comfortable in this new environment. For that reason, purchasing a huge, undoubtedly expensive underwater housing for your biggest, most expensive camera doesn’t really make sense. You’re probably not going to recoup that investment anytime soon because of the learning curve and honestly, some of these underwater housings are far too complicated when you’re just getting started.
In my own experience, it's better to find some middle ground first. If you can invest in a housing and camera setup that still allows you to shoot a superior image in comparison with the GoPro but doesn’t cost the earth or over-complicate things too early, that’s the way to go. You can always upgrade in the future if things progress!
So, what’s the answer? I looked at the compact point and shoot market where some of the options start to tick all the boxes. For starters, the image quality is superior to GoPros and you can white balance manually. Meanwhile they’re cheaper than large mirrorless flagship cameras and they’re also far smaller and lighter, meaning the underwater housing is more affordable.
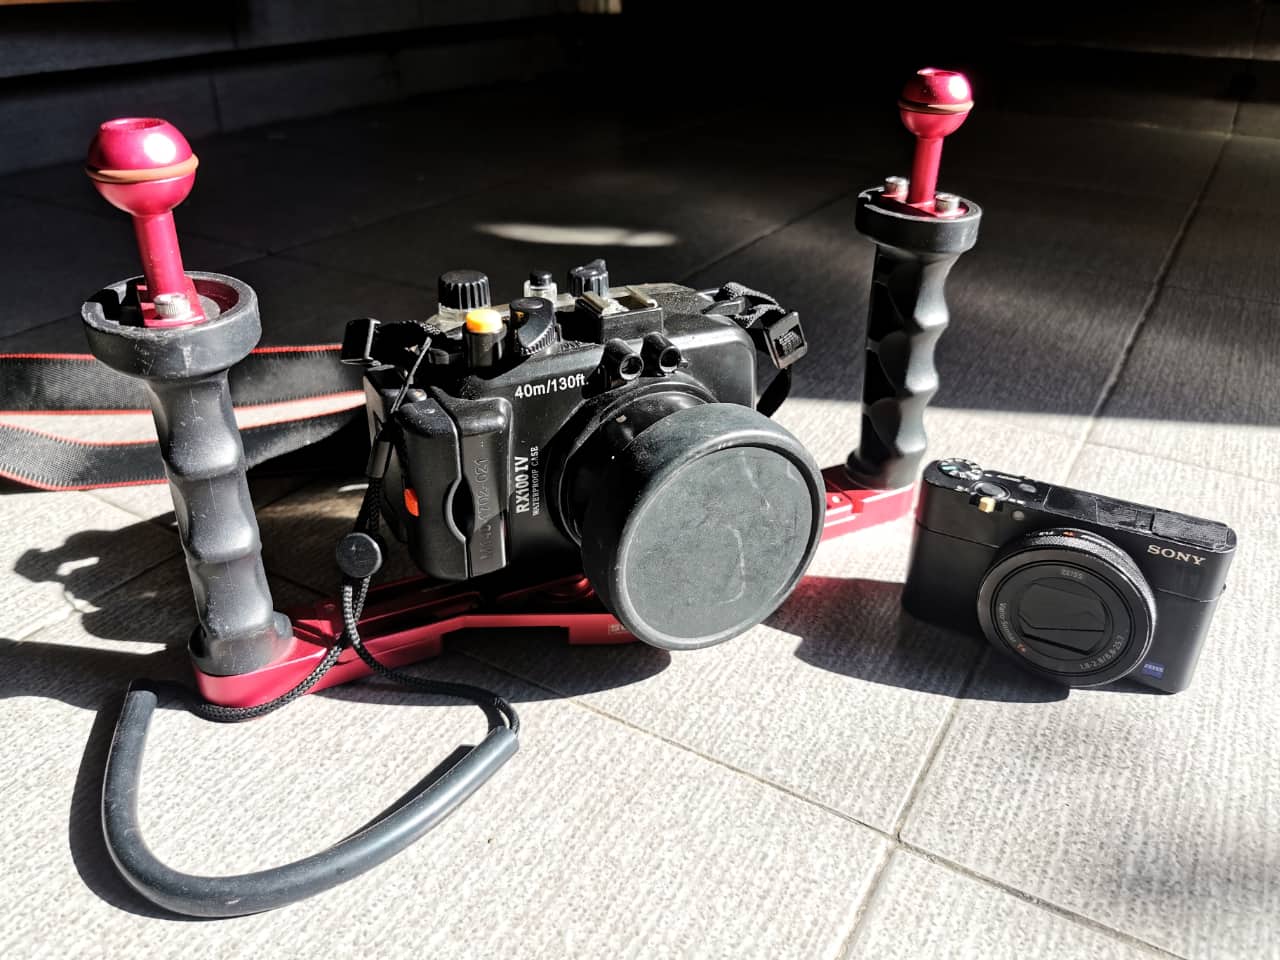
With this in mind, I purchased a Sony RX100-V and a Sony DSC-RX100 IV/ RX100 V 40m/130ft Meikon Underwater Camera Housing. On the second hand market you could pick these two items up for under £600.00.
Other compact cameras worth looking at are the latest (pricier) Sony RX100-VII, the Canon G7X III or the Panasonic LX10. All of these tick the boxes.
I went ahead and purchased a Supe TG20 underwater tray because it adds a bit of weight and the two hand grips enable steadier footage.
You may also want to purchase dive lights, depending on the depth you’re diving and the visibility. If you go ahead with lights, then you’ll need arms on the tray and potentially even buoyancy aids. Personally, I’ve opted to keep my setup as simple and stripped back as possible.
Whatever your setup, here are a few top tips to help get you started on your journey as an underwater filmmaker.
A PADI Open Water Diving Course is essential. You won’t get far without it and in many cases, employers need far more. Learning to dive safely is imperative – you have to be comfortable in the water and have everything come naturally to you before you can even think about operating a camera underwater.
Doing further courses tailored around buoyancy and underwater filmmaking can greatly improve your performance, helping you to remain steady and composed in the water while shooting.
You need to build a showreel that shows people what you can do as an underwater filmmaker. Nobody is going to hire you out of the blue (although that’d be nice if they did). Get out there and put the hours in practising, capturing a variety of landscapes and wildlife that show off your skills as an underwater cinematographer.
Personally, I prefer to shoot at shallower depths. Where I dive in Indonesia, the most interesting reefs and activities tend to be happening at the shallow end. This is great because this is also where I have the most natural light to work with and more accurate colours.
If you’re shooting something directly below you, it comes across as if you’re snorkelling or on the surface. It feels amateur. Instead, make use of your dive gear and immerse yourself in the 3D environment. Shooting things at eye-level or even from below gives a far more interesting, dynamic shot.
I purchased my underwater housing tray mainly because it has two hand grips, one on either side. This keeps my hands off the housing itself and the additional neck strap gives me a further point of contact, all helping to keep the camera steady. This is where buoyancy and breathing techniques can really help. You may think that because you’re underwater, your movements will be naturally calm and fluid but that’s not the case!
I film in slow motion for two reasons. One, it helps smooth out my footage. The Sony RX100-V doesn’t come with any in-built stabilisation, so slowing it down in the edit really helps iron things out. Second, I like the ethereal, almost magical feel that slow motion underwater footage gives me. That’s a personal, creative choice but try it out for yourself.
Just as you would on land, you want to mix things up underwater and cover different angles. Shoot the wide, beautiful landscapes, but don’t forget to make use of your focal range or get closer to subjects, filming mids and close-ups too.
Additionally, add some movement into your footage. Static shots work, but moving through an environment, potentially tracking some wildlife, can lead to really immersive, dynamic footage. Use your legs to move around and see what you can find.
Tags: Production

RedShark 2020 @ All rights reserved.

Comments