
3 minute read
The Sensel Morph is a control surface that can be used for any type of physical control you could care to think of. We find out how well it performs for editing!
The relatively recent explosion of NLE use, especially in the consumer arena, has accelerated the development of third-party peripherals. Several edit controllers or keyboards of various types have been launched. More traditional dedicated edit controllers or control surfaces can be expensive because they are niche products. Even at the lower end of the market costs can run into the many hundreds of pounds or dollars. The more dedicated the hardware the more expensive it becomes.
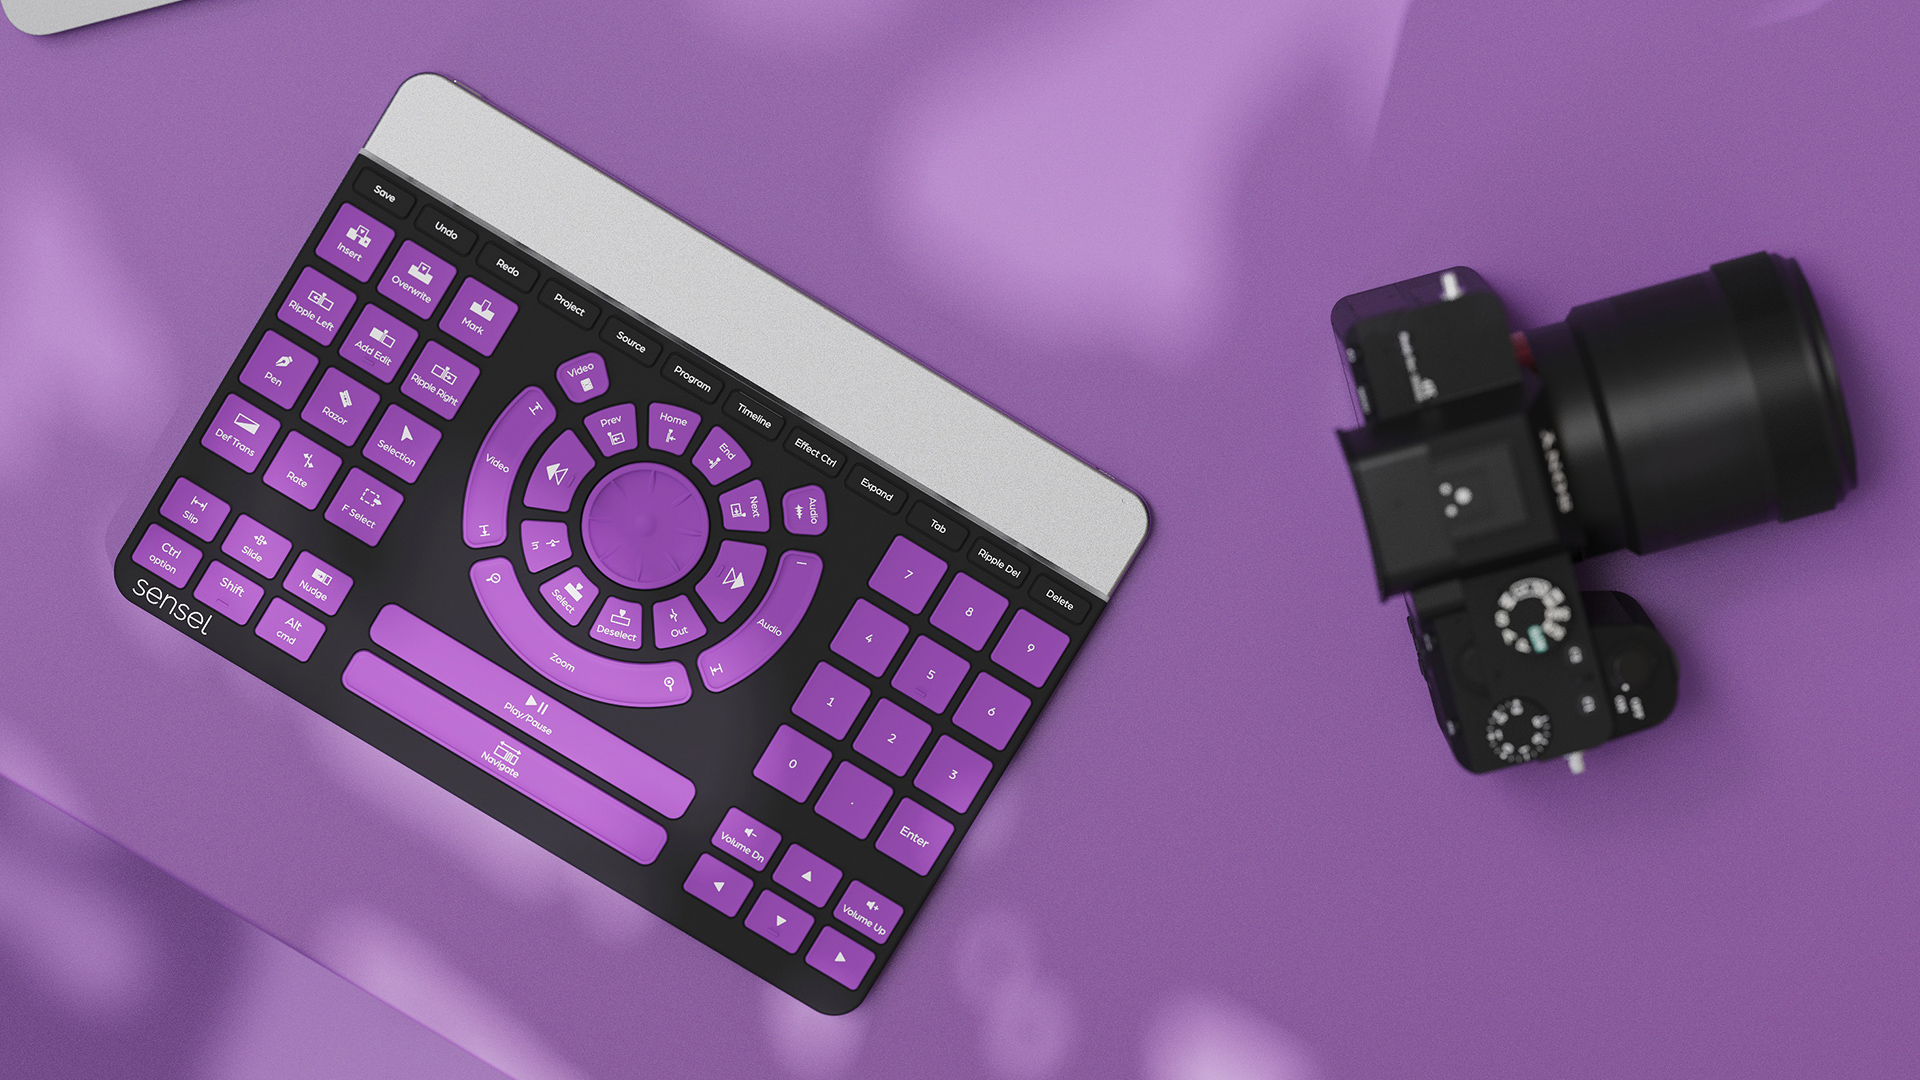
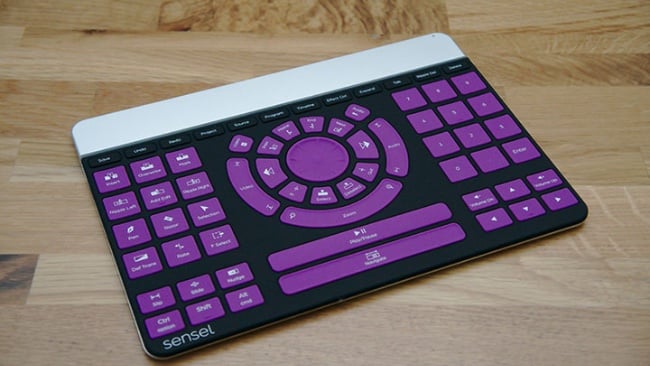
Sensel hopes to break this cycle with the Morph, a pressure-sensitive multi-touch pad that can be adapted for various use cases with different swappable overlays. This includes - but is not limited to - a standard QWERTY keyboard, a MIDI keyboard, a games controller and the one that I’m looking at here — an edit controller. The combination I’m looking at retails for £193.
The Morph is a touch pad measuring 240 x 169.5 x 7.5mm. Most of the area is taken up by the touch surface itself which has approximately 20,000 pressure sensors with a range of 5g to 5kg. There’s a small area at the top containing the electronics. This also houses a micro-USB socket, a power button and a small plastic window to enable Bluetooth transmission. There’s a small multifunction LED next to the power socket and a multi-element LED light bar at the top edge of the touch surface. This performs a number of functions which includes showing battery level and indicating updates to the key mapping.
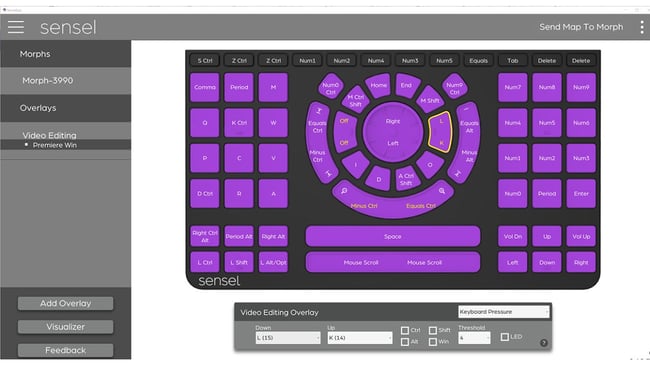
The first part of the setup involves downloading an app from the Sensel website or via the various app stores. I’m using mine on Windows 10 with DaVinci Resolve 16 Studio. It also supports macOS, iOS and Android for some of the different overlays. The setup was very simple but, of course, like most devices it required a firmware update before I could delve into using it. As I was using it with the video edit overlay, I also selected this in the app. It supports multiple overlays you can switch between. The overlay itself is a thin rubberised mat containing 66 distinct customisable buttons. It simply locates magnetically onto the touchpad.
Setting it up is not as simple as it first appears, which is down to two main reasons. Firstly, some of the buttons are not simply On/Off buttons but variable sliders. For example, the timeline zoom function allows you to run your finger forwards and backwards to select various zoom levels. In addition to that, you also have the ability to select varying pressures for activation. You can select different pressure levels to activate different speeds for shuttling through the timeline and even have these set up differently for forward and reverse. Getting pressures dialled in to suit you can take some time and I did find that the default pressure for the shuttle function (at 64x) was rather high with the default setting at 7 — I ended up selecting 4.
The physical buttons themselves do not move and can take some getting used to, especially if you’ve been using physical keyboards or controllers to perform your edits. It’s rather like editing on a touchscreen. The only feedback you get is a small clicking sound to indicate a key has been pressed. Some of the keys have small lips around the edges to aid locating your fingers on them, these being the zoom, video and audio sliders as well as the jog wheel. Most of the other main keys are slightly concave, although the Play/Pause button is convex. In addition, the jog wheel does not rotate. This is actually quite easy to get used to but initially felt rather odd. The edit overlay itself is set up for use with Adobe Premiere CC, although it’s not difficult to change the internal key bindings to match other NLEs. The labels on the keys themselves may not correspond to the ones you are using and these cannot be changed on the keyboard itself without adding your own key labels.
After I spent some time setting up the keys to my liking — it took around two hours — I started to use it in earnest and I found that the learning curve is rather steep. This was more down to retraining my muscle memory and I’m still not there yet. After my relatively short time with this, I find that I’m having to look at the Morph more than I would like and some of the transport controls — like the Previous and Next edit buttons — are a little smaller than I prefer. The set of keys to the right and left of the main transport controls are OK, but I would like to have seen some variation in size of the Control, Shift and Alt keys which are the same size as the slip, slide and nudge keys. I’m also not convinced by the presence of the keys with default numerical labelling, I know these can be reassigned but I don’t use them often when editing.
In use, I found its size and build quality to be very good. The rubberised feet on the reverse do stop it moving on all but the most slippery of surfaces. However, I do wish that there was an accessory provided to angle the Morph up a little bit. I do realise this can lead to issues with RSI, but for me the ergonomics dictate a small tilt. A stand that could be adjusted would be handy.
In conclusion, I think this is an accessory that’s very subjective, more so than something like Elgato’s Stream Deck. I need some more time to get used to it. After all, I’ve nearly 25 years of editing experience with a keyboard. This old dog needs a bit longer learning new tricks.
Tags: Production

RedShark 2020 @ All rights reserved.

Comments