7 minute read
Review: The Atomos Shogun Inferno would appear to be a dream come true for highly portable on-camera HDR monitoring. The device has been available for some time now. We thought it was time to find out how good it really is.
It could be said that external recorders changed video production forever. In a nutshell they allowed cameras that initially didn't have full broadcast approval, such as the Sony EX1 and EX3, to be able to record a fully broadcast approved 10-bit 4:2:2 signal. This opened up a lot of doors for producers on lower budgets to get more bang for their buck in terms of camera equipment.
Move forward several years, and although the internal recording codecs of cameras have become much better, the life of the external recorder shows no signs of abating. For one thing they now offer on-set monitoring, as well as raw recording. Which is where the subject of this review, the Atomos Shogun Inferno comes in.
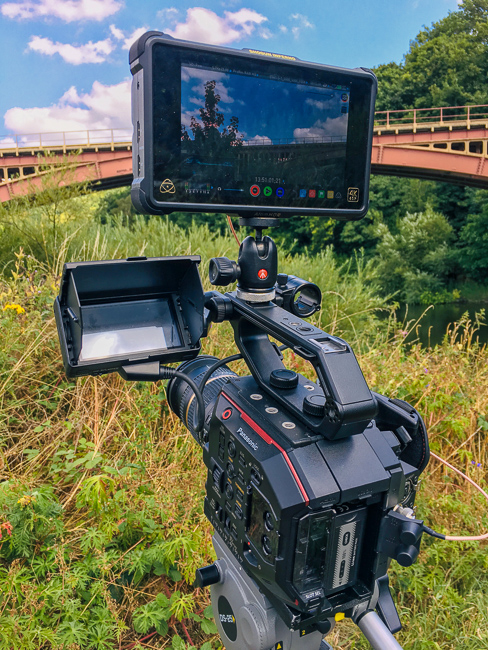
Atomos has a range of external monitors and recorders, but their flagship model is currently the Shogun Inferno (the Ninja 5" isn't shipping yet). Currently it is the only model, alongside the Sumo19, that can record the much publicised ProRes RAW format from cameras such as the Panasonic AU-EVA1 and the Sony PXW-FS5.
On paper the Shogun Inferno's specifications are impressive. A 7" display with 1920x1200 resolution, 1500nit display brightness, and the ability to show around 10.5 stops of HDR video.

The Shogun Inferno comes in a solid carry/flight case, with precise foam cutouts. This impressed me a lot since there is absolutely no need to purchase a separate carry case for the Inferno as a result. The list of contents is also impressive, and useful. It comes with:-
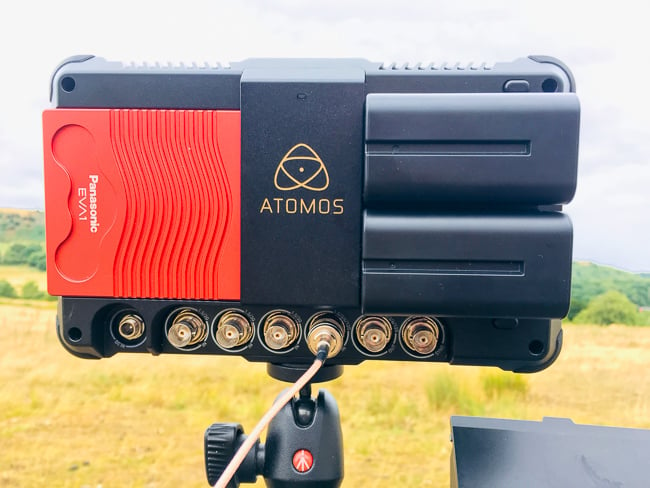
The design of the Shogun Inferno is reassuringly solid. Each corner has a rubber surround to help protect the device from bumps and scrapes. The top and bottom of the device offer 1/4" screw mounts to enable it to be mounted to cameras, arms, or tripods. Connectivity is clearly laid out. On the right hand side there's an XLR/Mic in, a headphone jack, and the sizeable power button, which is surrounded by a rim to prevent accidental pressing.
On the left hand side there's full size HDMI in and out sockets, and a remote socket. The latter is there so that you can plug in calibration devices such as the X-Rite i1Display Pro.
The rear of the Inferno is the main business end of things. There's the slot for sliding in SSDs and two battery slots. The device runs off one battery and will auto switch to the next one. This will occur even if you are running off a D-tap system. Once power is lost from one supply the Inferno will automatically switch to the next available one.
At the bottom there's a DC in (for mains, D-tap or battery adaptors), three 1.5/3G SDI in sockets, one 1.5/3/6/12G SDI in, one 1.5/3/6/12G SDI out, and one Genlock Sync port.
In all it is well laid out and clearly labelled. On the rear of the body there is also a tiny red tally light to indicate when recording is taking place.
Codecs wise, the Inferno is, shall we say, well endowed and shold satisfy any editor. The obligatory ProRes is there, in all flavours up to HQ. Avid DNxHD is also there up to 220x, as well as CinemaDNG, and the one everyone is talking about right now, ProRes RAW. Currently the Shogun Inferno is the only compact monitor/external recorder to be able to record this new format.
I've tested various Infernos with a selection of cameras, from the EVA1, through to the Sony FS5II, and the IO Industries Victorem 4KSDI-Mini, which I am currently still testing.
At 7" the Inferno is fairly large as a camera mounted display, but I wouldn't let that put you off. The device powers on very quickly and detects the signal being fed to it in no time at all. And then you are rewarded with what I can only describe as a wonderful display.
The camera feed is strikingly clear, even in bright sunshine. The provided sun hood comes in useful for monitoring in very bright light, but if you are wanting to move from shot to shot quickly, the 1500 nit brightness will serve you well in all conditions, to the point where I simply do not want to be bothered with a built in camera display ever again.
Previously an external monitor would suffer from similar issues of brightness and view ability as the cameras built in one. Not so with the Shogun Inferno.
Focusing is made easy not just by how sharp and clear it is, but there's peaking on offer, as well as the ability to scale the image up to 2x for critical sharpness of focus.
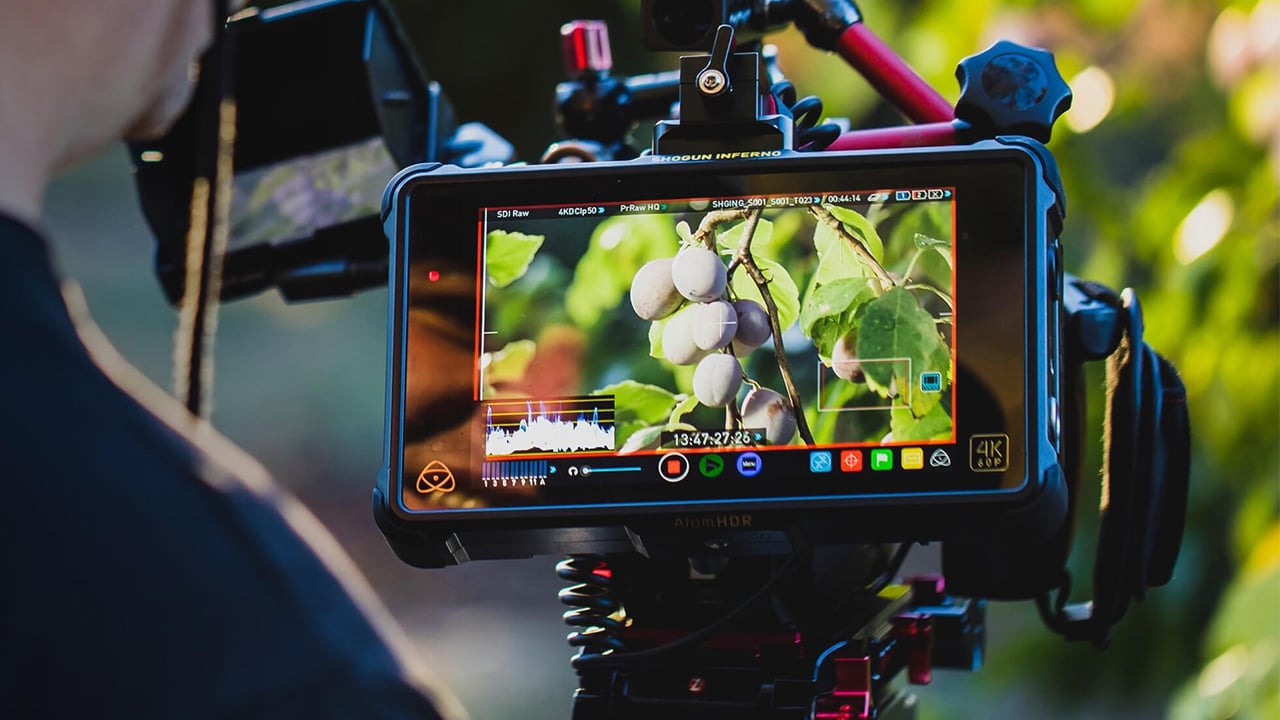
The Shogun Inferno's user interface is easy to navigate via the touch screen. It is in stark contrast to other external recorders and monitors I have used, which seem to revel in making icons and menus as small and incomprehensible as possible. The Inferno on the other hand is very clear indeed.
At the top of the screen the device reports what codec and resolution it is recording to, the codec recording quality setting, the filename, remaining recording time on the inserted media, and the power remaining indicator. Any one of these can be pressed to bring up deeper options/settings.
On the bottom of the display are audio meters, headphone volume, record, play, and clip menu, which allows timecode, device info, date and time, and display calibration settings to be accessed.
At the far right of the bottom interface are four icons. Each of these are where the meat of the Infernos setup and shooting assist features can be setup such as waveform and vector scope monitoring, focus and exposure assist, clip tagging, and the Monitor Mode.
All of these are important to help you get the most out of shooting, but that last one, the Monitor Mode icon, is the one where a lot of the cleverness happens.
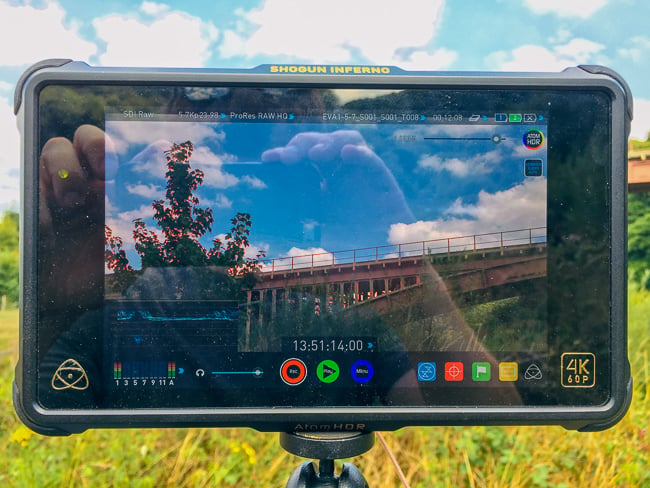
Shooting log footage can be full of gotchas, and getting the exposure right is not always easy when you are looking at a flat, desaturated image due to the gamma mismatch between the monitor and the selected log curve. This is especially the case when shooting outdoors in sunshine. This is where the 1500 nit brightness and 10.2 stop display capability of the Shogun Inferno really comes into play.
In this menu, at the top there are four icons. The first is a Native Source option. This allows you to view the signal from the camera, whether it is Rec.709, or in log mode as is with no modification. Adjusting the brightness of the Inferno in this mode will simply do that, adjust the brightness as per any other monitor. Straightforward enough. But the second icon is the magic one, AtomHDR.
In short, the AtomHDR mode will take your log video input and use the monitor's full dynamic range to show the footage in HDR. In other words you will no longer be viewing a flat, desaturated looking image, and instead will be seeing a glorious HDR one with full colour saturation. The Inferno will generally recognise the camera that you have plugged in and will process accordingly. Although you can manually select this. Note that this is non destructive and does not affect your recorded images.
This isn't a one click option. Atomos has provided a dynamic range slider so that you can optimally display each individual scene. Setting this too low will mean highlights will clip on the display, while setting it too high may make the image too dark, and harder to expose for. Handily there is an AutoHDR button which will automatically tune the display to each shot.
The result of all this is that you can shoot with any camera's log mode without having to guess if you have the optimum exposure, since the Inferno is transforming the log output into WYSIWYG.
The third icon along is a Log to Video option. This will take the log input from a camera an apply a Rec.709 LUT to it. Lastly there's a Custom look option that allows you to apply your own 3D LUTs to the footage, which may be useful if you have a specific look in mind for the final production. Additional options become available while using these options, such as the ability to bake in the LUT look to the recorded footage, apply the look to the HDMI/SDI outputs, and even to split screen comparison to compare different look options or with the original footage.
When all these options are combined with the comprehensive focus and exposure assist options such as false colour, blue only (for identifying overly noisy footage), and there shouldn't be any excuse for badly captured shots unless you really are in a great hurry.
It is rather incredible to think that not so very long ago the sort of assistive functionality that is now available on the Inferno would have required great big racks of hardware scopes, a video engineer, and a ton of cables all over the floor! And even then such hardware wouldn't have given half of the assistive options available now on this device.
Another important aspect of the Inferno is its timecode functionality. The Inferno supports embedded HDMI and SDI timecode, record run, time of day, auto restart, and LTC input via gunlock. The first two are very useful due to being able to be triggered from the camera itself. Setting this up is vital if you want to be able to record the ultra-high frame rates in raw from the Sony FS5 for instance, which buffers the video before writing it to the recording media. By setting up the correct SDI timecode trigger on the Inferno the FS5 will automatically start the device recording once it starts to play back the slow motion buffer.
For many HD cameras the Shogun Inferno will detect a pulldown signal, and remove the it. If the device doesn't detect it, it is still possible to manually set the devices to remove it by setting it to the correct frame rate you wish to record. You will then have to perform a pull down detection analysis by subjecting it to moving imagery, such as waving your hand in front of the camera. Although there are limits. For instance the Inferno does not support the removal of Panasonic Advanced pulldown.
That said, I know that pulldown is still an issue for some people looking at using external recorders, so it will come as reassurance that Atomos have got this angle covered as much as possible.
With all the talk of its HDR monitoring abilities it is easy to forget the audio aspects of the Inferno. The device supports up to 12 channels over SDI, 8 over HDMI, and 2 via XLR. You have full control over how many of these channels you record simply by pressing on the little "Rec" icon beneath each one on the meter display.
Audio input line levels can be set to Line Level, Mic Level, or Pro Level. There's also an option to enable 48v phantom powering. More importantly there's an audio delay option that allows you to set the number of frames of delay due to processing.
There are in fact far more setup options and functions than I can go into here. But what I like most about the Shogun Inferno, apart from the wonderfully bright display, is that the interface is set up for straightforwardness and simplicity. Anything that can make an often complex task like HDR shooting simple gets a big vote from me. And that's a big reason I can recommend it over some of the alternatives. The fact that Atomos has seen fit to include so much useful functionality on top of the HDR monitoring is a very large icing on the cake. And that's without considering that at the time of writing it is the only on-camera monitor/recorder that can record ProRes RAW from cameras such as the EVA1 and FS5. Try one and you'll probably never want to use your built in camera viewfinder or display ever again.
The Atomos Shogun Inferno lists for $1295 (ex local taxes) or in the UK for £1350 inc VAT.
Tags: Production

RedShark 2020 @ All rights reserved.

Comments