4 minute read
 Creating a DCP can be an involved process
Digital projection has opened up lots of possibilities for independent film producers, but the process involved in creating the neccesary compatible Digital Cinema Package could have a few pitfalls for first timers. Neil Oseman takes us through his own experiences.
The switch from celluloid to digital projection has made the cinema much more accessible to independent filmmakers. It has been possible for a few years now to make your own Digital Cinema Package at home, take it to your local multiplex and screen it in 2K or 4K with Dolby surround sound — an opportunity unthinkable just a decade ago. Today, it is common for festivals and distributors to ask for DCPs, but while making them is not exactly difficult for anyone who is technically-minded, it is far from intuitive. I’ve been through the process five times now, with — to my pleasant surprise — perfect results every time, so in this article, I will guide you around the many stumbling blocks.
A DCP is a set of six files — one picture, one sound and four metadata files — which can be read by a cinema server. Now, let’s say we have a 16:9 short film which has been mastered by the colourist as a 1080P ProRes file and the re-recording mixer has supplied six WAV files containing the individual channels of the finished 5.1 surround sound mix. To complicate things a little, let’s say we shot the film in the UK at 25fps. Many attributes of this hypothetical film — its aspect ratio, resolution, codec, colour space, frame rate and file format — will need to be altered to make a compliant DCP which will play in any digital cinema.
There are several ways to make a DCP, but our method will use mostly free software, the key piece being an open-source application called OpenDCP, which you can download here. There are a few things we need to do before we get to OpenDCP, though.
First of all, we need to convert our ProRes video file into an image sequence, a huge folder where each individual frame of the movie is represented as a single image file, specifically 16-bit TIFF files. The 16-bit part is important because unless we shot our film on a DSLR and haven’t graded it, our film will contain at least 10 bits of colour depth. If we were to use ordinary 8-bit TIFFs — by exporting them from Final Cut Pro 7, for example — we would lose a significant amount of colour fidelity.
We also need to adjust our film’s aspect ratio. At 2K, the two standard DCP resolutions are 2048x858, for a 2.39:1 “Scope” aspect ratio, and 1998x1080 for a 1.85:1 “flat” ratio. The latter is closest to 16:9, so that’s the one we want.
We can use Adobe After Effects to adjust the resolution and ratio and to export the TIFFs. We create a new composition at 1998x1080, drag and drop our 1920x1080 ProRes video and scale it up slightly to fill the width of the frame. The top and bottom of the image will be cropped a very small amount, but this is preferable to pillar-boxing the image, which may confuse projectionists.
To set our composition to 16 bits per channel, we’ll click the little button marked “8pc” at the bottom of the Project panel and alter the depth in the Colour Settings box. When we render out our TIFF sequence we must also make sure, in the Output Module, that the colour depth is set to trillions of colours and there is no TIFF compression applied. (We can double-check that the resulting TIFFs are 16-bit by looking at their file size; they should be about 12MB each at 2K.)
Cinemas project at 24fps, even in the UK, so that’s the frame rate our DCP must run at. Now that our video is an image sequence, it no longer has an inherent speed, but the same is not true of our sound. For our 25fps film, we’ll need to reduce the audio speed by 4% so that it still syncs with our images when they’re run at 24fps. Any decent sound editing app will be able to do this. Audacity is a good, free, open-source option available for Windows and MacOS; use the Change Tempo setting and enter a value of -4%.
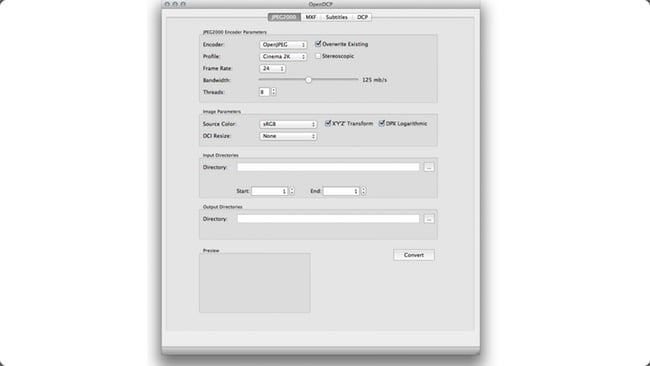
Now we are ready to launch OpenDCP. The software consists of four panes representing the steps in converting our image sequence and WAVs into a final DCP.
The first panel imports our TIFF sequence and converts them from RGB to the XYZ colour space used by cinema projectors, as well as transcoding them to JPEG2000. The options can all be left at their default settings, including the bandwidth of 125mb/s, which will give excellent results at 2K.
Once the images have been crunched, we can move onto the second panel, which takes the JPEG2000 sequence and wraps it in an MXF file. Again, the default settings will suffice.
Next, staying with the MXF pane, we’ll convert the audio too. We select WAV from the Type drop-down menu, then select 5.1 and bring in the appropriate files to the Left, Right, Centre, Sub, Left Surround and Right Surround fields.
We’ll skip the subtitles panel and move on to the final step, in which the software spits the MFX picture and MXF audio files out into a folder of our choice along with the four XML metadata files. It’s worth entering useful information into the Title, Annotation and Issuer fields because it will all help the projectionist find our film amongst the many DCPs listed on their system.
We now have our finished DCP files, but there is one more hurdle to jump. We’ll be taking our DCP to the cinema on a USB stick — a 2K DCP is about 1GB per minute, so these days, even a feature will fit on a stick. But digital cinema servers run on a variant of the Linux operating system and as such, they can often only read drives formatted with a Linux file system, specifically EXT2 or EXT3. Unfortunately, neither Windows nor MacOS can read or write to this file system.
We don’t want to go to the trouble of installing Linux on our computer, but we can use a free OS called Ubuntu to format our USB stick instead. We can download a startup disc that allows us to boot our machine in Ubuntu without installing it. Once Ubuntu is running, a right-click on the drive icon brings up a contextual menu with a Format option. EXT2 is one of the default settings — or we can open the Disk Utility to find EXT3. I’ve used both successfully, but I suspect that EXT2, being the older, has the widest compatibility.
Now it’s just a case of copying the six DCP files onto the newly-formatted stick and we’re done. There is software around — EasyDCP Player for example — that will let us crudely view a DCP on a home computer, but the only way to be sure, is to take it to our local cinema and run it. In my experience, independent cinemas are usually willing to help out a local filmmaker in this way and you might even be able to broach the subject of discount screen hire for your cast and crew premiere while you’re there!
Tags: Production

RedShark 2020 @ All rights reserved.

Comments