6 minute read
 Raiders of the lost Ark
Having charted the story of VFX in cinema in the first four parts, Andy Stout turns his attention to detailing the various techniques used over the past century, starting with optical effects. Dismiss them at your peril; after all this is how they made 2001
At its heart, most VFX of the optical era involves combining elements shot at different times and different scales into the one frame. To do this and prevent one image looking uncomfortably ghostlike (unless, of course, a ghost was exactly what you were after) you need a matte. The very earliest mattes were static and blocked out whole areas of the exposed negative in what effectively amounts to a split screen process. That’s not to say they weren’t highly sophisticated though.
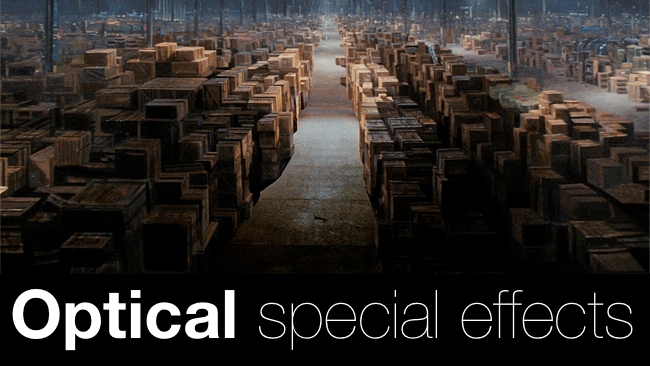
Remember the last scene in Raiders of the Lost Ark when the Ark of the Covenant is abandoned in a Brobdingnagian warehouse that seemingly stretches on to infinity? That’s a matte painting right there, and it’s on screen for over half a minute.
The first mattes (and some of the last) used by the VFX industry were painted glass sheets. Glass had been used by still photographers for years to tweak their shots, and while it worked well with film it wasn’t an easy process: locked off cameras of the early film era necessitated sandbags on the camera legs to ease the problems of vibration and judder, while the artist drawing the picture had to pretty much guess the lighting conditions that the final scene would be filmed under.
Hence original negative matte painting was developed. This simply uses a black-painted piece of glass or even cardboard placed inside a matte box in front of the lens to block out an area and prevent that part of the negative being exposed. The film is then kept in the fridge, with a couple of frames snipped off and projected back through a special camera onto an easel for the artist to add the required elements. Various tests are undertaken to match exposure levels, and then the whole thing is then shot again and developed.
Travelling mattes then took things to the next level. What is required here is to shoot two elements – a background and an actor, typically – and then produce a background image that contains an unexposed hole exactly the same size and shape as the moving actor. The actor element is then slotted into the hole and, providing both scenes have been lit carefully and in the same way, the illusion that he or she is performing in front of the background is convincingly created. That’s the idea anyway.
Working with film this takes several, finicky stages to produce a composite and several different, equally finicky processes were developed that refined it as the industry progressed. The Williams Process, patented in 1918, shot the actor in front of an evenly lit black screen and then copied it a number of times to produce a clear background with a black, moving silhouette. This was then bi-packed with the desired background element and printed, but not developed, to a new piece of film. This was then bi-packed in turn with film showing the correctly exposed foreground/opaque background, and the whole thing run through the printer and re-exposed.
It was laborious but it was also effective, and was used for nigh on two decades in the industry.
The colour method that first gained widespread usage was the Dunning-Pomeroy process, which also happily shifted the production of the necessary mattes to an in-camera process. The background scene was printed to produce a positive B&W image and then dyed to give an orange and white version. This positive was then bi-packed with ordinary unexposed black and white negative in a specially designed camera that could run both together. Meanwhile, the foreground was set up in the studio to be bathed in orange light and a bluescreen was placed in the background.
All this meant that during shooting the orange foreground elements passed safely through the O&W film to produce a normally exposed image, while the light from the blue screen was absorbed by the orange areas, effectively enabling the actors to operate as their own travelling mattes.
The need to make travelling mattes compatible with the new era of colour film led to Technicolor experimenting with their own newly introduced three-strip technology in the 1930s (the D-P method used colour but wasn’t capable of reproducing it). Essentially this entailed filming in front of a blue screen and used the blue and red strips to generate high-contrast ‘male’ and ‘female’ mattes. It was later refined to utilise single strip colour stocks and become codified as the bluescreen colour separation process.
It’s worth detailing exactly how it works, but those of a nervous disposition might want to skip the next couple of paragraphs as they almost single-handedly show why computers had to be invented...
1. Film your foreground element in front of a bright blue background
2. Take the camera negative and produce a colour master positive
3. Print this onto B&W film through a blue filter to produce a colour separation negative
4. Do this again using a red filter
5. Take the red colour separation negative and print it onto high-contrast B&W stock to produce a positive
6. Take the blue separation negative and the red separation positive and print them onto the same strip of high contrast B&W stock. This is the male matte (clear background, solid black foreground)
7. Make a positive copy of the above. This is the female matte (clear foreground, solid black background)
8. Combine with the master positives of foreground and background in an optical printer
9. Job done. Easy, eh?
Despite all the stages, there are multiple problems with the process, namely spill, the inability to use blue, transparent objects, and the fact that any soft-edged object tended to have a blue fuzz around them.
The Sodium Vapour process was conceived to get round these problems, and was probably the most sophisticated of the dual film approaches. It was similar in execution to the Dunning-Pomeroy one, simply using sodium vapour lights to provide yellow light and adding the sophistication of a beam-splitter to send the images to two separate rolls of film: colour stock with blocked yellow light, and yellow only footage to black and white stock that produced the female matte. This could then be simply duped to produce the male matte and everything then combined.
It took the bluescreen colour difference process to improve on the results of the sodium vapour method. This simplified bluescreen work and improved its quality by reducing the number of generations needed to produce the final composite and, because each separation was taken directly from the original neg, allowed semi-transparent and fuzzy-edged objects to be added into the scene composition.
Rear projection was enormously popular for many years in studio-bound productions. It is certainly a much less technical way of compositing images – simply film live action in front of a projected rear element – but arguably the results are also less convincing. That’s not to say that Hollywood didn’t try, however, developing large screens and water-cooled pin-registered projectors, sometimes banks of them, to throw bright, stable images against them.
The key to making it convincing, as ever, lies with lighting, and it was quickly superseded as the above travelling matte processes became more sophisticated. However, it had a few advantages that kept it in use way past what many would consider to be its natural sell by date: namely it’s fast, you can pan and tilt without having to rely on motion control, it’s good for out of focus work (such as scenes taking place behind windows), and for a long time was much cheaper than bluescreen for longer shots.
Its cousin, front projection, which projects the background from in front of the action, was a rarer but arguably more interesting beast. It works by mounting a camera and a projector at right angles to each other, with a beam splitting mirror between them that reflects half the light that hits it. During filming, actors stand in front of a highly reflective background which maximises the background up to full brightness, while the foreground is strongly lit, effectively scattering the projected scene that washes over any objects in it. The camera captures the images via the mirror, with precise alignment meaning that any shadows are neatly obscured by their foreground objects.
Variations on a theme include the Zoptics system used in Superman, where movement against a background was achieved by syncing the movement of projection and camera zoom lenses, and the patented Introvision system, which added male and female mattes into the equation and allowed effects teams to split a projected background into discrete layers as a result.
There were also a whole host of tricks that could be accomplished in the optical printing process. Skipping frames was a noted way of speeding up the appearance of action, while double printing others was a sure-fire way of slowing it down when required. A pan or zoom could be added to crop out an unwanted part of the frame or to add motion such as seaborne movement, while all manner of filters could turn day to night or add fog and rain with varying degrees of success.
And, of course, the optical printer was key to getting all the different film elements of a composite shot perfectly aligned, perfectly matched with the other elements and successfully processed. Towards the end of optical’s hegemony this started getting hideously complex, some shots in Return of the Jedi, for instance, being assembled from over 100 separate elements. Nowadays all that effectively requires is more processing grunt, back then that required more than 100 pieces of film: all located, tagged and perfectly matched. And even with the triple and quad head printers that were designed and built in the late 1970s and early 1980s, that was a mammoth task.
Read part 4
Read from the start of the series here
Read part VI: physical effects models and make-up
Tags: Production

RedShark 2020 @ All rights reserved.

Comments