3 minute read
Calibrating your monitor is one of the most important things you can do to get an accurate idea of what is going on with your imagery. Colourist Blake Jones takes us through the new, simplified ASUS ProArt Monitor V2 Calibration Software.
The ProArt line of monitors from ASUS prides itself as having the truest colors that cater to the discerning requirements of colorists and graphic artists around the world. This holds true as not only are the monitors pre-calibrated in the factory but they also have an added bonus of most including an X-Rite calibration probe. Naturally other types of probes are also supported but the simplicity of the X-rite probe makes it ideal for the task. The calibration process allows you to create your own calibration and store the data into presets within the monitor. Other monitor brands typically will store the calibration data within the computer. This option works fine except when you attach another computer to the monitor there can be a loss of calibration data.
ASUS has simplified the calibration procedure to make it a simple task for anyone to calibrate a monitor. They have the calibration software integrated within the monitor’s internal operating system. This software works together with the software that you can download from the Support page on the ASUS website that matches the operating system of your computer.
Once you install the software on your computer, you then need to make the necessary connections. If your computer supports Thunderbolt 3, a single Thunderbolt connection is all that’s required to send video and data information between your monitor and computer. If you normally connect to your monitor using either a Display Port connection or a HDMI connection, an additional USB connection is required between your computer and monitor in order to exchange data information. Finally you will need to attach your probe to a USB port on the back of the monitor
Now that you’ve connected your computer to the monitor, the next step is to set your monitor to the desired settings using the monitor’s menu displays. Once we’ve done this it’s now time to launch the software that you’ve installed on the computer. When launching the software, the computer will automatically confirm that all the connections have been done correctly.
The first display on the ASUS calibration software will allow us to set up the parameters for the calibration process. When you click on the Next button it will confirm that everything is ok with your connections. When you click once again on the Next button it will ask you to select the probe that you are using for your monitor calibration.

If you click again on the Next button, you will be asked whether you want to do a Uniformity calibration. This function can either be used in the 3X3 or 5X5 grid configurations. When this is selected, the calibration patch will move into each sector and your probe has to be moved accordingly. You can easily skip this procedure by clicking on the checkbox in this window and then clicking on Next.
The next window will measure the monitor brightness. When you click Next, you will then see a grey field and a target. You then need to position your probe over the target area and click on Start. This procedure will adjust your monitor’s brightness in reference to the setting selected on the first screen in the Calibration Configuration page. Once completed it will tell you that the brightness has been correctly adjusted. You will also see a timer display at the bottom of the display. This shows you that the monitor needs to be warmed up for at least thirty minutes before the calibration procedure can continue. You do have the option of bypassing this if required. When you click on the Next button you will start the main calibration process. You’ll see the same target display appear with a Start and Cancel button directly under it. Simply position the probe over the target area and click on Start. It will first check the parameters and then ask you once again to click on the Start button to proceed. The process takes a little over ten minutes to complete.
Once the process has completed you will see a Calibration Report on the screen. You will also be able export this as a PDF file. If you are satisfied with the calibration results, you need to click on the Apply button. This will allow the data to be written into the monitor’s User Mode area.
You will also be able to view several images to compare before and after calibration results.
The final step is a display window that allows you to name your profile and select which User Mode area you would like to use for storing the data. Simply click on Save and the process is done.
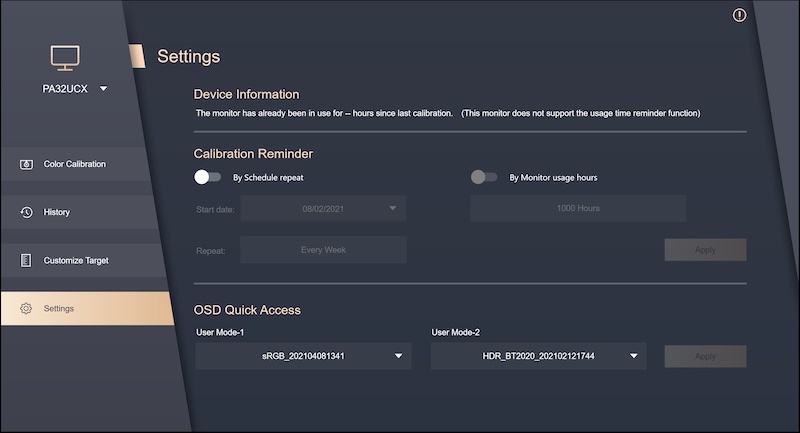
ASUS has also created an area in the software that will remind you when it is time to once again calibrate your monitor. This is extremely important as periodic calibration is very important to ensure that your monitor is always set up properly.
Tags: Post & VFX

RedShark 2020 @ All rights reserved.

Comments