
5 minute read
HDR has added a layer of complexity to grading and monitoring that is often not straightforward to deal with. AJA's HDR Image Analyzer is designed to make dealing with both HDR and SDR grades much easier.
Samuel Bilodeau is the HDR Colorist and Head of Technology and Post Production at Mystery Box. He's been working in HDR since 2015, delivering exhibition grade HDR content to companies like LG, Sony, Visio, Intel, NASA, the UltraHD Forum, and AJA. He's certified by Dolby Vision, and has been working with AJA's HDR Analyzer as a beta tester in June of 2018.
I recently spent some time speaking with Samuel about embracing high dynamic range imagery. We delved into the tools, techniques, and equipment required to make the transition.
Unlike HDR for stills, where we're capturing wide dynamic ranges and squeezing them into a narrow dynamic range, HDR for video enables a wide dynamic range for presentation.
For example, in an indoor scene with sun streaming in from a window, there's no way to represent both the interior and the exterior the way that the human eye would see them. Once you've squeezed the dynamic range to fit the narrow range the monitor supports, the result will look flat and washed out. To add contrast, your options are to let the window clip, or use HDR techniques to squeeze both into the available range while preserving the mid tones, which takes the detail and vibrance out of the highlights and shadows.
In video things have changed drastically in recent years. Higher end displays can reach as much as 18 stops of dynamic range, and the relatively inexpensive Atomos Sumo has 10-11 stops. Nearly every consumer television on the market today supports HDR, though there are several competing standards.
Though Netflix is willing to purchase quality content in SDR, any content produce start to finish as a Netflix Original must be mastered in Dolby Vision HDR. Many studios, including most of the big five already require it, so it won't be long before it's a standard requirement across the board.
In SDR, using the broadcast legal standard of 2.4 gamma encoding, we're limited to showing a little bit of super black and super white, but really not much. The brightest we can show in SDR is 2.5 EVs above the midtones, and the super white peak is around 2.7 EVs above the midtones and 3-5 EVs below.
Even entry level HDR TVs can show around 4.5 EVs above midtones, while the full Dolby Vision specification allows for 9 EVs above the midtones, and up to 13 below. The more conservative HDR10 standard support around 5.8 EVs above the midtones.
The additional range that HDR opens up enables a range of whites and a range of blacks, so it's now possible to show contrast and detail within each. This makes it possible to show a scene with the same brightness we're used to, but with the sun a blazing six or seven stops brighter.
This opens up a lot of options.
For an easy start into HDR mastering, you can take a scene and master it with the same brightness in HDR as in SDR, but let the highlights be brighter and shadows darker. What this amounts to is basically the same image as in SDR, but but with detail in the shadows and highlights. Clouds for example, that would look in SDR like a mass of flat grayish white can have detail so that the shadows cast on each other give the clouds the definition we're used to seeing in real life.
Though Samuel recommends this as a starting point, he doesn't recommend it as a long term approach to mastering for HDR because it leaves a lot of creative potential on the table.
Instead, Samuel recommends moving the midtones; in other words, go ahead and change the brightness of the midtones to suit the scene; let them be brighter for a sunlit outdoor scene than for an indoor scene lit with artificial lights.
His reasoning is based on how light behaves in the real world. In an outdoor scene, especially on a clear day, everything is bright, even skin tones that in the SDR world we would normally place at 18% grey will be brightly lit. Indoor scenes on the other hand typically have a lot less light, even on a sunny day because there's so much less ambient light filling the space, so everything is darker.
With HDR we now have the freedom to make an indoor scene dark and foreboding, and the scene immediately after can be an outdoor scene where even the shadows have more ambient light in them than the highlights indoors did, leading to a much more cheerful scene.
Samuel describes this as, "contrast and dynamic range between frames," which reflects what we would experience if we actually walked outside on a sunny day. Even though our eyes adjust, we can feel the change.
To embrace HDR, you'll have to make some changes to your workflow, tools and equipment. Here's the overview.
The first thing Samuel mentioned is that on a normal monitor, an HDR image will look wrong. It will look flat like a log image because of the way that log encoding redistributes brightness values. So the first requirement is a monitor that can show HDR. Samuel Recommends the Atomos Sumo and SmallHD 1703 P3X at the low end. The Sumo is less expensive at around $2000, while the $4000 SmallHD 1703 has a wider color gamut and a 10-bit panel, though a lower peak brightness. Both are good for starter HDR monitors. Samuel uses and recommends a Sony BVMX300 and a Flanders Scientific XM310K.
For more information about using these for grading for HDR, see this article Samuel wrote.
To see an accurate preview of the scene's look, you'll also need to adapt the footage for the monitor's color space. Since we aren't able to simply let go of SDR yet, it's also important to view the image in SDR as well.
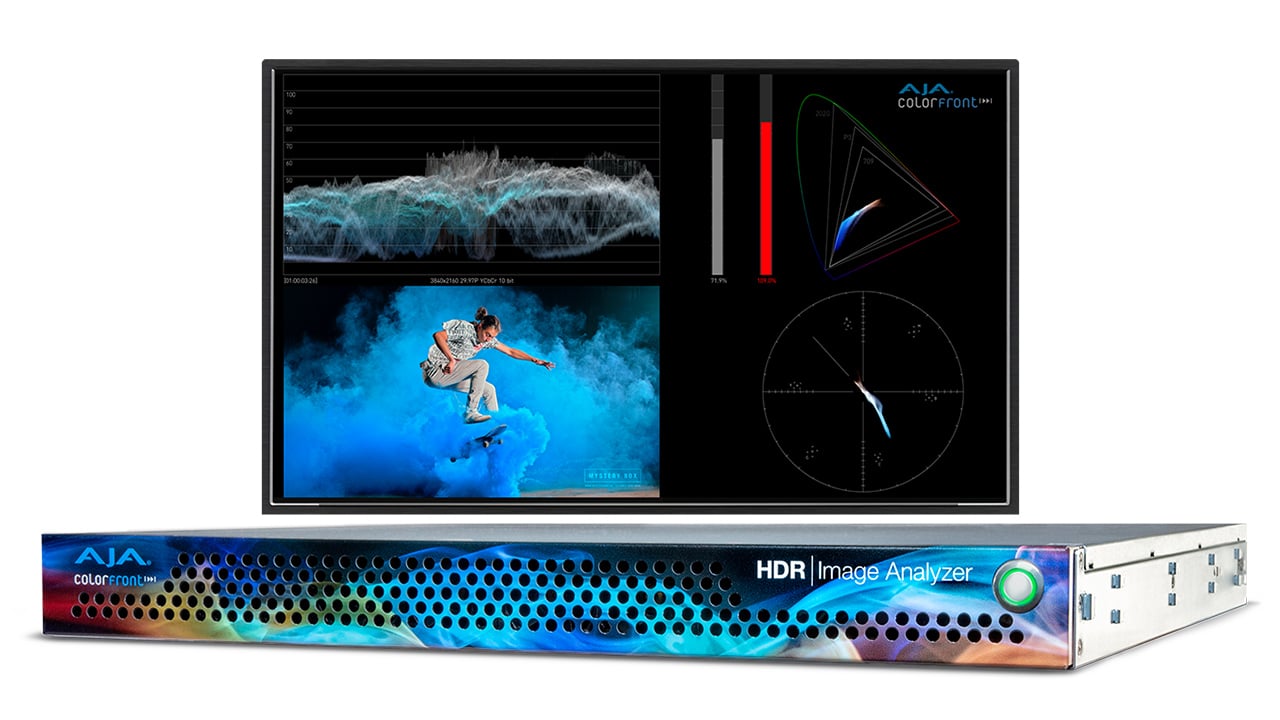
That's the first place in the workflow where AJA's HDR Image Analyzer comes in. The Image Analyzer can take an SDI feed from the camera and display scopes showing the color and EV range of the camera signal or HDR signal. It displays an RGB parade that shows how the camera interprets the scene's color and lighting, and it can even show how many EVs above or below reference an individual pixel is. It's an incredibly powerful tool for planning the color and lighting in a scene for HDR and SDR.
For offline editing, it's business as usual. Render dailies for offline editing with Rec.709 and edit there. Since NLEs generally don't handle HDR well, be sure to conform back to the original camera media in order to have access to the full recorded dynamic range and color during grading.
In a color grading application like Resolve you'll have to switch the scopes to HDR mode. The histograms will then show the full range of brightness values available.
The larger color gamuts also show skin tones in a different location on a vectorscope, which makes the scopes harder to use in HDR.
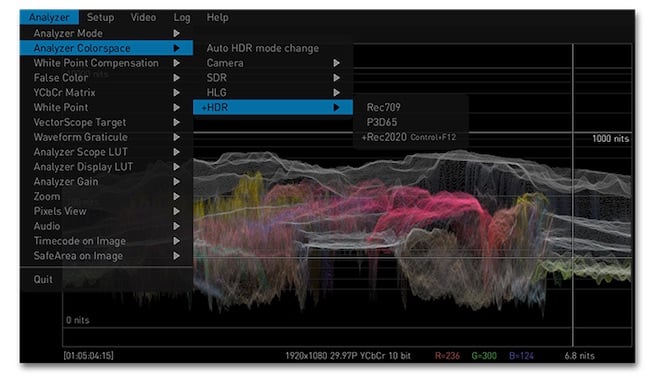
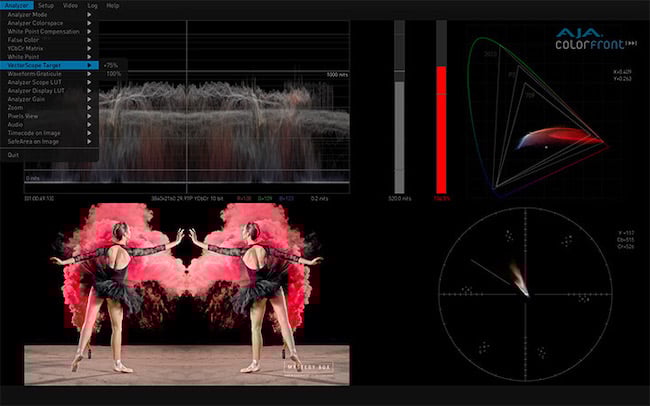
AJA's HDR Image Analyzer replaces the internal scopes. Once you configure it with what color space you're working with, it will show you where pixels land in the CIE (absolute) color gamut, and shows an HDR waveform or RGB parade for PQ HDR, EV based waveform or RGB parade for HLG HDR and camera LOG, and a vectorscope with an adaptive skin tone indicator that provides a reference for skin tones for any color space. It lets you focus down to individual pixels or groups of pixels to see their exact brightness, and includes a peak brightness indicator and P3 D65 gamut indicators to inform you of any colors that are falling outside of the the color gamut of your display.
Although it isn't mandatory for HDR grading, Samuel did tell me that it's been a huge help. It makes it a lot easier to see what he's doing a lot more quickly than traditional scopes do, and gives him the confidence of knowing exactly what's in his image. It's made lighting and exposing for HDR easier in the studio, and it's enabled Mystery Box to learn a great deal about how HDR works and how to use it.
Samuel recommends the HDR Image Analyzer so highly that he recommends purchasing one even before getting an HDR reference monitor, because when combined with a low cost HDR display like a Sumo or P3X you can get most of the way to a professional grade solution for 1/3 the price of a BVMX300 or XM310K.
Mystery Box has a series of articles on how to get started mastering in HDR, LUTs that can help you get started using less expensive monitors while you work your way toward a more professional solution if you can't yet afford an HDR Image Analyzer right now.
Tags: Production

RedShark 2020 @ All rights reserved.
Comments