7 minute read
 Testing the portability of the Blackmagic Pocket Cinema Camera 4K
The Blackmagic Pocket Cinema Camera 4K has a lot of detail and nuance to it. In the last part we covered its general features and how its dual gain (ISO) circuits allow you to have flexibility and control over exposure despite the lack of an ND wheel. In this part we want to focus in on some of its more detailed functionality.
Read part 1 of this review here, and the final part 3 here.
The setup menus on cameras can often be a maze to navigate. Sub menus within sub menus present themselves to you in a seemingly never ending mire of complexity. Blackmagic Design has always gone to great lengths to make sure that this isn’t the case with its own systems, and it has won plaudits with previous models such as the URSA Mini for the ease at which users can navigate the many settings.
The BMPCC4K is no different, except that the company has gone even further to make the menus easy to use. There is a design ethos to the BMPCC4K that simply says “ease of use”. The idea behind the way that both the setup menus and the main control interfaces are designed is that once you have created your base setup (eg your frame rate and resolution), you shouldn’t need to enter that menu again for your shooting day unless you require something highly specialised, such as 120fps slow motion, which I’ll come to later.
The setup menu system is split into six very clearly labelled sections, Record, Monitor, Audio, Setup, Presets, and LUTs.
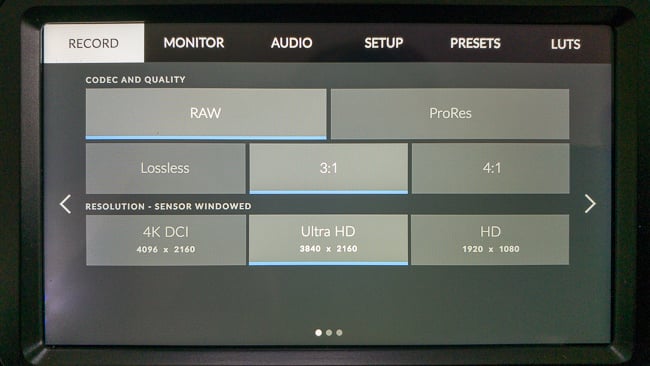
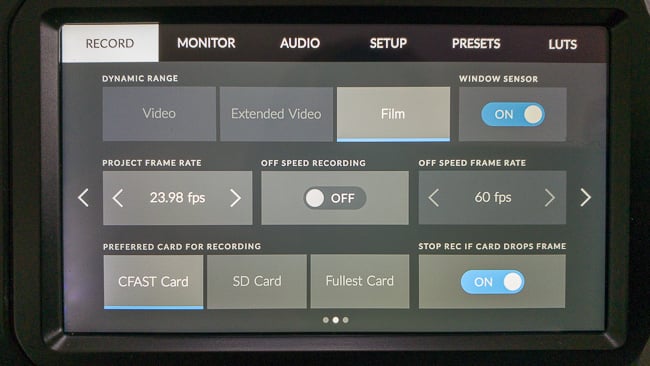
“Record” sets up your codec type and resolution, your colour gamut and gamma (Video, Extended Video, Film), frame rates, Timelapse set up, and even detail sharpening (which by default is off) and can be set to Default, Medium, and High. This latter setting is interesting because traditionally BMD cameras do not do this, but if you are in a television environment recording to Video (Rec.709) mode it may be useful.
Frame rate set up is also interesting. URSA users will be familiar with this, but you can set up a project resolution, and then an off speed frame rate separately. As per any other setting that may need to be accessed during actual shooting, the off speed frame rate setting can be adjusted without needing to enter these main setup menus simply by pressing the HFR button, and touching the frame rate on the screen.
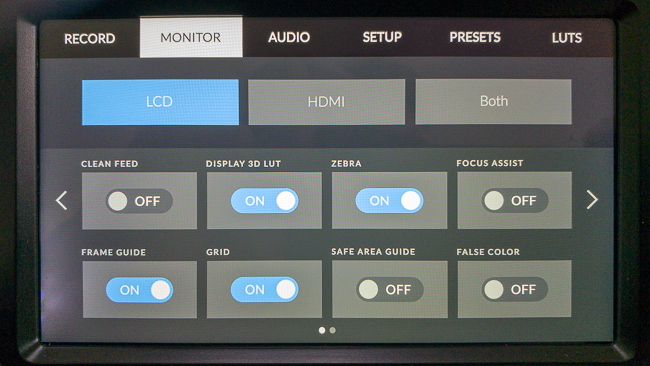
The “Monitor” section gives you access to everything you need to setup your various outputs and overlays for both the built in LCD and the HDMI output. “Audio” is pretty self explanatory and gives access to set up your audio sources and channel gains, although again the main audio adjustments are also available directly from the main shooting interface. Although it is from within this menu that you can toggle the phantom power on and off.

The “Setup” menu is delightfully simple. Here you can set the date, language, whether you want shutter angle or shutter speed, image stabilisation on/off (for lenses that support it, and timecode drop frame. There’s even a flicker free shutter function. Further settings allow you to configure your multi-function buttons as well as Bluetooth pairing for remote setup and control amongst other things. But again it is all presented in an extremely simple and clear to understand way.
“Presets” is a way to save different camera configurations and recall them quickly, while “LUTs” deals with the loading and selection of, well, LUTs.
The BMPCC4K comes configured with four LUTs you can use with the cameras Film mode. Pocket 4K Film to Extended Video, Pocket 4K Film to Rec 2020 HLG, Pocket 4K Film to Rec 2020 PQ Gamma. You can also load your own 3D LUTs by simply copying them to the root of an SD card.
LUTs can be used in two different ways. They can be used to make monitoring while shooting in Film (log) mode easier on the eyes. But you can also hard bake the LUT into the recording too. When you are using a LUT simply for monitoring the camera will display a little “LUT” symbol on the top left hand side of the display. However, usefully when you are hard baking a LUT into the recording it will show an entirely different LUT symbol in bright red so that you are kept alerted that you are baking in the look.
However don’t make the mistake I made once. I had the camera set to Extended Video mode and for some reason thought by using the LUT toggle button I was going between Film mode and Extended Video. By mistake I was simply adding the Extended Video LUT on top of the existing Extended Video setting! For the recording at the time it didn’t matter since I wasn’t hard baking it, but it did explain why I found things so contrasty on the monitor!
The BMPCC4K only has a single Mini-XLR in for direct balanced audio. However it also has a 3.5mm mic in as well. Now, as a main audio input I would most definitely opt to use the XLR input as my primary preference. It is clearly much more robust for day-to-day use than any 3.5mm jack ever will be. But with that said the setup options are flexible. You could adapt another XLR mic, or any other type of mic for that matter to be used as a second source of sound through the 3.5mm jack.
Within the audio setup menus you can independently select the source input for both of the stereo channels that are available. These options include Camera (internal mic) left, camera right, and camera mono. For external mics you can choose between XLR Line, XLR Mic, 3.5mm Left - Line, 3.5mm Right - Line, 3.5mm Mono - Line, 3.5mm Left - Mic, 3.5mm Right - Mic, and 3.5mm Mono - Mic.
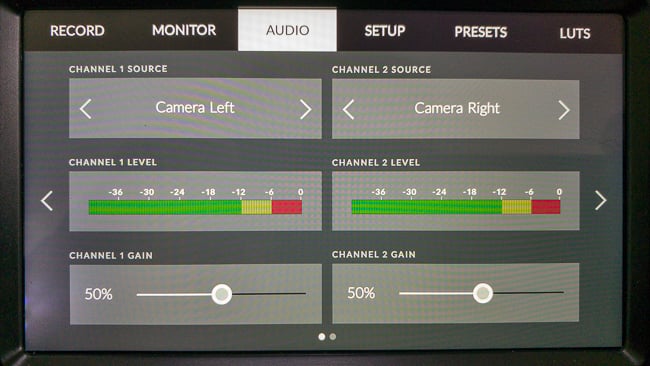
The 3.5mm mic jack is stereo, and you can select between the left and right channels or do a mono mix. But you will not be able to, for example, have an XLR mic going in through the XLR input set to the right hand channel, and then have a stereo input going in through the 3.5mm on the left, and still have independent levels control over both 3.5mm input channels. You will have to choose between left, right, or mono for each respective recorded channel of audio.
With the optional selection of phantom power as well, the audio side of things is well covered. During use the audio meters are very responsive. There is the merest hint of a response delay, but it is very, very minor.
The audio meters are big, and very clear in the bottom right hand corner of the main LCD display, and helpfully they also have clear dbfs markings. Touching the meters brings up audio levels controls, controlling both the left and right channels/inputs as well as headphone output.
Download a sample of audio taken from the camera below. These were taken using the on-board camera microphone as well as a Sennheiser wired lav mic, some with the gain set to max to really show up any noise. Are the audio circuits totally quiet? Not quite, but they are a vast improvement on the original BMPCC, and by any measure the preamps are very quiet.
The main user interface during shooting is also very clearly laid out. Like everything with this camera, the important stuff is there without clutter. Touch a part of the screen and the camera will focus on that point. Touch any of the shooting info and you can set it up. For example at the top left hand side of the display is a little target box. Touch it and you can easily set up zebras, focus peaking, frame guides etc. On the subject of frame guides, there is a good selection from 14:9 all the way to 2.40:1. I would like to see 2:1 in there as well, but currently it isn’t present.
Pressing on the timecode toggles between record run and time of day. The rest such as ISO and white balance is pretty self explanatory, although it is worth noting that the white balance can be adjusted in 50k increments as well as offering an AWB option as well.
A swipe up on the screen clears the display from all HUD info, while another swipe brings it back. A swipe across brings up a screen for setting up clip and project metadata. All of this metadata, including Day and Night, Int and Ext can be read by DaVinci Resolve to make clip organisation easier later on.
One of the stand out features of this camera is that it offers off-speed recording, which in short means glorious slow motion! In 4K this goes up to 60fps, while in 1080p you can go all the way to 120fps by windowing the sensor.
I know of one person in particular who likes his slow motion to be recorded with sound so that he has the option of ramping or choosing his playback speed later for maximum flexibility. In 4K modes, both DCI and UHD, he could do this in a couple of ways. The first is that he could simply use the camera by setting it to 50p or 60p. All sound will be recorded this way and if he used the footage in a lower frame rate editing project he can obtain realtime speed by the NLE dropping frames.
Another way to do it would be to, say, set the camera project frame rate to 25p, but set the off speed frame rate to 60p. This way when the off-speed HFR button is pressed the footage will record at 60, but playback automatically in slow motion.
This applies equally to shooting at 120fps in FHD mode. This windows the sensor by 2x, but remember that you are windowing a full 4K of resolution. You can then record 120fps continuously and it will automatically play back in slow motion. But there is a very handy feature that the BMPCC4K employs when it records these off-speed clips, and I found this applied to the URSA Mini Pro as well. The camera still records sound in off-speed mode. When you play the footage back in slow motion the sound will also play, although because the audio comes through in realtime it is not synced up to the action happening on screen.
What’s the point of that, you may ask? Simple, if you want to speed ramp later in post and have some of the clip with audio, you have all the sound there. A lot of cameras will only record slow motion silently, which reduces options later, or requires off-camera sound recording. It seems like a minor feature, but one that I know can come in very useful.
Lastly regarding windowing of the sensor. When you select UHD mode (3840 x 2160) the camera will have the “Window sensor” button engaged. This is normal and is simply because of the difference between operating in UHD resolution versus the full DCI 4K (4096 x 2160) resolution.
That’s it for this time. Tune in for the final part of this review where I will be delving into battery life, whether you need a cage, and those all important example clips!
Tags: Production

RedShark 2020 @ All rights reserved.

Comments