7 minute read
Updated Replay: The GoPro series offers a huge number of modes and options. Here are some go-to tips for getting the most from such a camera.
 The GoPro can produce incredible results. If you use it correctly.
One criticism about action cameras is that the results that most people get look nothing like the amazing footage that the pro athletes capture for the sizzle reels. Any camera, and the resultant footage will be reliant on good light and an interesting subject. Furthermore, frame composition doesn't just go out of the window just because the frame is dynamic. When using an action camera we must remember that it does some things really well and other things not so well. So the key to getting good footage with it is using it to do the things that play to its strengths.
Here's a few quick tips to make sure that you are at least starting off from the right footing in order to get high quality footage.
The biggest criticism of cameras like the GoPro is the fisheye look. It’s a consequence of having such a wide angle lens that has been made to a budget to fit on such a small camera. But just because it is the default look, it does not mean you have to keep it. With the 5K resolution available on the latest camera it is an easy thing to get rid of in post. The camera itself also has a ‘Linear’ mode, which gets rid of the fisheye distortion in-camera.
Linear mode does crop into the sensor, but the cameras are so good now that as long as you have good quality light it works really well.
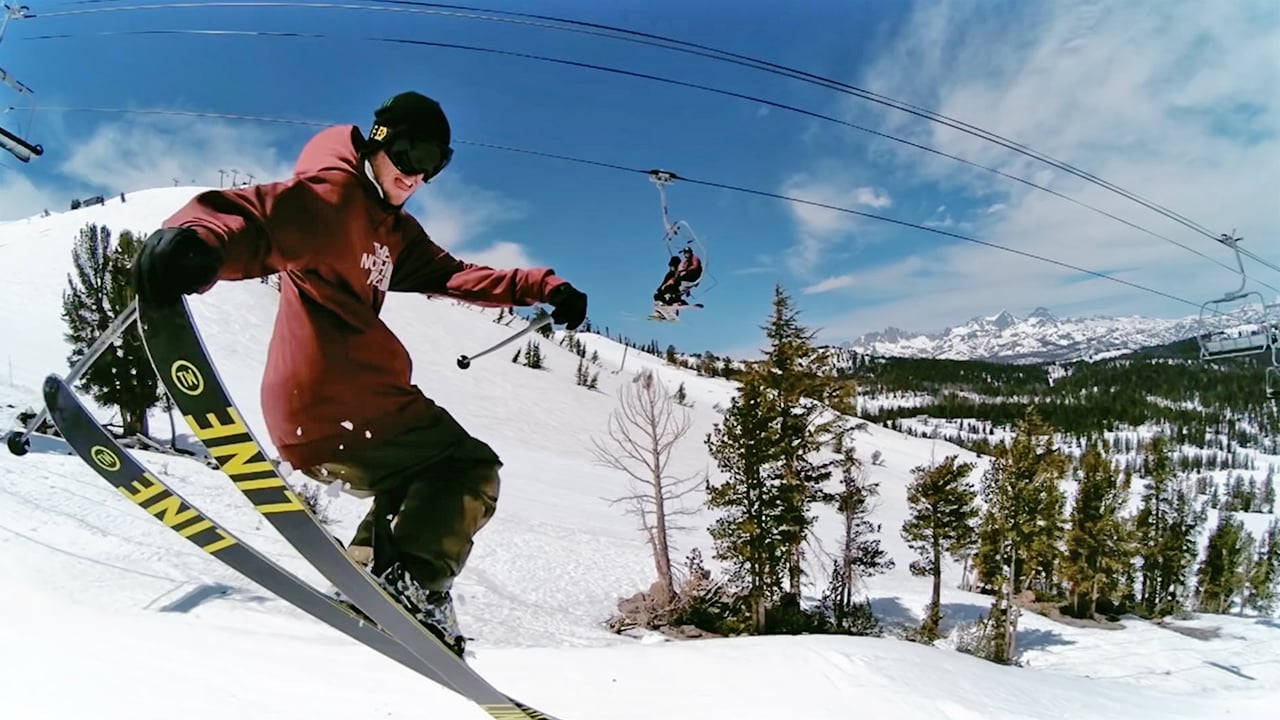
 This shot was easily corrected in post using a Hero 6 Black to get rid of the 'fisheye' look thanks to the 4K resolution.
This is incredibly important and ensures that the camera is recording to the highest bitrate possible. On older cameras Protune was turned on and off. On later cameras Protune became an integral part of the camera picture profile setup menus.
On the Hero 6 for example it is automatically activated once you change a picture setting, such as detail or the colour profile. On the latest Hero8 and Hero9 models you can adjust each individual property at any time.
Always turn High Bitrate on to make sure that you are capturing the highest quality image. On low action shots you might not notice much difference. But once things become rowdy you'll be happy of the extra picture information. Reduce the sharpness setting to medium or low. The Hero8 looks great with a medium sharpness setting. The Hero9 is currently still a little too over sharpened in medium to my liking, despite the recent firmware update. But expect this to be tuned further in later updates.
Either way, you don't want the camera set to high sharpening because this not only makes the picture harsh and 'video' like, but it can also sap the effectiveness of the codec.
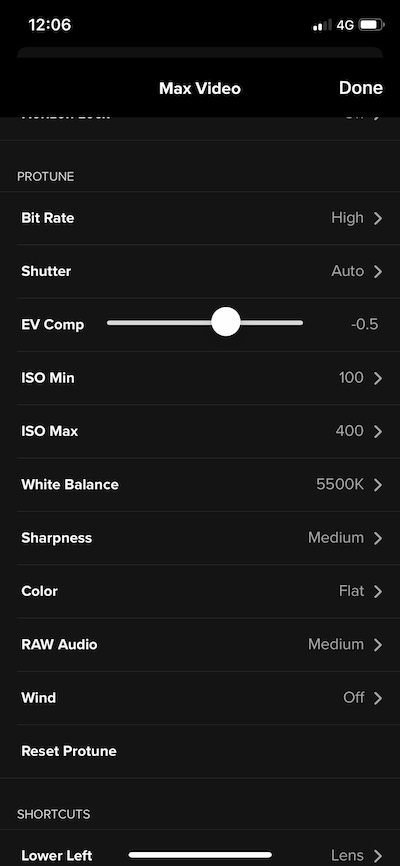
The Hero5 to Hero8 all have one issue that can rear its head from time to time. On highly saturated colours such as blue, the colour channel can clip in a very ugly way if the exposure is too high. Learn the conditions where erring on the side of caution with a one-stop under exposure compensation in the picture settings can help avoid such situations as well as switching to the 'flat' colour profile. It doesn't always eliminate it though. In those situations sometimes switching the native white balance mode on can also help, although you'll need to have some grading knowledge to work with that.
Thankfully the newest Hero9 doesn't suffer from this issue and instead deals with extremely saturated colours much more naturally.
Such a small sensor as found on a camera like the GoPro is never going to be great in low light. In addition it is better to be in control yourself when it comes to exposure control rather than leaving it to the camera. Force it to adjust exposure using the frame rate by setting the maximum ISO to 400. In bright conditions setting this to 100 ISO is even better. This way you will reduce the possibility of unwanted noise.
Sometimes in lower light you might want to let the camera run to ISO800, but much above this and things get nasty. It's just the way of small sensors.
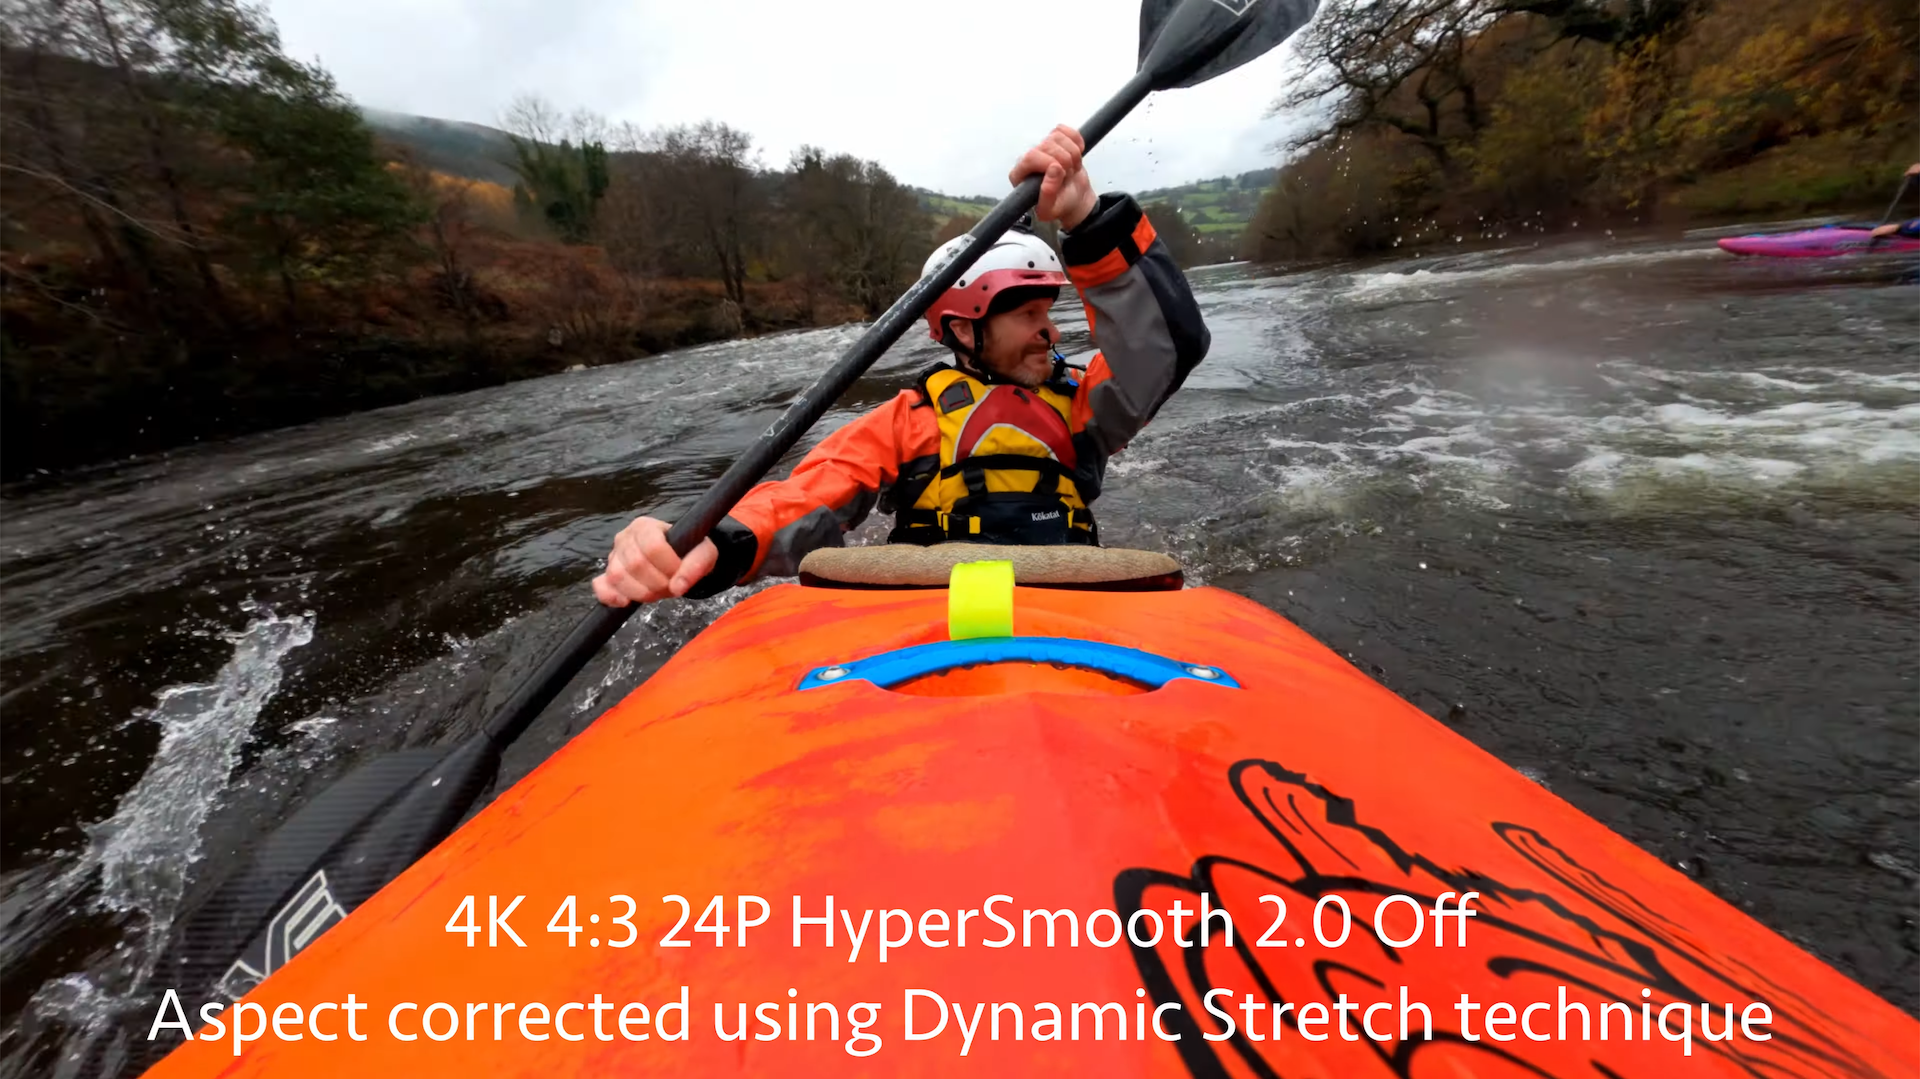
A great all-round mode to use on the Hero is the 4K 60 wide setting. This allows ultra high resolution imagery along with a fantastic half speed or more slow motion when edited on a 24, 25, or 30p timeline. But it isn’t always the best for the circumstances. For POV shots it is often better to use one of the 4:3 or Superview modes. The 4:3 modes record a much wider angle of view height wise (along with more pixel resolution), and a slightly wider view horizontally. For experienced editors, these modes will either need to be cropped or have their edges dynamically stretched in post. The results can be very immersive. Superview does the same thing, but bakes in dynamic stretch. Superview is the mode to use if you are more of a technophobe.
On newer cameras equipped with Hypersmooth the jitteriness can be taken out of POV shots at the expense of some image crop. The Hero9 can use a lens attachment called the Max Lens mod, which I'll be reviewing very soon just as soon as lockdown allows me to do something interesting!
The Max Lens Mod gives you a 150 degree POV with minimum distortion and perfect stabilisation. You don't have to use horizon levelling either, which means that POVs can be kept dynamic looking.
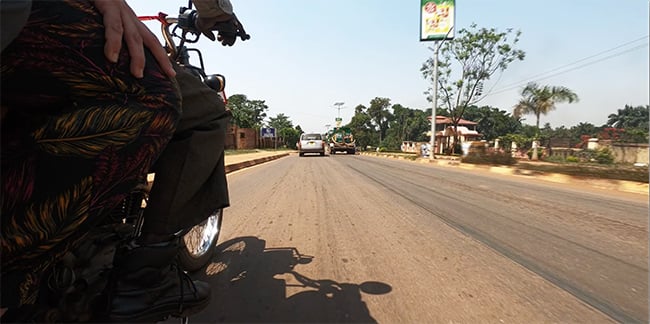
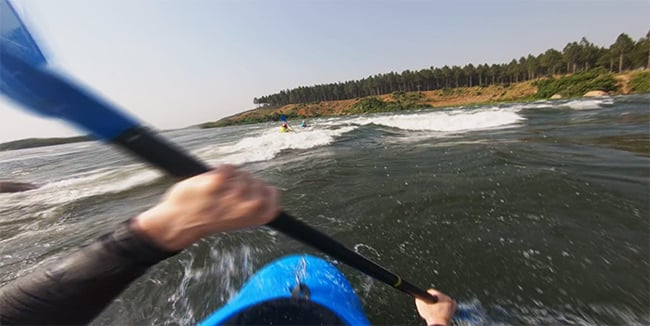 An example of a POV shot taken in 4:3 mode and dynamically stretched to fit a 16:9 frame using the Hero6 Black. More sense of speed and immersiveness is imparted compared to default 16:9 setting.
4K may be taking the world by storm, but HD is still very valid, even in a 4K timeline. This is because the GoPro can record 1080p at up to an amazing 240fps. Granted, there is some aliasing, but in the right circumstances it can give you incredible slow motion. If the shot is good, and the subject matter interesting, the slight picture deficiencies with this setting are easy to overlook. For a slightly lower, but still exceptionally good slow motion, 2.7K can be recorded at up to 120fps with virtually no picture compromises.
In bright sunshine, even at high frame rates, you might want to make things look more natural, rather than leaving the camera to its own devices and end up using some rather high shutter speed settings. To counter this, get hold of some good ND filters, such as the ones from PolarPro.

The beauty of decent GoPro footage lies in its immediacy. It needs to be used in a way that plays to it’s strengths. And that means getting as close as you can to the action or at least ensuring that it is right in amongst whatever action is happening. Sometimes this is difficult, but using the many accessories such as long poles, gimbals, and other more ‘agricultural’ and imaginative methods to mount the camera will pay dividends. Get creative with your mounting.
360 action cameras like the Max or the Insta360 models are great for getting shots where the gear you used to mount the camera can be made to become 'invisible'.
With such a wide angle lens, lighting flare can be a big issue with a GoPro. This problem is compounded if it has had a lot of use and is scratched. Protect it when not in use with an after market lens cap, replace one that is scratched, and protect a new one with a good GoPro lens protector. These work in the same way that a screen protector works for a mobile phone screen, and the good ones work very well indeed, and they usually come with a screen protector, lens cap, and spares in one pack.
Finally, beware of water droplets if you are doing watersports. Some people use RainX, but often a quick lick of the lens before you film something important will do the trick very well!
You can also buy lens protectors that have hydrophobic qualities, such as the Xclear products.
The latest Hero 6 firmware solves a few of the issues that the camera suffered from since release. One of these was to do with the digital stabilisation. When the camera was first released the stabilisation was exceptionally good, but it couldn’t cope very well with purposeful pans and tilts. The latest firmware, while still not totally perfect, has improved things hugely in this regard.
Even if your camera is mounted on your helmet, be careful to adjust your camera angle on its mount carefully. Just because the GoPro has a very wide angle does not absolve you from having to compose an image.
This often means anticipating the angle you will be while filming. For example, if you are going mountain biking and are using a chest mount it is actually better to mount the camera upside down and tilt it upwards to around 45 degrees to account for the fact that you'll be leaning forwards when riding the bike. Make sure that the camera has its orientation lock option turned off so that it can automatically make the footage the right way up during recording.
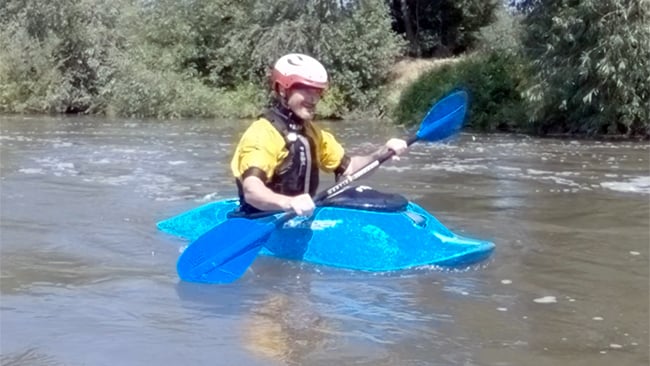
The same goes for helmet mounting. If you align the camera so that it is facing directly ahead from the helmet you might end up missing a lot of action. On a kayak sometimes you need to angle the camera down a bit so that some of the nose of the boat can be captured, adding some dynamism to the shot. On an MTB it might need to be angled up to account for the forward tilt of your head.
If you are head mounting and climbing or bouldering you might want to angle the camera to face a sharply downward angle. This lets you capture your arms and feet, as well as ensuring you are capturing where you are going when you look at the climb ahead, rather than just ending up capturing lots of sky!
The key here is to experiment before you head out on your trip.
On a separate note, when you are wearing a GoPro on your head, you are the camera. Learn how to smoothly move your head and to resist the temptation to nod when speaking to people.
It's tempting to use Hypersmooth all the time. Sometimes though, particularly with shots where the camera is mounted to a vehicle you don't always want it turned on. It can be cool having the 'floating camera' look, but it's worth experimenting to see what looks best.
This is by no means an exhaustive list of things to do, but it will hopefully help out those who are newer to the camera. Some of these suggestions will also apply to other action camera makes as well.
Do you have any advice and tips of your own? Let us know in the comments below!
Tags: Production

RedShark 2020 @ All rights reserved.

Comments