7 minute read
 LumaFusion is the first serious NLE for mobile devices
Review: LumaFusion from Luma Touch is positioning itself as the most powerful editing system for mobile devices yet seen. We take a look and tap into its potential.
In my recent review of the Gnarbox I hinted that the solution to lightweight editing on the move with an iPad was upon us. But there was one more ingredient missing to make this happen, and that’s an effective and useful NLE. Until now.
LumaFusion has been available for a while, but only recently has it gained full compatibility with the Gnarbox. This new ability opens up a whole raft of possibilities now that the storage woes of the iPad are no longer a barrier to editing.
As an NLE LumaFusion has good pedigree, with many of its development team being responsible in the past for the Pinnacle editing systems. LumaFusion works on most iOS devices such as the iPad and iPhone, so it is versatile, too. So let’s cut to the chase and explore what it really offers.
When you first load up LumaFusion it looks like, well, a NLE! The interface immediately looks more ‘pro’ than many of the alternatives (such as iMovie). As you’d expect on a touch device, the interface initially looks a bit simplistic. But this is deceiving. The layout is certainly uncluttered, which is a good thing given that it also has to be usable on small screens.. But there is a lot of power under the hood. Global and project settings are easily modified. A glimpse into how in-depth these are comes when you look at the global settings, and you are given different options for fitting odd aspect ratio footage into your current project, such as Fit, Fill, Focus, and Stretch. There are also settings for the default length of inserted photos, titles, and transitions. Preview quality can also be changed to help performance on slower devices.
The interface has a few different preset layouts available so you can select the one that works best for you and the device that you are using.

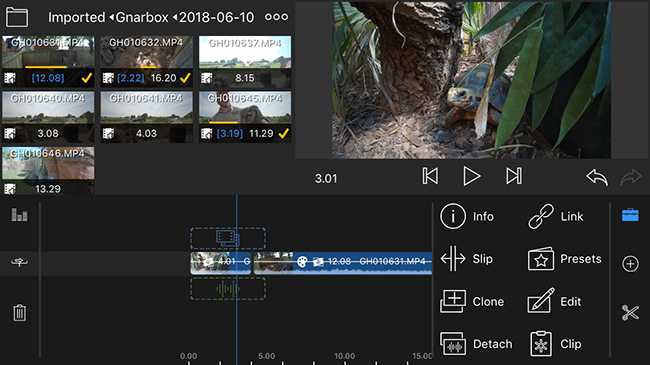
Once the Gnarbox is connected to the device and LumaFusion is loaded, the Gnarbox appears on the list of footage import sources. If you imported and logged your footage using the Gnarbox app it will be transcoded ready for editing, and you can import straight into LumaFusion. Depending on the length of the clips the time it takes to do this will vary. With long clips it can take some time. But once this is done and the footage is imported into the editor and onto the iOS device, you are not reliant any more on having the Gnarbox powered up and connected until you need to render out a high quality version of the file using the original footage, or exporting for editing elsewhere, which I’ll come to in a bit.
Once the footage is imported you can select the relevant folder where you will be presented with thumbnails of the clips. Tapping on one of these places it in the trimming window. This is where the amount of thought that has gone into LumaFusion becomes apparent. Initially the trim window appears in the top right of the interface, and on a phone this is rather small. But a simple double tap on it brings it all up full screen. You can finger slide through the clip, and a clear blue line shows you where about in the clip you currently are.
Trimming can be performed in a few ways. You can click on the in/out icons to mark in and out points, or you can simply swipe down to mark an in point, and up to mark an out point. But that’s not all. One of the questions that you might have thought of is regarding how frame accurately you can make an edit? The answer is very! Simply navigate to the rough area of the clip you’d like your in/out point to be, and then swipe either left or right on the clip view to move the play head in single frame increments. Then swipe down or up to mark the edit point you’d like without accidentally nudging the playhead. The region you select can also be slid left and right. Frankly it’s brilliantly thought out.
More power is revealed when you click on the clip info screen. The clip name can be modified for easier reference, as well as notes added about it. Full clip details such as the frame rate, codec, and file size can also be seen. Clips can also be tagged with colours for easier reference. Double clicking on the clip again puts it back to the right hand corner of the editing interface. The clip can either be dragged onto the timeline, or you can click on the insert icon.
Once the clip is on the timeline it can be dragged easily to different positions, and you can grab and drag the in/out points as well. In fact the timeline in LumaFusion behaves in a very similar way to the one in FCP X. It even bears a slight visual resemblance to it. On the far left of the timeline is an icon that allows you to switch the mode of operation. In its default position if you drag a clip from the middle of an edit the timeline will act like the FCP X magnetic timeline and automatically shift all other clips back to fill the gap that is left (insert edit). Pressing the icon changes the mode of operation to an overwrite mode, and other clips will be left in place. Or if you add a clip to the timeline it will overwrite anything in that position. Lastly you can replace clips by dragging on top of an existing clip whereby a replace clip box will appear allowing you to overwrite with the existing clips duration, or a new duration from the clip you are dragging in. Clips can be split easily simply by clicking on the scissor icon.
Above the mode-change button is an audio meter icon. Tapping this once displays volume sliders for each individual timeline track along with an overall VU display. Tapping it again reduces it to just the VU meter. On the right of the timeline is a tool box icon. Pressing this reveals controls for slipping mode, detaching audio from a clip, linking it back up, effects presets, and clip editing. Many of these functions, such as detaching audio, can also be performed by other gestures such as triple tapping on a clip. Doing this enables one easy way of performing J and L cuts.
The clip editing section is where the power of LumaFusion is truly seen. This is not a toy NLE. Effects presets include such things as contrast adjustment, vibrance and saturation, blurring etc. There are also motion presets such as zoom effects and panning. You can also create your own presets. However, double tapping on a clip brings up a whole raft of adjustments that you would only have expected to have seen in a full blown NLE on a desktop or laptop machine.
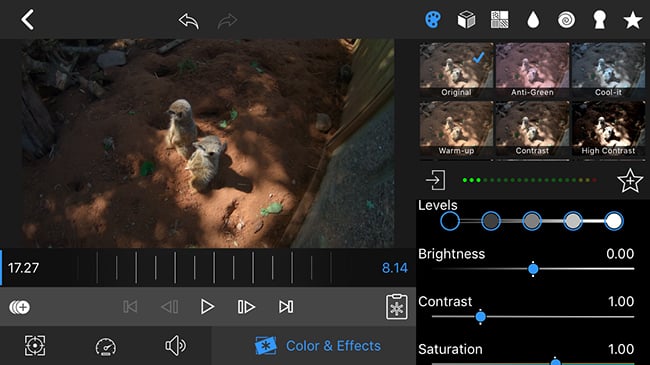
When you double tap on a clip you are taken into the effects and adjustments ‘room’. It is here that you can crop and adjust clips, level off horizons, adjust the clip speed and speed ramps (you can even tell it to maintain audio pitch during speed changes too), as well as apply colour effects.
There are a huge number of presets for these including an anti-green filter, cool down, warming up, contrast, shadow lifting, as well as stylised film and vintage looks. All of these can be finely adjusted and blended, and absolutely everything can be keyframed. There are even ‘de-log’ filters, a preset for de-flattening footage taken with FiLMIC Pro, vignetting, glow effects, sharpening, unsharp masks, and a huge amount more. Far more than I can ever list here. You can even pull footage from a green or blue screen. Or you can start from scratch and just click on ‘Original’ where you can perform colour correction right from your own base point.
All of these effects are fast and responsive, with the results instantly applied to the clip view. Playback is also very smooth even with a few effects applied. Frankly, this is a huge step up from anything you could previously expect from an iOS video editor.
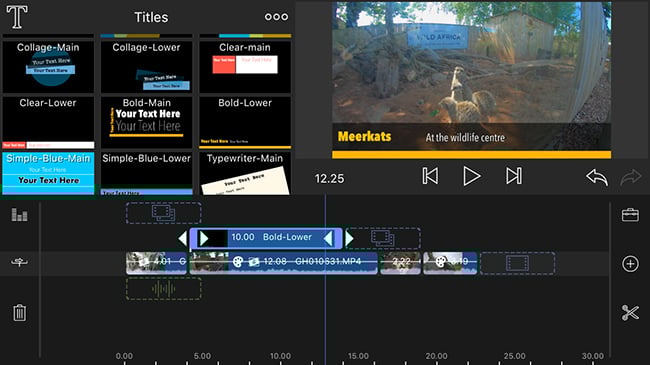
What about titles? This is all catered for as well. There’s a full library of title presets for lower thirds, main titles etc, as well as basic ones that you can all tune to your hearts content. Once again, all animatable and keyframeable, with full font adjustment.
Is that the end of the features? Not at all! Just as FCP X has a sound effects library, so the makers of LumaFusion have included a small royalty free music library encompassing different genres such as Action & Adventure, Cinematic, logo stings and much more besides. The library isn’t huge, but the quality is high.
Just when you think you’ve discovered everything about LumaFusion, it gives some more. The export options are extensive, and there’s more on the way. Currently you can export movies directly to YouTube or Vimeo, to your current device, Facebook, your iCloud Drive, wireless networked drives, Dropbox, Airdrop, and all manner of other options. You can export the full movie, or just the audio, and you can control the final bitrate up to a point as well, with 1080P options going up to 50Mbps.
But what if you are out in the field having just done a rough cut, or even a mostly finished edit, but you want to complete things on a full computer using FCP X or Resolve? In the current release you can export a project archive. This includes the EDL and all the media, so that if you want to keep an archive of your projects and want to clear space on your iOS device, you can. Saving a project archive gives you the choice of saving all the original footage files in their entirety, or in a trimmed form with 2 second handles either end to save space. You can save the archive directly to different cloud services such as Dropbox. But can also get it to send the archive via Airdrop directly to your desktop or laptop machine.
The most exciting thing is yet to come, however. In the next major update to the software you will be able to export a full FCP X compatible version of your edit for finishing on a more powerful machine. This also opens up the ability to grade and/or edit within Resolve too. Or if you use Premiere, you could import to Resolve and export a Premiere compatible EDL.
To be frank I have only scratched the surface of the power, options, and abilities here for LumaFusion. Other abilities include being able to import custom fonts, record voice overs, and the sheer power on offer when it comes to creating effects with titles and masks etc.
Does it have limitations? Of course. For example you are limited to three tracks of video and audio. But who knows if this will change in the future? The fact is that you can now perform a full edit in the field using a lightweight tablet and compact SSD storage device.
Isn’t it easier to just take a laptop? Some people may always prefer working from a laptop, but if you are in remote regions charging a laptop is much more problematic when it comes to things like solar chargers than a device such as an iPad. And any laptop that can run an editing system well still weighs a lot more than any iPad, and are usually more power hungry. And you might not want to perform a fully finished edit. Instead you might simply want to log the footage and do assemble edits to make sure things fit together, or pre-trim interview footage for when you get back to base.
Even on a phone LumaFusion works remarkably well, and it is incredibly well thought out. Even in portrait mode the interface is perfectly usable. Team it with an iPad Pro and you’ll be flying. I have not come across any other iOS app with the sheer power and abilities of LumaFusion when married with a Gnarbox. It is a triumph of design and programming and I’m pretty excited to see what the developers have up their sleeves as the software develops.
LumaFusion is available on the App Store for $19.99. For more information visit the Luma Touch website.
Tags: Production

RedShark 2020 @ All rights reserved.

Comments