8 minute read
RedShark Review: Panasonic’s AU-EVA1 was a hotly anticipated camera when it was first announced, conjouring up as it did connotations of being a mini Varicam on a budget. But can it live up to the hype?
The Varicam is a legendary camera with a legacy that goes back to the early days of high definition. The current versions of the camera are similarly well regarded. The AU-EVA1 is a camera that is designed not only to fit into every day production on lower budgets, but to fit in with the workflow of its big brother Varicam cameras.
On paper the EVA1 promises a lot. A S35 5.7K (5720 x 3016) sensor, which after the debayering process produces a full resolution 4K image with minimal artifacting, 5.7K raw output via SDI, dual native ISO modes, and high frame rate capabilities amongst other features. The current price, too, at £6168 including VAT makes the EVA1 a very tempting proposition.
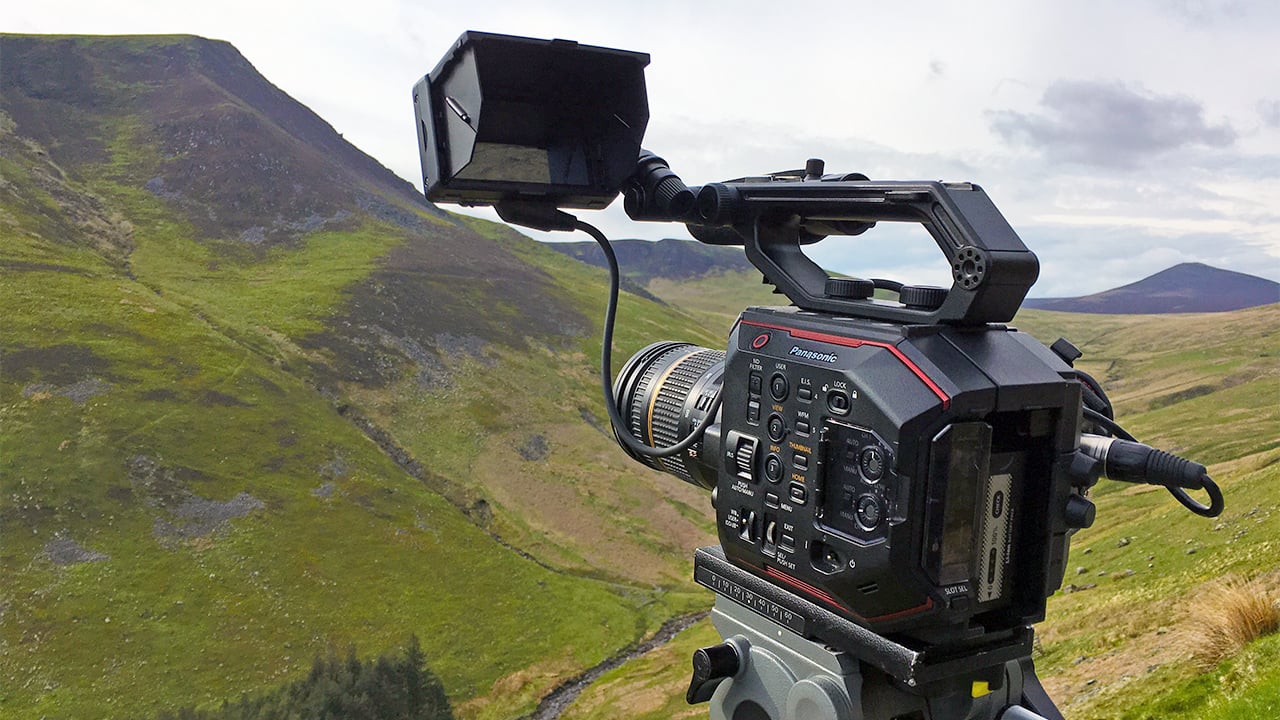
Out of the box the EVA1, with no lens or accessories attached is very light. At 1.2kg for the body only makes the EVA1 a pretty good contender for drone use.
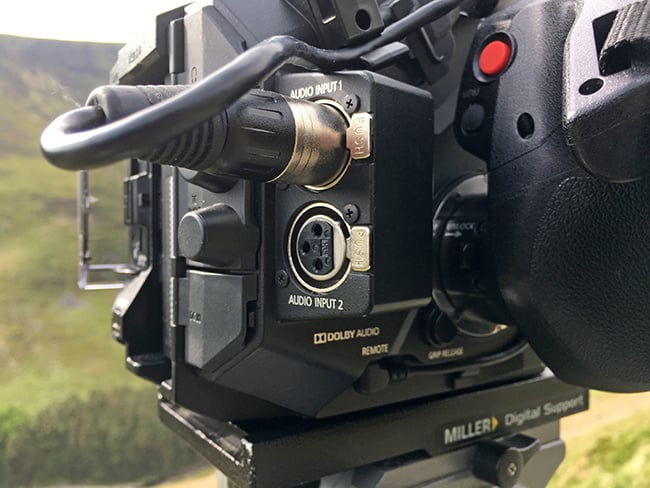
The EVA1 has the now familiar ‘box’ style form factor now expected of ‘cinema’ style cameras. Buttons on the camera are a useful size and clearly labelled. XLR audio inputs and other AV connections are placed conveniently on the rear of the camera. This makes a nice change from the weird and wonderful places we sometimes see cameras have such connections placed these days!
The EVA1 uses an EF lens mount, which makes perfect sense for a camera of this price where stills lenses are likely to be used a lot. But it also means that it is capable of utilising the many EF style cinema lenses that are now being made too.
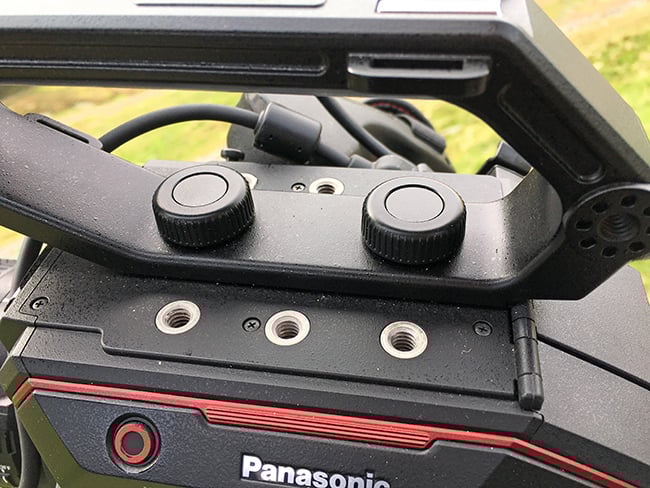
The top of the camera has a number of screw mounting points. By default the centre holes will be used to mount the supplied top handle, which screws in quickly and easily with the supplied large thumb screws. Without the handle, these mounts make a perfect area to bolt on accessories, or to mount to devices such as gimbals, or perhaps low mode on a Steadicam. It makes the camera body pretty versatile without the need to buy an additional cage.
The supplied LCD display bolts onto the side of the handle quickly and easily. There is a mounting point for this at both the front and rear of the handle depending on where you want placement. This display can also be removed from the 15mm rod arm, making it easy to mount your own display/recorder there instead if you wish. It goes without saying that if you need a cage or want other extension arms these can be utilised. However the point here is that if you are on a limited budget there are options here without having to purchase a whole set of extra rigging.
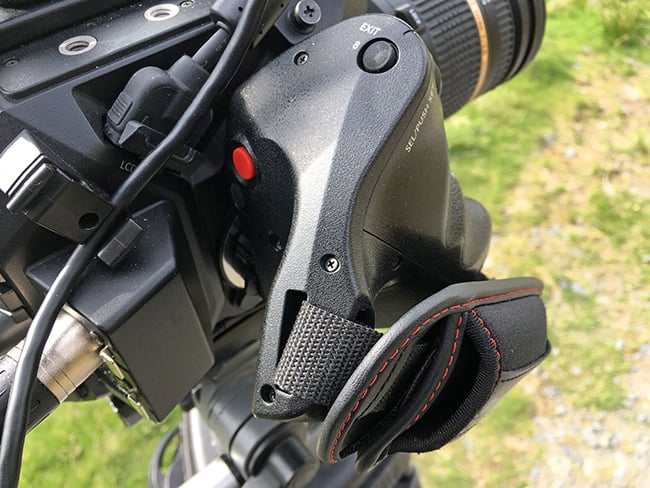
The right hand side of the camera features a removable hand grip, which features record toggles and a function dial. This grip can also be rotated for comfort. Due to the EVA1’s light weight, using this grip isn’t quite as unwieldy as other cameras with a similar system. Although your mileage for handheld operation will depend on the lens that you are using at any given time.
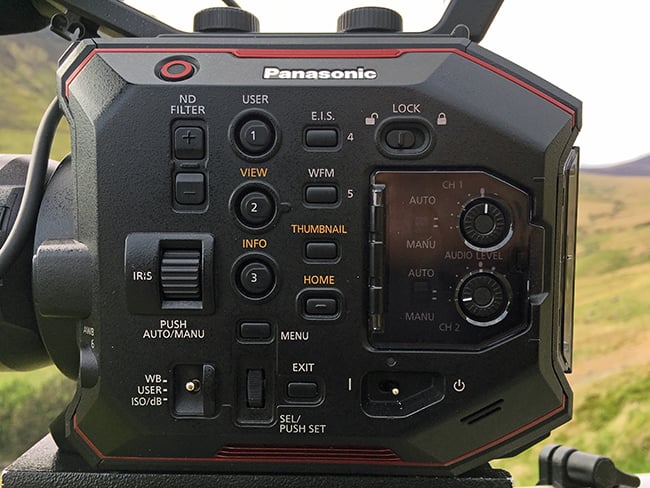
The power switch for the EVA1 is a good old physical metal flick switch. My favourite. I would much rather have this than any type of plastic slider style switch. The time to power on the EVA1 is pretty fast, around 3 seconds. It’s not the fastest, but it isn’t the slowest I’ve come across either.
When DSLR lenses are mounted, iris control is via a rotary dial on the side of the body. This is clearly labelled, and thankfully it is also fairly large and chunky, as well as being fairly well isolated. Therefore it is easy to use and you won’t be knocking any other controls accidentally while using it.
Below this is a metal switch to change adjustment modes. This is labelled for ISO/Gain, User, and WB. Another rotary dial allows you to adjust these modes. By default the User option is set to frame rate adjustment, which I found to be pretty convenient. But this can be set to pretty much anything you want, including the shutter speed adjustment. Sometimes I like to play around with shutter speeds when I am recording slow motion, so it is a bit of an inconvenience that I can’t have both adjustments available on the body at the same time, but this is only a small thing. Most of the time you will be using a 180 degree shutter.
Above the iris control are two good sized buttons for the ND filters. Pressing these activates the motors that bring the desired ND in front of the sensor. It’s simple and works well.
Other controls on the left side of the body include three user buttons, which by default bring up focus assist displays, and turn the display information on and off. There is also a button to bring up the waveform monitor, as well as playing back clips, and going into the menu system.
The main recording medium for the EVA1 is via SD cards. Very fast SD cards! There are two slots for these with a clear light showing which one is currently active and recording.
At first when I viewed the supplied LCD I found that it wasn’t very easy to see in the outdoors due to reflections. If you go into the menus there is an adjustment to boost the backlight and increase the brightness of the display. This made things more manageable so that I could at least see what I was shooting, although it isn’t the easiest to view display that I’ve encountered. A lot of the time a camera like the EVA1 will be used with an external display and/or recorder, and this should be on your list of considerations with the EVA1.
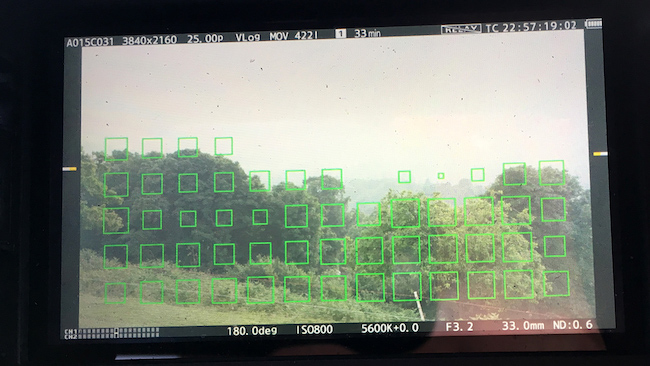
One of the difficult things about shooting in 4K and above is focus. It is critical and very hard to get right. The EVA1 has a very useful focus assist mode as an alternative to the traditional peaking. Once activated the camera overlays highlight squares onto objects within the picture. As focus becomes sharper the squares become bigger. By looking at the size of the squares and feathering the focus you can see which part of the picture is most in focus. By default the button you press you get the squares will toggle between no display, through to peaking, and then the focus assist squares. However you can delve into the menus and assign peaking or squares mode in isolation if you wish. The user assignable button on the side grip handle can also be used to activate the expanded zoom view to assist as well.
The EVA1 has a high number of recording options available from MP4 compressed AVCHD through to 422 10-bit intraframe. It is the latter that will be of most interest, although the more highly compressed LongGOP formats will still be of interest to those with limited storage capacity or who may wish to work faster for certain projects.
The fact that the EVA1 has 422 10-bit intraframe recording right from the off speaks volumes at this price range. With alternative cameras recording 8-bit max in 4K modes, this is one of the EVA1’s aces up its sleeve.
SDI output can be set to output 5.7K raw to devices such as the Atomos Shogun Inferno, which will record to ProRes RAW. Output in this mode from the EVA1 is at 10-bit colour precision.
Frame rates, too, are well catered for. Aside from the usually options of 23.98, 24, 25, 29.97, 50p, and 60p depending on the resolution you are filming in, the EVA1 doesn’t disappoint when it comes to shooting slow motion either. With up to 60fps being catered for in 4K using the S35 sensor mode (in 8-bit colour), up to 120fps in 2K/HD using this same sensor area, and up to 240fps in 2K/HD when using the windowed 4/3” sensor mode there should be enough flexibility available here for most users. Also note that in windowed modes there is a 1-stop dynamic range penalty and the ISO range drops from the usual 800-2500 to 400-1250.
Usefully, output over HDMI is also 10-bit, which opens up a lot of options when it comes to external viewing and recorders. It is also possible to elect to have different resolutions and gammas outputting over SDI and HDMI at the same time while recording internally. In other words you could record to an external recorder in V-log while also outputting a Rec-709 signal to another monitor.
Gamma choices are also wide and varied. The stand out mode here is V-log, which is designed to fit in with the full size Varicam and can record a claimed 14-stops of dynamic range. Panasonic has also included two modes which are designed to record the same 14-stop range, but be much more monitor friendly. These are called eV-Looks. These are very much like the old Cine-V and Cine-D modes from Panasonic cameras of the past. In addition there is a Rec-709 mode, HLG, as well as a couple of other gammas designed to give a bit more punch than a straight Rec-709 mode would give.
You will need to delve into the manual to discover which scene files these are contained within however, since it isn’t clear from the menu screen alone, unless you delve into the respective settings, which gamma is applied to which scene file.
If you like tinkering, the EVA1 contains extensive colour matrix setup adjustments along with many other settings that a Masters in video engineering would come in useful for!
The big talking point about the EVA1 is the dual native ISO modes. In layman’s terms dual native ISO means that you can switch the camera into a specific higher ISO mode and suffer no drawbacks when it comes to picture noise. More cameras are starting to feature this now, and it is an amazing thing. Not only does it open up more possibilities for low light shooting, but it also helps during daylight as well. How?
For instance I decided to try out the slow motion of the camera by filming some mountain bikers in a forest. Ordinarily I would need to open up the iris, reducing the depth of field. Which when following fast action isn’t necessarily what I would need or like. Bumping the camera into the its higher native ISO mode of 2500 meant that I could stop down and increase the depth of field while suffering no noise penalties.
While I haven’t the facilities to make any meaningful analysis of the dynamic range between the two native settings of 800ISO and 2500ISO, I can say that from what I have seen of it there’s nothing not to like about it, and I hope even more cameras gain this ability in the future.
That said, the EVA1 is not a low light monster. The dual native ISO certainly helps when shooting in lower light, but don’t expect to be shooting in near darkness and making things look like daylight!

I liked the EVA1. It is a very no nonsense camera. It may not have some of the gimmicks of some of its rivals and it does have certain foibles such as the reflections on the LCD display, but what it does do is output a very nice, smooth picture indeed, as well as containing the type of functionality that users will find very useful such as the dual native ISO modes.
Battery life is very good thanks to the cameras low power draw of 19W. Two to three batteries should get you safely through an intensive day of shooting.
Some people might find cause to complain that the raw SDI output is 10-bit rather than 12. But something to consider here is that firstly it is outputting the full 5.7K of resolution from the sensor, and secondly this is a camera costing just over £6K. You are getting a lot of functionality and features for the money you are paying. And the main thing here is the overall picture quality.
Speaking of which, this is an area that Panasonic has always excelled in. Its cameras have always had lovely colour science, and the EVA1 is no exception to this. It’s a natural looking picture, but has a certain quality to it that I can’t put my finger on. It’s very pleasant to look at, and you will get good results quickly, even if you are shooting V-Log, which is the predominant mode I used.
When looking for a budget cinema style camera the EVA1 should be on your list of considerations. Some may cite that its main rival is less expensive. But my counter to that is that the EVA1 is giving you 400Mbps 10-bit intraframe recording at a full 4K resolution, internally to SD cards. That's not a feature to be ignored. The EVA1 is a no nonsense camera that does what you need it to do, and does it extremely well while producing and recording a wonderful picture.
Some of the footage I shot can be seen below. Apart from a Panasonic Rec-709 LUT applied to the V-log footage in Resolve no other colour or exposure correction has been applied, apart from one night time shot where I added gain and noise reduction in Resolve. I wanted to leave the footage as untouched as possible.
Tags: Production

RedShark 2020 @ All rights reserved.

Comments