4 minute read
Want to record professional quality audio and music to rival the best? Follow our new series on setting up a professional quality recording studio in your home.
Thirty years ago if an artist or band wanted to sell records and get in the charts they would need a manager, a record deal and a few weeks (or months) in a recording studio with hundreds of thousands of pounds worth of outboard equipment and an excellent sound engineer. Today it’s possible to create commercial ‘release-ready’ songs that would not sound out of place being played between a song by Coldplay and another by The Weeknd on BBC Radio 1, and this can be achieved with a regular home computer, £3,000 worth of outboard hardware, a DAW (digital audio workstation software) and about £1,500 worth of plugins. The icing on the cake is that you can publish your own music on Spotify and iTunes yourself, without a record label and it’s easy-peasy!
Of course the equipment, hardware and software alone won’t turn you into sound engineering genius like Trevor Horn. There is something of a learning curve to master the intricacies of laying down a song track-by-track before mixing and mastering and there are an abundance of rookie mistakes that separate the home recording studio engineer from the professionals who produce commercial-grade recordings that we hear on the radio every day. But with my help and advice, and some home studying and practical work on your part you could get into the commercial ballpark of recording in just a few months.
It would be impossible for me to impart all the knowledge, wisdom and advice – let alone several hours worth of tutorials – during this brief overview, which is why I’ve created a rather lengthy (3 hr 20 min) video tutorial to accompany this article (view it at the end of the article).
Going back 35 years a home recording engineer would have had to come up with around £250,000 to buy all the required outboard gear to produce a commercial production on a multi-tracked recording. Just the SSL console and SSL preamps alone would have cost the price of a (then) 2-bed house in Manchester. Today you can buy an audio interface with A/D converters and preamps of even higher quality for under £1,000 – staggering!
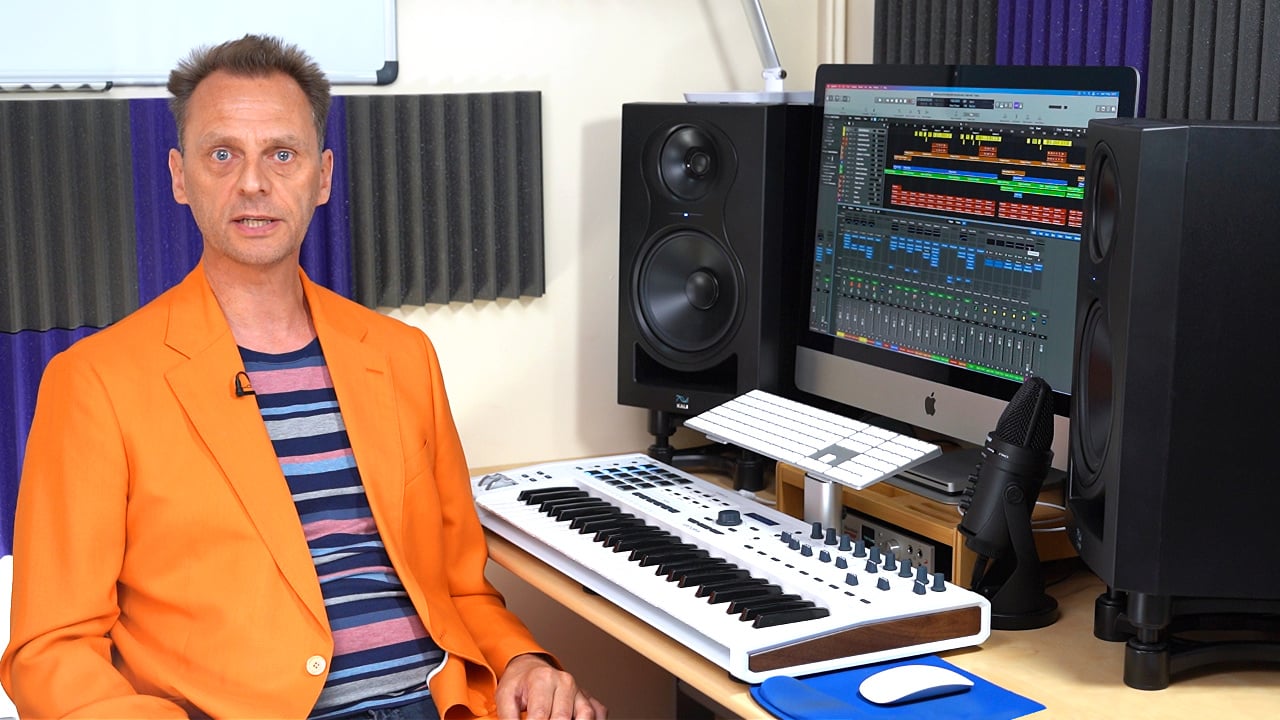
So what equipment do you need to produce commercial grade ‘release-ready’ songs? Well, a half decent home computer for a start. Personally I favour Apple gear for my audio work simply because I find that when configuring a marriage-made-in-heaven assortment of outboard studio gear, hardware and software, Macs are just more stable, but a PC will do the job too. The computer does not have to be blistering either. I use a 2017 27-inch iMac with a Retina 5k display, 4.2 GHz Quad-Core Intel Core i7, 40 GB RAM, 8 GB graphics, 1TB internal SSD drive and a couple of external CalDigit Raids – nothing earth shattering, but more than enough for a complex multi-tracked song.
Next comes the DAW (Digital Audio Workstation), which is the software where you’ll record all the tracks, arrange, mix and master your song. For this I use Apple’s Logic Pro, as many professional recording studios around the world do. If you’re a Windows user the following DAWS are pretty decent and they all basically do the same thing: Ableton Live, Image Line FL Studio, Reaper 6, Reason Studios and PreSonos Studio.
Gone are the days when you had to spend upwards of £10,000 on an audio interface, you don’t even need to spend £3,000 on a Universal Audio model either. I consider the audio interface to be the heart of the system as this is where you plug in your guitars, mics, vintage synths etc.The audio interface is also where those analogue signals get converted into digital files that sit on the DAW’s tracks.
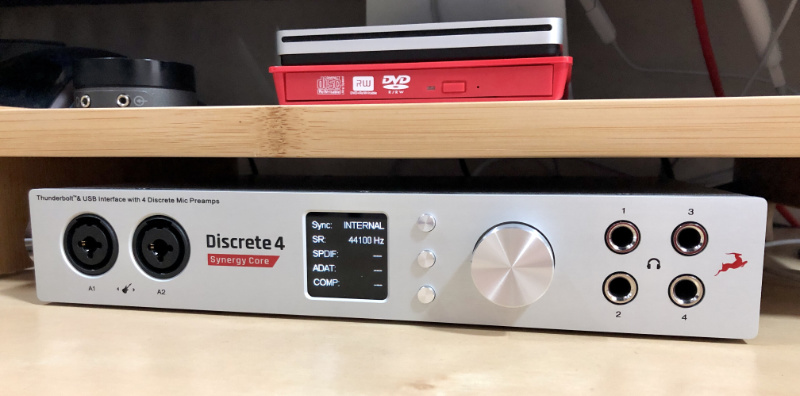
I’ve tried and tested loads recently and today I use an Antelope Audio Discrete 4, which comes in at around £875: The quality of the converters and preamps are studio grade. The Antelope records at 44.1, 48, 96 and 192 kHz and everything in-between at up to 64-bits. The Discrete preamps are state-of-the art and with the massive 65db of mic gain and abundance of other pro-grade features the Discrete 4 is more than capable of producing pro-grade commercial tracks.
Next come the near field monitors. Again, the need to splash out £40,000 on a part of ATC SCM300A monitors isn’t necessary these days. Course, they are bloody nice monitors, about as good as you can get if you have a large Abby Road type studio to justify them, but the home recording engineer does not need to go anywhere near this price. Near field monitors should not colour the sound in anyway. Unlike regular Hi-Fi speakers, where any given manufacturer brings its own flavour to the party, studio monitors should be totally neutral and, for me, they are by far the most important piece of equipment as they are your listening devices, they are what you will be mixing and mastering and judging your mix on so they have to be spot on.
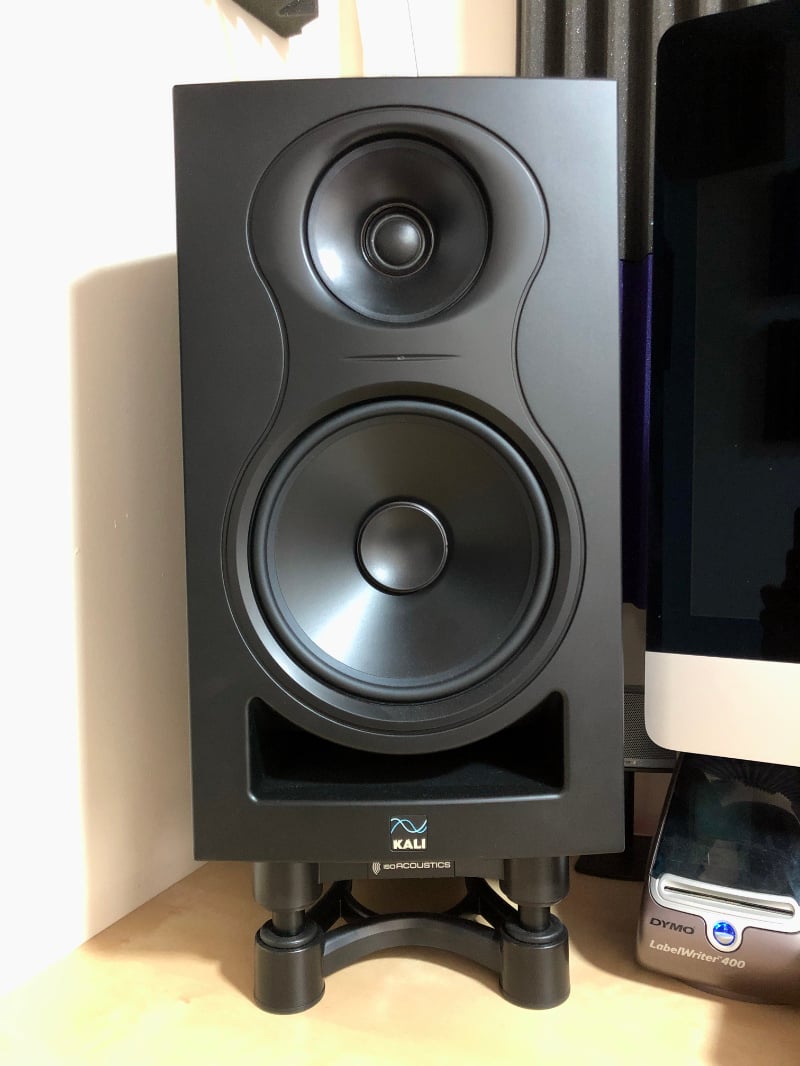
But, not all ‘so-called’ near field studio monitors are neutral in sound, even some of these often introduce some sort of sonic flavouring. KRK Roket monitors are known for their bass-heavy presentation, which is why I personally don’t like mixing on them. I can always tell when a song has been mixed on Roket’s as the final mix is always bass-light where the engineer adjusted the mix according to the Roket’s bass-heavy presentation, resulting in a bass-light final recording when played back on any other system. After trying and testing loads of near field monitors from £300 up to around £3,000 I settled on a part of Kali Audio IN-8 monitors and the reason for my choice was simple. First, they are a 3-way design, a must if you want accurate bass and mid separation and these are a concentric (coaxial) design meaning the tweeter is in the centre of the mid-range speaker which results in a clean stereo field.
At just £600 a pair the IN-8’s are dirt cheap, given the superb monitoring capabilities they produce for mixing and mastering purposes. The clever front-firing letterbox port yields superb bass extension that is tight and controlled. The mids are crystal clear and the high frequencies have just the right amount of sparkle. Sure, the IN–8’s are not in the same league as the aforementioned mega-bucks ATC’s, and there are other better monitors out there, but not at this price range, not even close.
To go with the monitors I also use a pair of ISO Acoustics ISO-200 desk monitor stands – a must to prevent sounds travelling through the desk (if you have them on the desk) and muddying the sound.
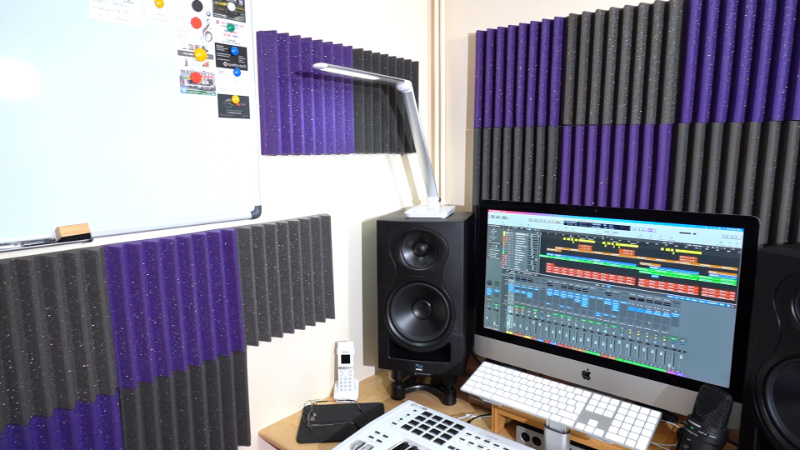
Acoustic room treatment is just as important as the monitors. Your monitors will only be as good as the room they are in, which is why you should treat your room, and the room treatment materials, as another vital piece of equipment. I paid £400 for a Universal Acoustics Mercury-2 room treatment kit that consisted of a load of foam tiles, bass traps, spray mist glue and instructions and it improved my room acoustics a thousand percent. Not treating your room will suck up at least half the price of your monitors. I’d rather listen to a pair of £500 monitors in a well treated room than a pair of £40,000 monitors leaning up against a couple of marble pillars in St.Pauls cathedral.
Tags: Audio Speakers & Headphones DAW

RedShark 2020 @ All rights reserved.
Comments