3 minute read
The GoPro Labs firmware is one of the most important differentiators between the company's cameras and the competition. Here are five settings that aren't commonly known.
First of all, these settings are only available by downloading and installing the GoPro Labs firmware onto your camera, and the particular ones I'm going to talk about only apply to the HERO10 and HERO11. However, the HERO11 is the camera to take the most advantage due to its 10-bit colour. Installing the Labs firmware will not affect your camera's reliability. Although use some of these settings with caution since you might need to perform a factory reset if you permanently install them and want to get rid of them.
For the uninitiated, the GoPro Labs firmware lets users create presets and settings for the camera that are not available normally. It does this by getting the camera to read a QR code created in a mobile app with the user's custom settings. All sorts of things are possible, including getting your camera to use its GPS position to calculate when sunrise is and automatically initiating a time-lapse recording at the right time to name one.
There are two ways to initiate a setting in the QR command creation. If you place a ! before the command, the setting will become permanent, and will be there each time you turn the camera on. Place a lower case o before the command, on the other hand, and the setting will only stick until you power the camera off.
Now that I've done the preamble, let's talk about the settings.
By default, the GoPro's "24p" mode is actually 23.976, which isn't ideal if you want to mix the camera in with other cameras running at an integer 24fps rate. A little known fact is that you can change this in the Labs firmware with the command M24HZ=1. Remember, preface the M with either a o or an ! depending on whether you want this setting each time you power on or not.
Setting the camera's 24p frame rate in this way only affects the 24p modes. All other frame rate modes will run as normal.
Want to match the GoPro's flat colour profile to a different make of camera more closely? Contrary to popular belief, the Flat profile on the GoPro is in fact a logarithmic function, although sometimes it comes in for criticism for not really adding much more dynamic range.
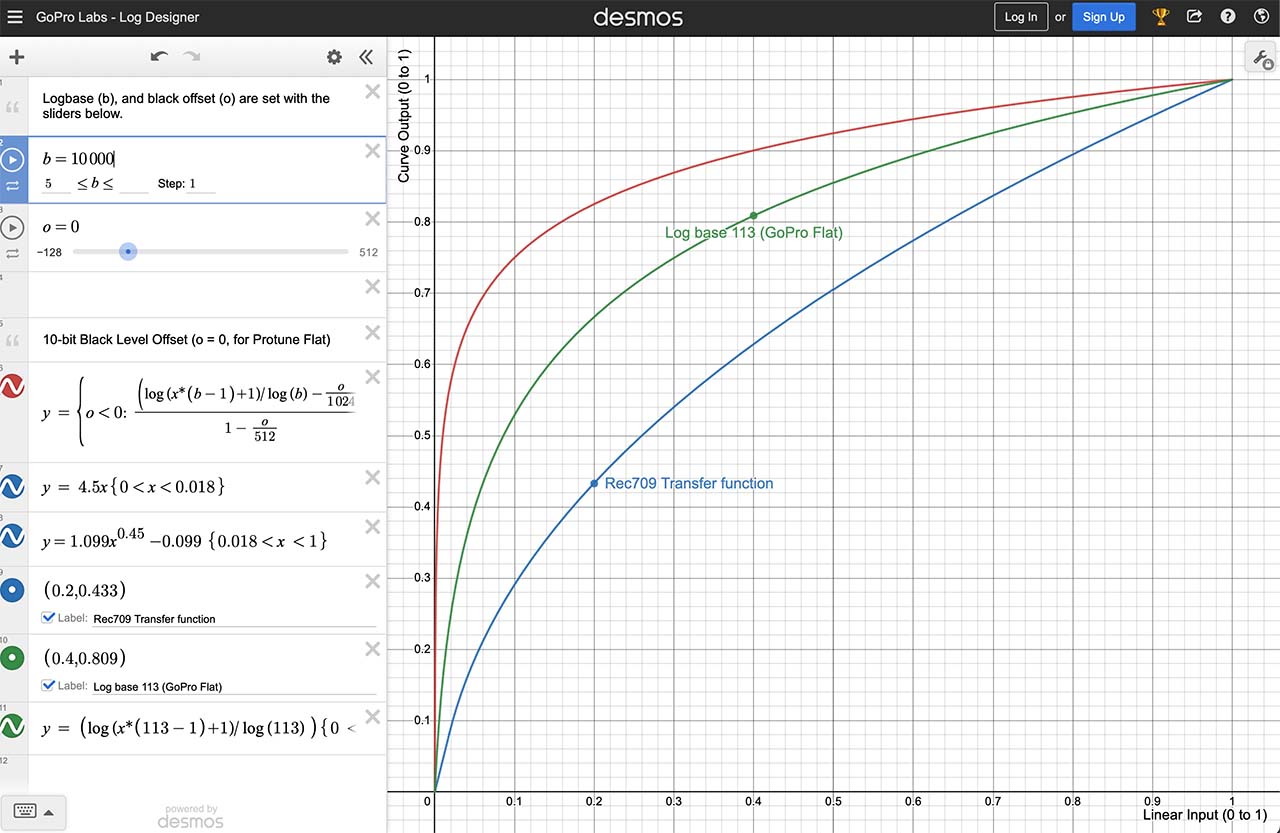
This can be changed, however using the MLOGB function. There are two parts to using this: There's the logbase and the black offset. The Logbase is the primary setting here, and, for example setting it to 400 will give you a boost in dynamic range. You could increase it much higher to 10000, which will give you a very flat image. You can use the black offset to give some correction to the shadows. A positive setting in the black offset will lower the shadows while a negative one will lift them. For example, you could make a very "Cineon" looking curve with oMLOGB=10000. If you wanted to darken the shadows a tad, you could put oMLOGB=10000,200.
A handy log designer tool has been created so that you can design your own curves so you can see directly what each setting does to the logarithmic curve. You might not be able to get an exact match to your own main camera, but you can probably get an approximation.
The log curve adjustments need to be used with care. If you use them on their own you can end up with an extremely noisy image. By default, when you enable the MLOGB function, noise reduction is effectively turned off, so you need to set it to your own preferred level using the MNR01 command.
The range goes from 1 to 100, with 100 being the maximum amount of noise reduction. You'll need to experiment with this to get a happy medium. A good place to start would be oMNR01=50, and then either increase it or reduce it to taste.
With the potential increase in noise level from the above settings, you'll want to make sure you have a bit more recording bitrate on hand. This can be increased from 120Mb/s on the HERO10 and 11 up to 200Mb/s. You'll need to make sure you have a decently fast SD card, but you can set this with the command !MBITR=200. This will permanently enable it so you don't need to scan a QR code each time you switch on.
The above settings should all be used with caution, and I would advise using the o prefix rather than the ! one. This will mean that you will have to keep rescanning the QR code each time you switch on the camera, but until you get the settings you prefer dialled in it's as well not to make them permanent otherwise you may have to perform a complete factory reset or a reinstallation of the original firmware.
That said, if you are wanting to mix the GoPro with other cameras for a specific shoot, these settings could be very useful to you.
Tags: Production Action cameras cinematography

RedShark 2020 @ All rights reserved.

Comments