3 minute read
 All you need to make 4K videos without a 4K camera
RedShark Summer Replay: With 4K footage on YouTube becoming increasingly commonplace, Craig Marshall details one way of producing and uploading video in the format without the need for a 4K video camera. The answer? An '80s presentaton style called 'audio visuals'.
I've recently returned from Kyoto, Japan, where I shot a promotional video on HD ProRes 422, but during the trip I took the usual bunch of 'happy snaps' on my Sony NEX 5n, an older 'stills' camera which shares the same APS-C sensor and internal processing as my NEX VG20 'video' camera.
The 5n can be configured to shoot 16:9 RAW and JPEG stills simultaneously, so this is my usual setup. Once upon a time back in the mid '80s, I had a business producing 'audio visuals'. Remember those? You shot a bunch of 35mm slides, then projected them to an audience on a huge screen with two or more Kodak 'Carousel' projectors, all painstakingly syncronised to a 'panoramic' stereo soundtrack via a basic form of timecode. They were an ideal and inexpensive way to get across a dramatic point to a semi-inebriated audience. Travel promos on tropical countries were my specialty, so with all the talk of 4K today, I decided to try a little trick to bring the audio visual or 'slide show' forward to the digital age.
With YouTube now delivering 4K content, I wanted to make a 4K A/V video from still images and discover a digital workflow which could also be suitable for HD and 4K video production.
Here is the short one minute A/V I produced, so be sure to set the YouTube resolution to either HD or UHD, depending on your viewing monitor.
For the purpose of this exercise, I wanted to retain the highest possible picture quality throughout the entire post production chain. I used my NLE to cut the pictures to a stereo sound track and export an Edit Decision List (EDL or AAF) to DaVinci Resolve for a quick grade and render out to a format suitable for Youtube from the original pictures. In Kyoto, my NEX-5n was configured to capture 16:9 RAW RGB images with 12bits/sample at 4920x3276 pixels, each of which required about 16.5 MB of digital space. As they were saved in a Sony .ARW file format, I needed software which would perform two simultaneous conversions in one 'batch' process:
a) convert from .ARW to .TIFF
b) perform a re-size from 4920x3276 pixels to the UHD standard of 3840x2160 pixels
After sorting through my stills, I downloaded and installed the free XnViewMP app, which performed both tasks in the same quick process.
My previous AV and Television Commercial experience had taught me that if you cut the right scene to the right track at the right time, you could almost achieve a result greater than the sum of the two parts. So, I needed a music track which would help convey the drama and mystique of the the ancient Japanese capital. My searches lead me to Soundimage.org, a free music resource created and managed by Eric Matyas. Eric offers a vast range of compositions Royalty free in return for a credit in your production. He can also create custom mods and bespoke music, which I guess is where he earns his crust.
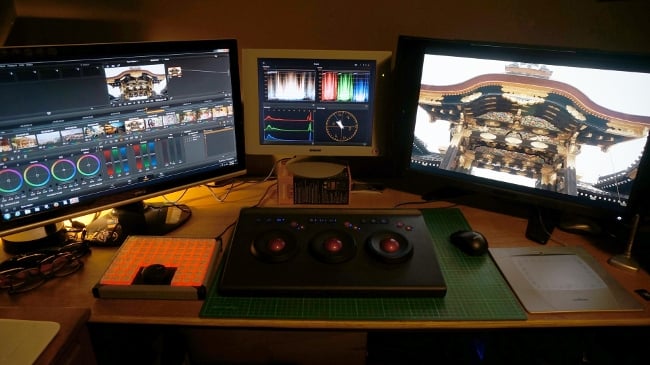
With a chosen MP3 music track on the NLE's 25fps timeline, I set about selecting and cutting in the UHD stills to suit the mood and pace of the piece. Once I was happy with the choice, pace and timing, I put in some short dissolves, plus a fade or two, before Exporting an EDL out of the NLE and into DaVinci Resolve. Resolve is of course 'overkill' for grading a sequence of UHD stills, but my home studio offers me a 10bit, colour-managed monitoring pipeline. With Resolve's nice internal 'scopes on a third monitor, I was able to load the stills in the Media Pool, import the EDL, then perform a quick Lift, gamma, gain 'grade' on each shotg before a direct render out of the Delivery page to a 'High' bitrate H.264 MP4 for YouTube upload.
The entire process described above took no more than an hour-or-so, plus a bit of extra time to refine the transitions and timing in the NLE prior to the Resolve grade. Of course, editing can be performed directly in Resolve now, with the forthcoming v12 promising even more functionality, but in the interim, I prefer to use a dedicated 'editor' such as Lightworks.
My Resolve z87 Haswell PC workstation has a Decklink SDI 4K card installed which allows me to monitor at 6G 10bit 4:4:4 directly to my 55" Sony X9000B 4K 'client' monitor, a high-end consumer TV which 'takes no prisoners'. That is, if your SD or HD video has issues, you'll certainly see any faults when automatically up-rezzed to 4K. But in this case, it was a satisfying experience to play a 4K master off a Resolve UHD timeline in real time to a big, 55" 4K screen.
I'm keen to read comments from anybody else who may have used this or a similar processes to output their UHD video. Time-lapse has become so common now it runs the risk of becoming almost passé, but I'm sure this workflow could have benefits there, too.
Tags: Post & VFX

RedShark 2020 @ All rights reserved.
Comments