9 minute read
 Writing video effects for Lightworks
Gary Hango, an expert in video effects and processing, is also an enthusiastic Lightworks user. In part 2 of this series, he introduces the language Lightworks uses to create video effects, and shows how you can write your own.
Warning – The following article contains massive quantities of geek-speak. Reading may cause diminished coolness. Continue at your own risk!
In my previous article I covered the basics of how computer software, namely VFX software, through the manipulation of the matrix of numbers that represents the various intensities of light and dark in each of the red, green, blue and alpha channels of a digital video frame, creates video effects. Armed with this knowledge we’ll look at how to apply it in the creation of new custom effects for Lightworks.
If you’re the curious type, you’ve probably opened several of the “.fx” files that came with Lightworks. What you found is what appears to be source code written in the C programming language. And you would be correct. Lightworks VFX are written in a variant of the C programming language called HLSL, or High Level Shader Language. This language is used to write DirectX Pixel Shaders that Lightworks compiles into video effects that then become accessible from the Lightworks effects panel. These Pixel Shaders are the software that manipulates that matrix of numbers in your video file. The unique aspect of Pixel Shaders is the speed at which they process video. Each frame is transferred to a buffer location in the graphics card hardware and every pixel is run through the Pixel Shader code simultaneously and placed in a new buffer location ready for output or additional processing. I liken it to having a wire mesh screen in front of a canvas (the mesh being the Pixel Shader) and throwing a pallet of paint at it, with the mesh-altered splatters hitting the canvas at the same time, instead of painting a picture with individual strokes. The faster your graphics hardware, the faster this processing takes place and the closer to real time playback your system will achieve.
Before we dive into the code itself, let’s first look at the basic structure of a Lightworks “.fx” file. The first section of the file defines the name of the effect and into which category on the Lightworks effects panel it will be placed. The next section defines the various GUI controls that allow you to adjust parameters for the effect with most having the ablility to key frame their values. The following section concerns the actual video inputs to our effect. Here you define the number of video tracks you want the effect to work with. The fourth section is the meat and potatoes of the effect. This is where you create the code that will actually manipulate the pixels of your video. The functions you create here will change the pixel values of your input video according to the mathematical algorithms and GUI control settings you’ve defined, and output new pixel values. The final section tells the Lightworks Pixel Shader compiler how to compile all the previous code. Here you can chain functions together where the output of one function feeds the input of the next function. This allows you to get around some of the limitations imposed on how complex a single Pixel Shader function can be.
Let’s now take a look at one of the “.fx” files that comes with Lightworks. In the Lightworks installation folder, in the “Shaders” folder, you’ll find a file named “negative.fx”. Open this with a generic text editor such as Notepad. As mentioned earlier, you’ll see what looks like C source code. The first thing you’ll notice is the presence of many double forward slashes, “//”. Just like C code, these are used for adding comments. When Lightworks compiles the code it ignores anything on a line after the double forward slash. Use comments liberally in your code to describe what’s happening at each stage of the effect. It will especially help when you have complicated code. Okay, let’s dive in.
The first part of the code is the effect’s description.
//--------------------------------------------------------------//
int _LwksEffectInfo
<
string EffectGroup = "GenericPixelShader";
string Description = "Negative";
string Category = "Colour Effects";
> = 0;
//--------------------------------------------------------------//
In this example, the effect is named “Negative” and will be placed on the “Colour Effects” panel. Any new effect you create must have this declaration at the top of the file with a unique name as the description and category into which you want the effect to be placed. If the category already exists it will be placed within it, and if not, a new category will be created. This way you can organize your own effects in their own category on the effects panel. Just set the “Category” to something like “My Effects”.
We then come to the parameters section.
//--------------------------------------------------------------//
float Level
<
string Description = "Level";
string Group = "Threshold";
float MinVal = 0.0;
float MaxVal = 1.0;
> = 0.0;
float Softness
<
string Description = "Softness";
string Group = "Threshold";
float MinVal = 0.0;
float MaxVal = 1.0;
> = 0.25;
float _MaxSoftness = 0.2;
//--------------------------------------------------------------//
This is where you define the controls for your effect. There's a multitude of controls you can use, which you can discover by looking at the parameter sections of the various “.fx” files in the “Shaders” folder or in the user effects files which you can download from the Lightworks forum. The parameters in this example are slider controls with a minimum floating point value of 0.0 and a maximum of 1.0. Any time you define a “float” here, Lightworks will create a slider for your effect. “float2”, “float3” and “float4” will create different kinds of controls. By examining other .fx files your will discover their uses. The “Description” values will be the names of the sliders. The “Group” value, shown here as “Threshold”, is an optional definition that puts the sliders into a named subgroup on the effect panel. It provides a way to differentiate between various groups of controls. You’ll notice after the “>” symbol, which closes each parameter declaration, is “= 0.0;” or “= 0.25;”. This is the default value each slider will have when you add the effect to a video clip.
In this parameters section example you also find the declaration “float _MaxSoftness = 0.2;”. This is how you provide constant values for use in different functions you might create for your effect. It will let you experiment with different values while you test your effect without having to change the value in multiple places in your functions. Just change the value at this one location. It’s important to add the underscore symbol before any constant values you declare. When Lightworks sees the underscore on a variable it will not add it as a control on your effect panel. Lightworks also provides some internal variables that exposes information about your project settings for use in your effect. Here are some of the most useful:
float _OutputWidth; //The project resolution width
float _OutputHeight; //The project resolution height
float _OutputAspectRatio; //The project aspect ratio
float _Progress; //A variable with a value that changes from 0.0 to
1.0 from the start of the effect to it's end.
The “_Progress” variable can be used to change some aspect of your effect over the duration of it on the timeline, like fades or disolves. To use these internal variables simply add the declarations as shown above to the parameters section of your code and use them in your functions like any other variable.
Now we have to define a way to pull the video from the timeline for use in the effect.
//--------------------------------------------------------------//
texture Input;
sampler InputSampler = sampler_state { Texture = <Input>; };
//--------------------------------------------------------------//
In Pixel Shaders, each video frame becomes a texture painted onto a 1.0 x 1.0 plane. No matter what the resolution of your source video, in Pixel Shader land, it will always be represented by this 1.0 x 1.0 plane. Every point on that plane contains four floating point values that correspond to the red, green, blue and alpha channel of the video frame. The first line in the example declares a texture called “Input”. This creates space in the graphics cards memory for the 1.0 x 1.0 plane and because it’s the first (and in this case, only) texture declaration, it connects it to the top video track in the Lighworks edit timeline. The next line actually paints the video into the 1.0 x 1.0 texture. If your effect needs to work with 2 or more video tracks you would just declare additional textures and samplers.
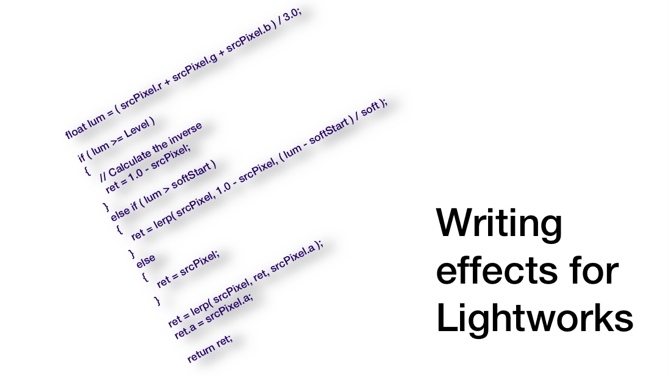
Now we come to the function that actually manipulates the pixel color values.
//--------------------------------------------------------------//
float4 ps_main( float2 xy1 : TEXCOORD1 ) : COLOR
{
float4 ret;
float soft = Softness * _MaxSoftness;
float softStart = Level - soft;
// Get source pixel..
float4 srcPixel = tex2D( InputSampler, xy1 );
float lum = ( srcPixel.r + srcPixel.g + srcPixel.b ) / 3.0;
if ( lum >= Level )
{
// Calculate the inverse
ret = 1.0 - srcPixel;
}
else if ( lum > softStart )
{
ret = lerp( srcPixel, 1.0 - srcPixel, ( lum - softStart ) / soft );
}
else
{
ret = srcPixel;
}
ret = lerp( srcPixel, ret, srcPixel.a );
ret.a = srcPixel.a;
return ret;
}
//--------------------------------------------------------------//
Here we have a function named “ps_main”. These pixel-manipulating functions are always declared as a “float4” because they will be working with the four floating point values of the red, green, blue and alpha channels of each pixel. The “float2 xy1 : TEXCOORD1” inside the parenthesis defines “xy1” to be the coordinates of the texture. When a Pixel Shader function is run, it needs to know which pixel it's working on. For every pixel location on the texture plane that contains our source video, that coordinate is loaded into the two floating point value “xy1”, with each horizontal pixel coordinate stored in xy1.x and each vertical coordiate stored in xy1.y and passed to our Pixel Shader function. “: COLOR” tells the compiler the function will be outputting pixel color values.
float4 ret;
This reserves space in memory for a four floating point value and names it “ret”. It will be used to hold the new pixel color values.
float soft = Softness * _MaxSoftness;
float softStart = Level - soft;
This creates a floating point number named “soft” that equals the value you set on the above defined slider control named “Softness”, multiplied by the constant value “_MaxSoftness” or 0.2. It then defines the floating point number “softStart” to be equal to the value of the slider control named “Level” minus the value of the number named “soft”.
The next line,
float4 srcPixel = tex2D( InputSampler, xy1 );
retrieves the RGBA values of the pixel at the “xy1” coordinate from the texture and sampler that were defined above (the source video), putting them in the four floating point number “srcPixel”.
float lum = ( srcPixel.r + srcPixel.g + srcPixel.b ) / 3.0;
Here we define the single floating point variable “lum” to be the average of each pixels value of red, green and blue. This is a simplified way to get the luminance value of each pixel.
if ( lum >= Level )
{
// Calculate the inverse
ret = 1.0 - srcPixel;
}
else if ( lum > softStart )
{
ret = lerp( srcPixel, 1.0 - srcPixel, ( lum - softStart ) / soft );
}
else
{
ret = srcPixel;
}
Next the function enters an “if-then-else” routine. If the “lum” variable (or luminance of the pixel) is greater than or equal to the slider value named “Level” then the four float variable “ret” is given the value of 1.0 minus the four float variable “srcPixel”, which contains the pixel values of the source video. It should be mentioned here that the different values of a four float variable can be accessed by using, in this example, srcPixel.r, srcPixel.g, srcPixel.b and srcPixel.a, which correspond to the red, green, blue and alpha channel. So when you write “ret = 1.0 – srcPixel;” what’s being implied is “ret.r = 1.0 – srcPixel.r, ret.g = 1.0 – srcPixel.g, ret.b = 1.0 – srcPixel.b and ret.a = 1.0 – srcPixel.a”. “float3” variables usually imply “name.xyz” and “float2” variables imply “name.xy”.
Back to the code. This part of the function inverts, or negates, the video. If your source pixel has a value of 1.0 then 1.0 – 1.0 = 0.0 and if the source pixel has a value of 0.0 then 1.0 – 0.0 = 1.0. It does this for each color channel of each pixel if the luminance value is greater than or equal to the “Level” slider’s value.
If “lum” is less than “Level” it then checks to see if “lum” is greater than the variable “softStart”. If it is, it runs the equation;
ret = lerp( srcPixel, 1.0 - srcPixel, ( lum - softStart ) / soft );
The function “lerp” is short for linear interpolation. This function takes three variables. The output of the function is the interpolation between the first variable and the second variable by the ratio of the third variable. So if the first variable is equal to 0.25 and the second variable equals 0.5 and the third variable is 0.75 then the function value would be 0.4375. 0.4375 is three quarters of the way between 0.25 and 0.5. The “lerp” function is used extensively in Pixel Shaders to blend video together. You can blend two video tracks together by “lerping” their pixel values using the alpha channel value from one of the tracks as the third parameter. See if you can determine how the three variables are being used in the example.
If “lum” is less than “Level” and “lum” is less then “softStart” then the function drops down to the final “else” section. Here “ret” is simply made to equal the value of “srcPixel”.
The final code of this function:
ret = lerp( srcPixel, ret, srcPixel.a );
ret.a = srcPixel.a;
return ret;
The “lerp” function mixes the source video with the inverted video by the value of the source video’s alpha channel. It then changes the alpha channel in our modified video to equal the source video’s alpha channel then “return”s, or outputs the RGBA values in “ret”.
The final section of code is called the “technique”. This is where the compiler is told how to compile the effect.
technique Negative
{
pass Single_Pass
{
PixelShader = compile PROFILE ps_main();
}
}
The “technique” must be given a name. It can be anything, but in this example it’s been given the same name as the effect. Inside the technique is a section called a “pass”, and inside it is the command to compile the “ps_main” function. The word “PROFILE” is a placeholder that Lightworks’ internal effects use. For your own effects you will need to enter the actual value. The values to use will be one of either ps_2_0, ps_2_b, or ps_3_0. ps_2_0 is the basic DirectX 9 shader. ps_2_b allows more complex functions. These two are the most compatible for the most graphics cards. ps_3_0 provides for even more complex functions but is not compatible with some graphics cards.
Once you've created your effect, you will need to use Lightworks to compile it. Put your .fx file in the following folder. If you don't the effect will not work.
For XP the location is:
C:Documents and SettingsAll UsersDocumentsLightworksEffect Templates
For Vista and above, the location is:
C:UsersPublicDocumentsLightworksEffect Templates
Start Lightworks and enter a project. Bring up the effects panel by using the designated shortcut or click the “Effects” button on an edit timeline. Click the cogs icon and choose "Create template from FX file". Select your .fx file and click “Ok”. If there are no errors in the file, your effect will be compiled and placed in the category you defined at the top of the file.
You now have the basics of creating your own VFX for Lightworks. Using the .fx files that came with Lightworks and the user effects downloadable from the Lightworks forum for reference, along with your imagination, you'll soon be writing your own VFX for your projects and sharing them with other Lightworks users.
Tags: Technology

RedShark 2020 @ All rights reserved.

Comments