
9 minute read
 DaVinci Resolve 12 for Editors
Jonny Elwyn tries out the multitude of new editing tools in the public beta of Blackmagic's DaVinci Resolve 12 and gives us the lowdown from an editor's point of view.
[Follow the link to read Eric Escobar's examination of the new colour correcting tools aimed at editors in Resolve 12: DaVinci Resolve 12: Colour Tools for Editors]
DaVinci Resolve 12 public beta came out last week and included dozens and dozens of new features, taking the world-class colour grading application deeper into the realm of being, not just a fully-fledged NLE, but an extremely feature-rich one.
In this article, I'm sharing my first impressions of the public beta software, diving deeper into the editing tools than I have before and, in the process, enjoying working with some footage from EditStock.com, who provides professionally shot projects to help you practice your editing skills.
With this 12th release comes a name change for the software, wherein the word 'Lite' has been dropped from the free version (DaVinci Resolve 12) and the word Studio added to the paid version (DaVinci Resolve 12 Studio).
This is largely to reflect the fact that the free version was never really a lesser product, and that the paid for version carries with it Studio level features like collaborative grading, stereoscopic 3D, remote rendering and multi-GPU support.
Although there are also a huge number of new colour grading features in this release, I'll be sticking largely to the 'Edit' page in this article. For a quick overview of what's new, here are some of the headline features.
Headline New Editing Features:
Headline New Colour Grading Features:
And a huge amount more! For a full list, check out the incredibly long 'Compare' page over on blackmagicdesign.com.
Before we get too far into things, just a quick word about minimum system requirements. You'll need to be running OS X 10.10.3 Yosemite or Windows Pro 8 and have at least 8GB of RAM.
You would also be best advised to update your CUDA drivers and your Blackmagic Design Desktop Video software. I forgot to do this and when I opened up Resolve, everything played in fast forward and without sound; after I had updated, everything was fine.
Another noteworthy thing to mention is that the user interface, which apart from being completely overhauled, will now scale on any screen size, which is a great bonus for laptop users and anyone with Retina screens.
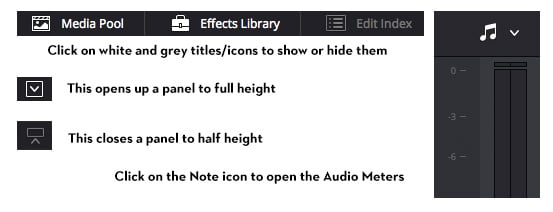 Resolve 12 UI Tips
If things are a little unfamiliar to you, here are a few very quick pointers to help you get around. Also, be sure to right click on everything and everywhere to reveal a smorgasbord of contextual options. If you're in doubt in Resolve, right click.
One of the things that I like about working in DaVinci Resolve is that you could choose never to leave the application and you'd still be able to perform every step of the post-production process from card copy and media ingest, edit, titles and grade, with the final mix thrown in for good measure.
Although Resolve is becoming more and more generalized in its capabilities, it is also becoming increasingly useful in numerous areas of post, like on-set DIT work for copying media, creating dailies etc., as well as combining simple composites and VFX work whilst in the grade.
 Audio Plugins in Resolve 12
Resolve 12 has a whole new audio engine under the hood, which allows for further openness and extension of the application through AU and VST audio plugins. As you can see in the image above, any previously installed plugins you might have (in my case Scarlett plugins from my Scarlett 2i4) will automatically appear in Resolve, too. These plugins can also be copied and pasted through 'Paste Attributes'.
This new engine allows for some of the nice improvements to how audio works in Resolve 12, such as the 'guaranteed real-time audio playback at all speeds' (which also means that Resolve will drop video frames in the Edit Page to maintain audio playback), automatic pitch correction when scrubbing at speed, and an impressive array of clip and track automation capabilities.
 Dynamic Trim
The main workhorses of any NLE are, of course, the editing and trimming tools, which have been further improved in this release. If you hit the 'T' key to enter Trim mode, your mouse will be a powerful, context sensitive Swiss army knife, allowing you to trim, slip, slide, roll and ripple. On top of that, with a quick press of the 'W' key to get you into Dynamic Trim mode, you can trim whilst playing forwards or backwards with the 'J' 'K' and 'L' keys. You can now also trim multiple clips at the same time and even do so asymmetrically.
Now, I have to admit that the dynamic trim tool in particular does 'look' very cool, but it does require a slight rethink and re-approach to the way in which you might normally edit.
So, I can't say that I'm ever going to use dynamic trim much, but maybe it's the kind of thing that, once you get used to it, you start to think, "How did I ever edit without this?!" Maybe.
 Fullscreen Multicam
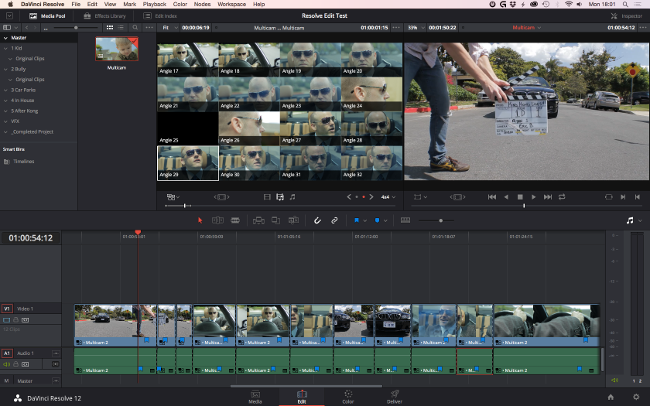
One of the biggest new editions to editing in Resolve 12 is the new multicam editing feature, which is an effective rendering of the same funcitonality found in pretty much any other NLE.
It is very easy to create a multicam clips based on timecode, in/out points or audio and edit them in all the same ways you can any other 'normal' clip. I'm not sure what the upper limit is on multcam angles, but I made a clip with 32 angles, and Resolve simply creates pages of angles based on a maximum of 16 angles per viewer page and lets you switch between them. The limitation may well be practical though, as you'll need a system fast enough to play back all these angles simultaneously.
One of the best things about working with multicam clips in Resolve is that multicam clips can be graded like any other clip and each angle has it's own grade, unlike Take Selector clips in which, helpfully enough, each take has the same grade. This a huge benefit if you have to go back and make changes to the final cut after grading has been completed, because rather than round-tripping a flattened timeline from another NLE, you can just click on the Edit Page and you're away. It couldn't be faster or easier.
 Edit Page
If you've never edited in Resolve at all, the following comments, which outline a bunch of things that I like about the software, might seem like quite small matters. However, as a working editor, it's often the small things that make the biggest difference day-to-day. Hopefully, these comments will help you get to grips with editing in the software and make a big difference in your day, too.
I've also thrown in a few tips that I've learned something along the way and some 'feature requests' that would be nice to see in future updates. (Although, I know that demanding more features is not the point of beta software! But, it helps you get a sense of where things are at.)
First things first: you'll need to make sure you turn on Autosave under:
File > Projects Settings > Autosave (Or hit shift+9 to bring up the Project Settings window)
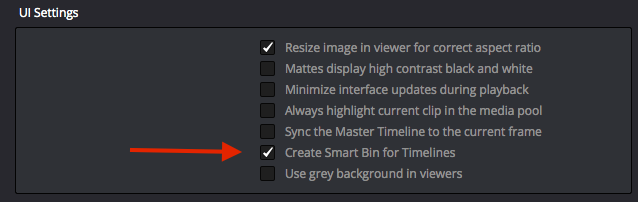 Smart Bin for Timelines
You will also want to go to Project Settings > General Options > UI Settings and check 'Create Smart Bin for Timelines'. With this setting, if you create multiple timelines, which are now no longer stored separately from your media, you won't accidentally delete them or lose track of them.
 No Media Alert
One of the appealing things, especially if you're new to Resolve, is that the UI tells you what to do; for example, to get started, you need to drag media into the media pool. This might seem a bit pedestrian, but how many other applications do you know that do this?
 Import Folders
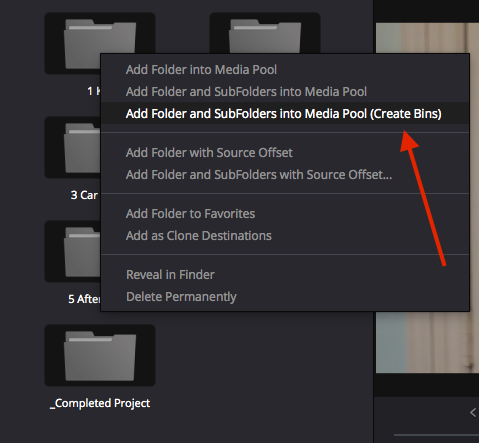
When importing media, it would be great if Resolve defaulted to creating folders, if you drag in a folder of media, and clips, if you only drag in a clip. As it stands, Resolve's default behaviour is just to grab all the media in a folder and its sub folders and dump it into the media pool.
To bring your footage into Resolve in a more orderly and organized manner, you can get around this by selecting as many folders as you'd like in the media browser, right clicking and choosing 'Add Folder and SubFolders into Media Pool (Create Bins)'.
 Warning!
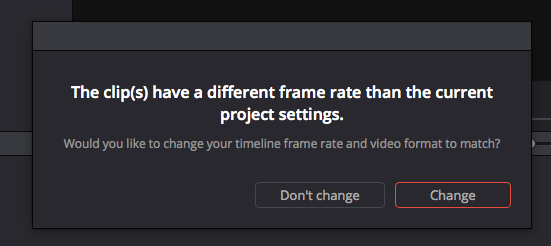
What's also really helpful at this point is that if your footage and project settings are miss-matched, Resolve will flash up a warning allowing you to change your project settings to match the footage you are importing. This is a similarly helpful feature found in other NLEs.
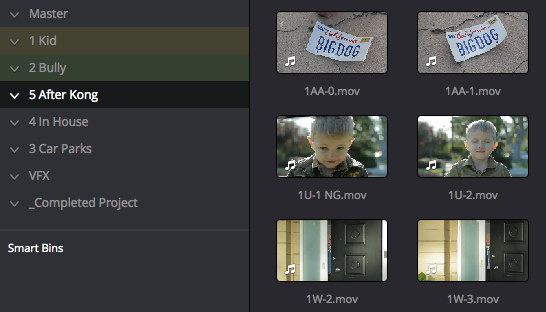
If you have already imported your footage and need to get things organized, you can create normal folders via the keyboard shortcut SHIFT+CMD+N. You can also hit ALT+S for a new Sub Bin, which is a nice touch. It means you don't have to rummage around dragging and dropping folders where you'd like them, but can create a hierarchy as you go.
 Smart Bin
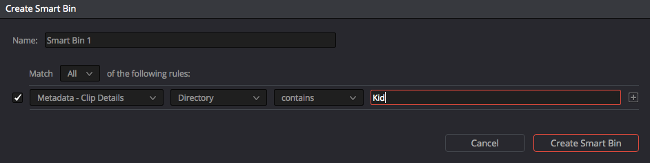
A really nice feature, similar to FCPX and Premiere, is that you can create Smart Bins, based on a multitude of metadata options. For example, you could re-create a hard drive's folder structure, after importing the media as a bunch of clips, by creating Smart Bins based on the original Directory metadata.
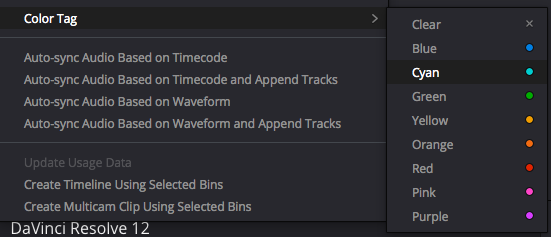 Colour Tags
Another nice feature, that only seems to half-work right now, is that you can 'Colour Tag' folders for organization. This feature would be much more useful if the contents of those folders inherited the same colour code, so that clips on the timeline would be pink or orange or blue (or whatever), matching the folder colour, so you could see which shots had come from which folder and therefore, for example, a scene or version from VFX.
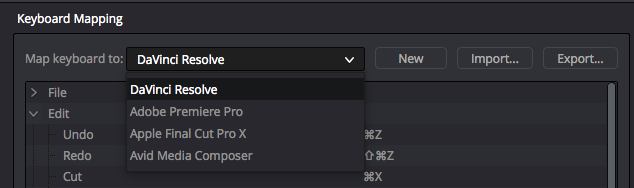 Shortcuts
I'm always a big fan of any application that allows you to bring your own keyboard shortcut muscle memory with you by providing keyboard shortcut mappings from other popular NLEs. My only suggestion would be that the keyboard shortcut window could do with a search box to make it easier to find a specific command in the scores of available ones.
![]() 'Reset Keyboard' Button
'Reset Keyboard' Button
However, it is great that you can simply hit the reset button to change a modified keyboard shortcut back to its original mapping if you need to.
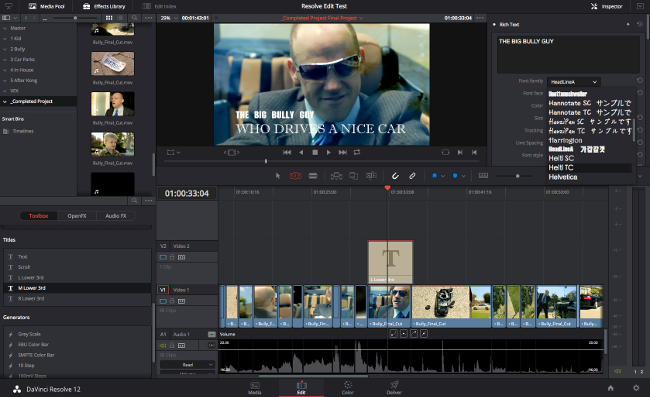 Text in Resolve 12
One of the things I was interested in investigating was the way in which text elements work within Resolve 12. Having moved from FCP7 to Premiere as an editor, one of the complications had been the paradigm shift in the way text elements function.
In Resolve 12, they work in the same way as they did in FCP7 and not Premiere. By that I mean that, if you copy a title clip and paste it, it functions as a whole new title, inheriting all the settings and text from the original, but that can then be modified to contain different text, rather than being a second instance of the first clip, as it is in Premiere Pro. There are pros and cons to this, but the Resolve 12/FCP7 method feels more intuitive.
The rich text editor makes it easy to adjust fonts, sizing and placement, along with drop shadows and background elements. It's handy that there are templates for Left, Right and Centered Lower Thirds. I also like that you can see the style of the font in the font name, as you're choosing it.
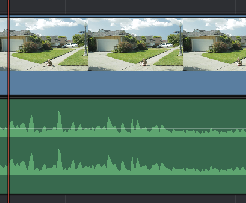
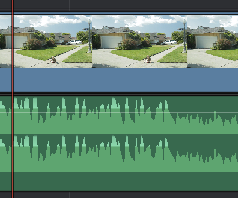 Waveform Sizes
There are nice touches too, in the way that waveforms grow visually along with volume adjustments. I also really like that you can only move keyframes in one direction at a time: up and down or left and right. This means you can slide your keyframe adjustments along a clip to a new location without messing up the volume level.
When trying to achieve the same thing in Premiere Pro, I often find that no matter how much you hold down Shift when sliding keyframes, you have to be very careful and hope it works. One thing I do love about Premiere, and it would be great to see this in Resolve, is the ability to lasso groups of keyframes, which comes in very handy when adjusting your mix to match an edit change.
By the way, you simply need to ALT+Click to add a keyframe to the volume bar.
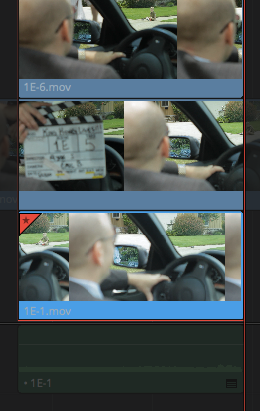 Take Selector Stack
The 'Take Selector' is an interesting implementation of the auditions concept from FCPX. You simply right click on a clip in the timeline, choose Take Selector and then drag another clip from the Media Pool into the take selector. Now, you have a stack of takes to choose from, baked-in to a single timeline clip.
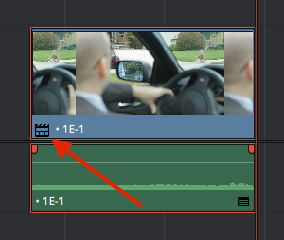 Take Selector Icon
When the stack is closed, you simply click on this icon to open it up again. When you right click and hit 'Finalise', the Take Selector simply disappears and the selected take is left behind.
It would be nice if you could drag clips from the timeline into the stack or select a group of clips in the timeline (say with all the 'in' points matched) to create the stack, but you can do the same thing from the Media Pool.
One of the most glaring omissions from this entire article is that fact all of these editing capabilities are happening inside the industry-leading colour grading application. This, of course, means you can grade as you go, polishing your project to your heart's content, including green screen composites and an excellent tracker.
The con to all these pros, is of course, that you need to restrain yourself from 'futzing' with every single shot (because you can!) and focusing on getting your story, structure and edit locked down first.
But hey, if you can't resist grading as you go, throwing in some power windows and a film emulation LUT, at least your rough cuts will look amazing!
As ever, Blackmagic Design is delivering yet another spectacularly feature rich release which, although not perfect, will be sure to delight a good many editors and colorists a like. And, incredibly, mostly still for free!
[Follow the link to read Eric Escobar's examination of the new colour correcting tools aimed at editors in Resolve 12: DaVinci Resolve 12: Colour Tools for Editors]
Tags: Post & VFX

RedShark 2020 @ All rights reserved.

Comments