2 minute read


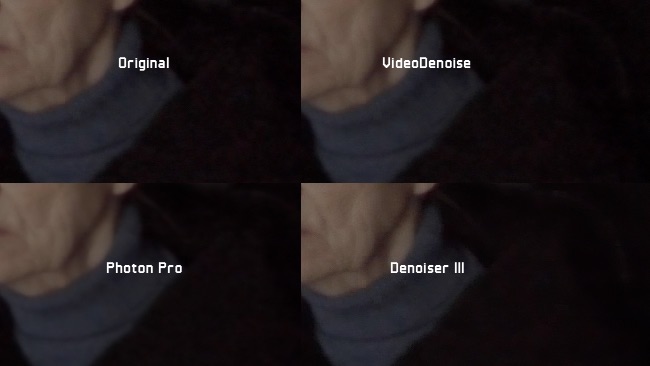
RedShark Review: Noise is a problem, especially with small-sensor cameras. VideoDenoise is a new $49 noise reduction plug-in for Final Cut Pro X and Premiere Pro from CrumplePop that claims to beat noise efficiently, using a simple interface. Erik Vlietinck tested it out alongside Red Giant’s Denoiser III and the older Photon Pro plug-in.
VideoDenoise has an inspector with only a few controls, including noise level and margin controls, temporal radius, block size, a method (3D or 2-step) and a channels control (YUV-based). There’s also a Sharpen slider. In contrast, Photon Pro offers a luma Noise Reduction and Chroma slider, a spatial and temporal radius control and a spatial mask. Denoiser III is the most simple of all with only Reduce Noise, Smooth Colors and Preserve Detail controls and two sharpen controls.
When you start playing with VideoDenoise, you’ll notice that the effects are subtle unless you crank up the controls. Noise in footage that has been shot at decent light levels can be tackled with the default settings, but as soon as the noise starts becoming serious — as in my test footage — VideoDenoise requires a careful mix of noise levels, block sizes and temporal radius settings. It’s not complicated, but without a good understanding of its parameters, you’ll be losing a lot of time experimenting.
Unfortunately — and this applies to all three of the tested plug-ins — there is no way to save settings for a next noise reduction session to fix footage shot with the same camera.
Photon Pro Noise Reduction gave me the quickest results with the least fuss. I am used to working with this plug-in that was released about five years ago and I know that it doesn’t make sense to start out with low values if noise levels are high. As it is the plug-in I know best, I was quickly on my feet with this one. Having said that, it’s the slowest to render, with VideoDenoise the fastest and Denoiser III somewhere in-between.
Speaking of which, Denoiser III is the only plug-in that starts by assuming you’ll want to fix some heavy noise, which in my test case saved me a few seconds. In fact, its default values are so high, even my terrible videoclip looked as if someone had emptied a bucket of liquid plastic on the moving protagonists. I had to dial back the Reduce Noise slider to a value close to zero before the footage started looking natural.
Much to my surprise, Denoiser III — which has much simpler interface approach than its predecessor — did a very good job of removing noise while keeping the image fairly detailed. It proves that Red Giant Software has found a way to keep the complex stuff hidden from the user with an algorithm that figures out for itself what is acceptable and what is not.
There’s no such “intelligence” built into VideoDenoise, but that’s fine if you know what you’re doing. For those of us who need a bit of guidance, the developers could have made an effort to clearly and elaborately explain what the parameters actually control and how they will affect your footage. With complex adjustments like noise reduction, the tutorial videos they publish are introductory at best. An explainer video doesn’t go into enough depth to make me really understand what I’m doing.
At the end of the day, you can work it all out yourself by trial and error. Only, it has to be said, with noise reduction that’s not always a lot of fun.
Tags: Post & VFX

RedShark 2020 @ All rights reserved.

Comments