3 minute read

Replay: Smoke, haze, fog, atmos – it’s that mysterious medium that makes shots magically more cinematic, but how does it work, and how can you get more of it on set?
At the most basic level, smoke simulates a natural phenomenon called aerial perspective. If you look at a range of mountains receding into the distance, the further mountains will appear bluer, lighter, less contrasty and less colour-saturated than the nearer mountains. This effect is due to light being scattered by particles naturally suspended in the air, and by molecules of the air itself.
19th century physicist Lord Rayleigh came up with a very complicated equation to describe this phenomenon, but for our purposes there are just three things to note:
1. Scattering increases with the angle between the incident light and the scattered light. In practice this means that the more you shoot into the sun – the more the air you’re photographing is backlit – the more scattering there will be. Film with the sun behind your camera and scattering will be minimal.
2. The further you are from the particles doing the scattering, the more scattering you will perceive, as per the Inverse Square Law.
3. The shorter the wavelength of the light, the more scattering. This is why things look bluer with distance; blue light has a shorter wavelength. It’s also why shooting through an ultraviolet filter reduces the appearance of aerial perspective or atmospheric haze.
Foggers, hazers and smoke machines simulate aerial perspective by adding suspended particles to the air. These particles start off as smoke fluid (a.k.a. “fog juice”) which is made of mineral oil, or of a combination of water and glycol/glycerin.
 An Artem Smoke Gun
In a smoke machine or gas-powered smoke gun (such as the popular Artem model), smoke fluid is pushed into a heat exchanger which vaporises it. When the vapour makes contact with the colder air, it condenses to form fog.
A hazer uses compression rather than heat to vaporise the fluid, meaning you don’t have to wait for the machine to heat up. The particles are smaller, making for a more subtle and longer-lasting effect.
As a general rule, you should use only hazers for interior cinematography, unless there is a story reason for smoke to be present in the scene.
Outdoors, however, hazers are ineffective. An Artem or two will work well for smaller exterior scenes; for larger ones, a Tube of Death may be the best solution. This is a long, plastic inflatable tube with regularly-spaced holes, with a fan and an electric smoke machine at the end. It ensures that smoke is distributed evenly over a large area.
Smoke is very susceptible to wind, and time is inevitably eaten up trying to wrangle this intangible substance into the right place on set. Artems are much quicker to move when the wind changes, but they often require the operator to run through frame just before the take, whereas a Tube of Death can be hidden from camera by undergrowth or set dressing.
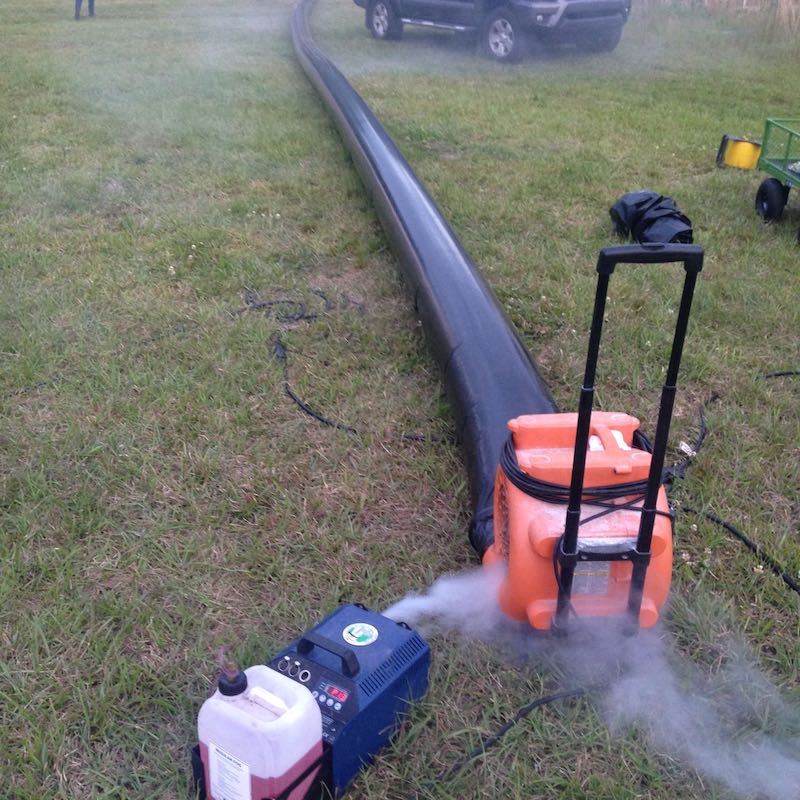 The Tube of Death
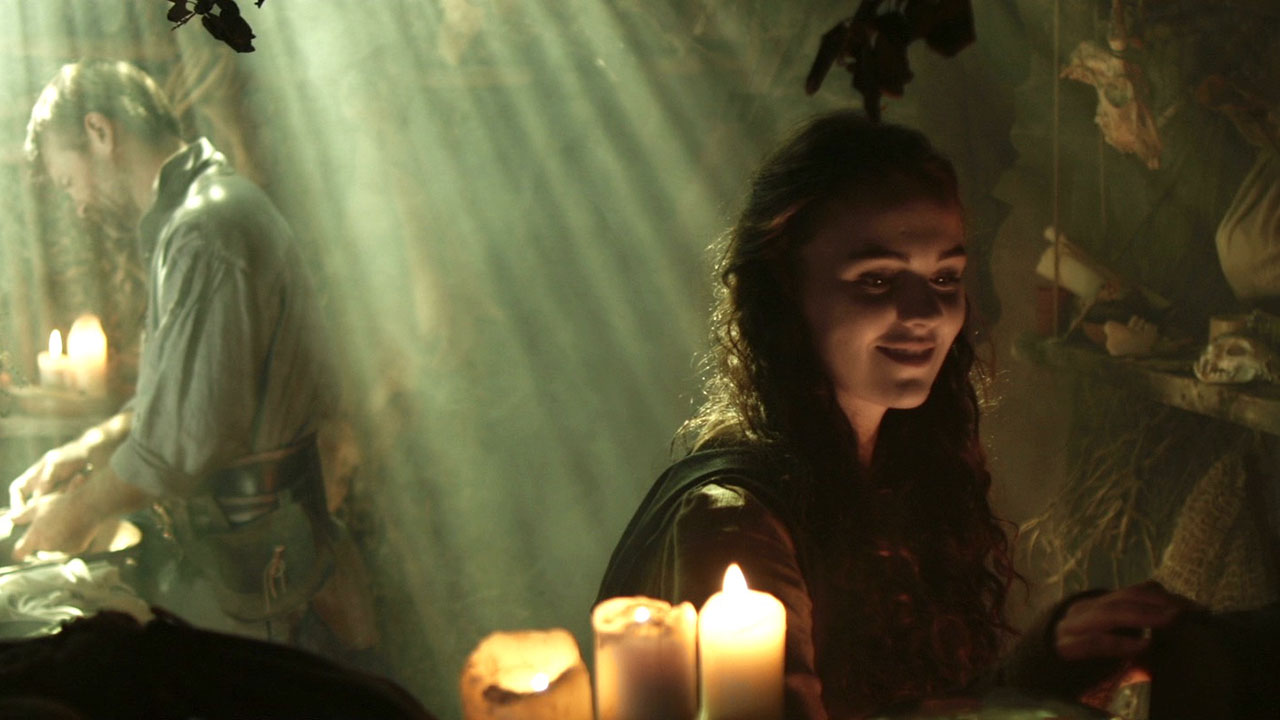
The results of this hassle are definitely worth it though. Just like aerial perspective, smoke/haze separates the background from the foreground, as the background has more smoke between it and the camera. The background becomes brighter, less contrasty, less saturated and (depending on the type of smoke) bluer, making the foreground stand out against it.
Smoke lifts the shadows by scattering light into them, which can make a surprising difference with a dark scene. It also has a volumising effect on the light, showing up clear shafts from hard sources and diffuse pools around soft sources. This magical look is perfect for fantasy and period pieces.
Shafts of light show up best against dark backgrounds; use a fixture with a lens, like a fresnel, and avoid contaminating the area with other sources. Since smoke also obeys the Rayleigh Equation, it shows up best when it’s backlit, a little when it’s side-lit and barely at all when front-lit.
Beware that volumising the light can give away hidden sources that aren’t well motivated. Backlit smoke in front of a person or an object will obscure them, concealing identity, but be careful if this is not the effect you’re going for.
Smoke diffuses the image, and does it more three-dimensionally than by putting a filter on the camera, because distant objects are softened more than the foreground.
Finally, if it’s sufficiently thick, smoke adds movement and texture to the image, which helps to make sets look less fake. Take care though, because this can easily get distracting.
If you want to take the next step in making your images more cinematic, I highly recommend experimenting with smoke. Basic machines are available very cheaply, and you’ll find that it adds immeasurably to the depth and polish of your shots.
Tags: Production Editor

RedShark 2020 @ All rights reserved.
Comments