3 minute read

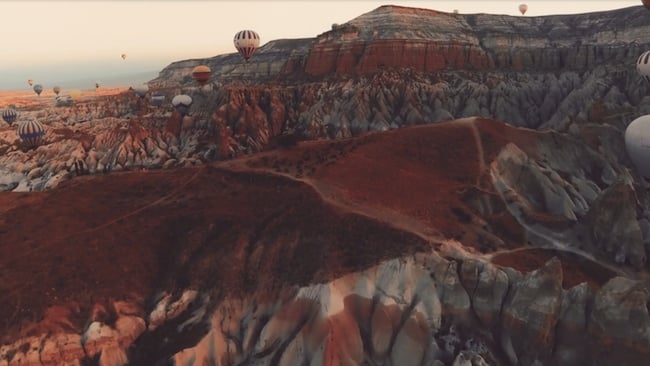
 Leonardo Dalessandri's 2015 'Watchtpwer of Turkey' exemplifies the cinematic possibilities of GoPro footage
GoPro footage is now being used in just about every film and TV show we watch. Not just for ESPN, but for reality TV like The Amazing Race to big budget films like Fast-n-Furious. But how do they make the footage go from the fisheye-like style to a more widescreen cinematic look? Well, there are a few ways to do it.
First off, there's coverage. The higher number of angles you use when capturing the footage for your project, the better. The beauty of the GoPros is that you can put them anywhere. When Shane Hurlbut was filming Need for Speed, he placed GoPros at all angles all over the cars he used for the race and chase scenes in order to grab that immersive, first-person look.
If you're an action camera geek, that can mean helmet mount, pole mount, wrist mount, chest mount; what the heck, even mount the camera on your skis. This can give you a great series of angles, many of which your audience isn't expecting.
If you're looking to buy all the cameras you need, GoPros aren't cheap at $399 a piece, though. But they are relatively affordable if you rent the ones you don't have, with a daily rate of about $10 a day fairly common. So, for less than $100, you can grab just about every camera angle you need for getting your shot and put together immersive, cinematic coverage of your scene.
Shooting wide, especially when in 4K, will enable you to zoom in when you need to and not sacrifice the resolution of your project. But shooting a more narrow or medium angle will make for an easier time to cut your footage more seamlessly.
Next is to film in ProTune. This is GoPro's cinematic recording codec that captures flat colour and contrast but enables you to adjust white balance, ISO, sharpness and exposure to capture as much digital light information as possible. Then you can colour correct and dial in both the colour temperature and dynamic range to your liking in post.
Shoot with a handheld gimbal. GoPros can yield a pretty shaky image if just added to a conventional mount, so if you can add a multi-axis gimbal to dampen that out, so much the better. That's where the new Karma Grip can come in handy because it integrates with just about any mount that GoPro offers. Soon to come is a Karma Grip cable that will enable users to plug the power grip remotely when mounting on a small area is required. And using a drone, of course, is also a great cinematic trick for those bird’s-eye view shots.
Once you've gotten your image files off the camera, the next step is to remove that fisheye look. GoPro's Studio App now has the option to select “Remove fish-eye” and it does an adequate job at doing so. But you might also want to look at a third-party app such as Prodrenalin which does as good a job, if not better, of removing fish-eye as well as smoothing out the shaky image that often comes with using a GoPro. It uses a stabilisation engine called Mercalli that stabilises the video while minimising zoom. It also uses distortion correction to compensate for rolling shutter.
Denoising can also help to make your image more cinematic. Whenever Shane Hurlbut uses GoPro or DSLR footage, for example, he loves to use the After Effects plugin Dark Energy to strip out the noise that comes from using a small sensor action camera and clean it up with a more natural looking film-like look. And Dark Energy was designed specifically for GoPro, so it is fine-tuned for that purpose. Other options include DE: Noise, Saffire, and even Neat Video's Reduce Noise. The key to getting a consistent noise removal is to select a uniform area of your image to sample from when denoising.
Stabilise the footage. Premiere Pro and After Effects offer Warp Stabilizer to take out a lot of the remaining shake, and the key here is to use as minimal stabilisation as you can get away with, so there isn't a too radical adjustment that can remove resolution or field of view.
Colour grade. There's really no better colour grader than DaVinci Resolve, but Adobe's Lumetri colour grader is getting better all the time, and applying a good look up table (LUT) will give you a good basic colour grade so you can move into editing.
Lastly, you can make your image appear widescreen by adding letterboxing to give your footage that anamorphic look. This makes the image feel bigger and will fill out the TV screen rather nicely.
By thinking ahead on how you film your image and then use these tools to dial in your image, you can make your footage not only look cinematic, but you can make people wonder which cinema camera you used to grab those action shots. No need to tell them you were hiring it at $10 a day...
Tags: Production

RedShark 2020 @ All rights reserved.

Comments